Garden, Plant, Cook!

Showing posts with label desert edible landscaping. Show all posts

Wednesday, November 09, 2016

Update on Dried and Drying Roselle


Dear Folks,

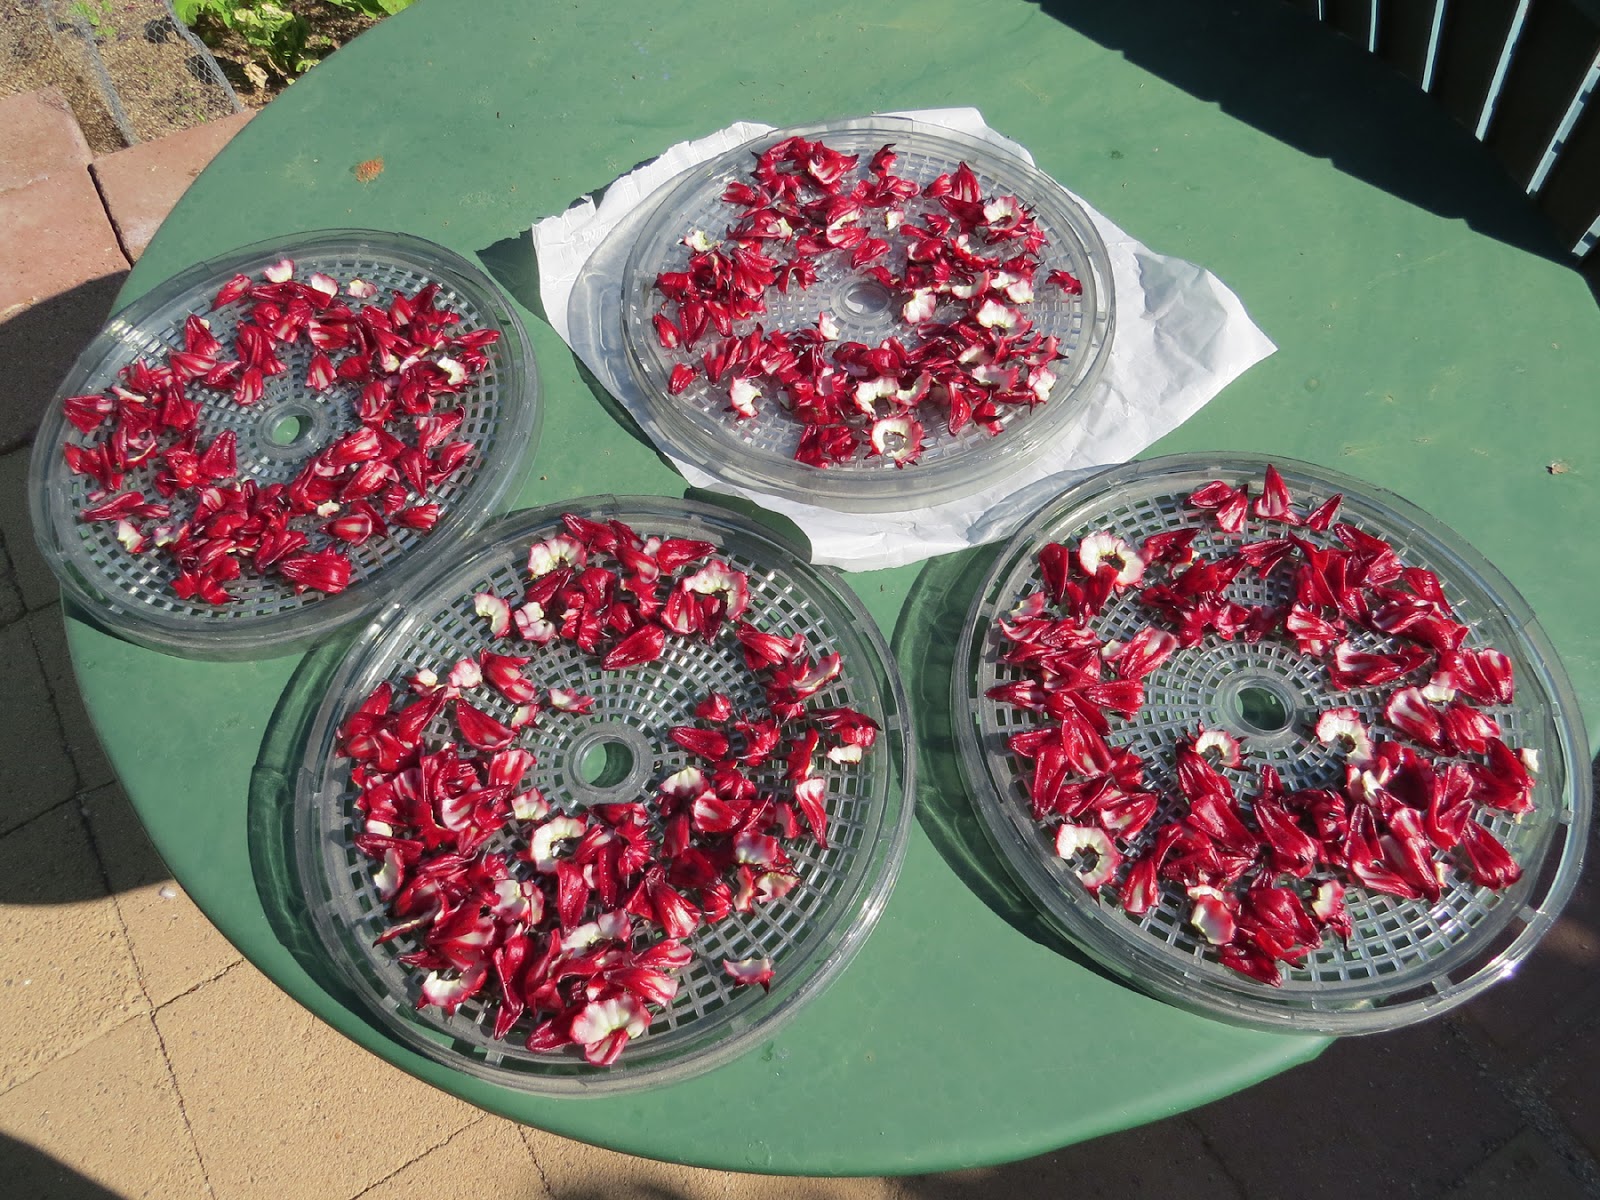
Back on October 26th, I posted about sun drying my Roselle (Hibiscus Sabdariffa).  I started with 4 trays and it took a couple of days and they were not quite finished drying when I left for my trip so they finished drying inside the house.  Turned out just great.

This is what they look like completely dried. I got a little less than a quart from the 4 trays.

The dried petals can be used for beverages, of course, like tea, but I also used them to top some turkey soup I made which imparted a lemony flavor to the soup.

You can use the dried petals dry, or reconstitute for use in salads and other fresh/raw foods.

You can add the Roselle to or replace lemon, lime or cranberry with Roselle petals.  Give it a try and you will be pleased with this Vitamin C rich addition to your ingredient options.

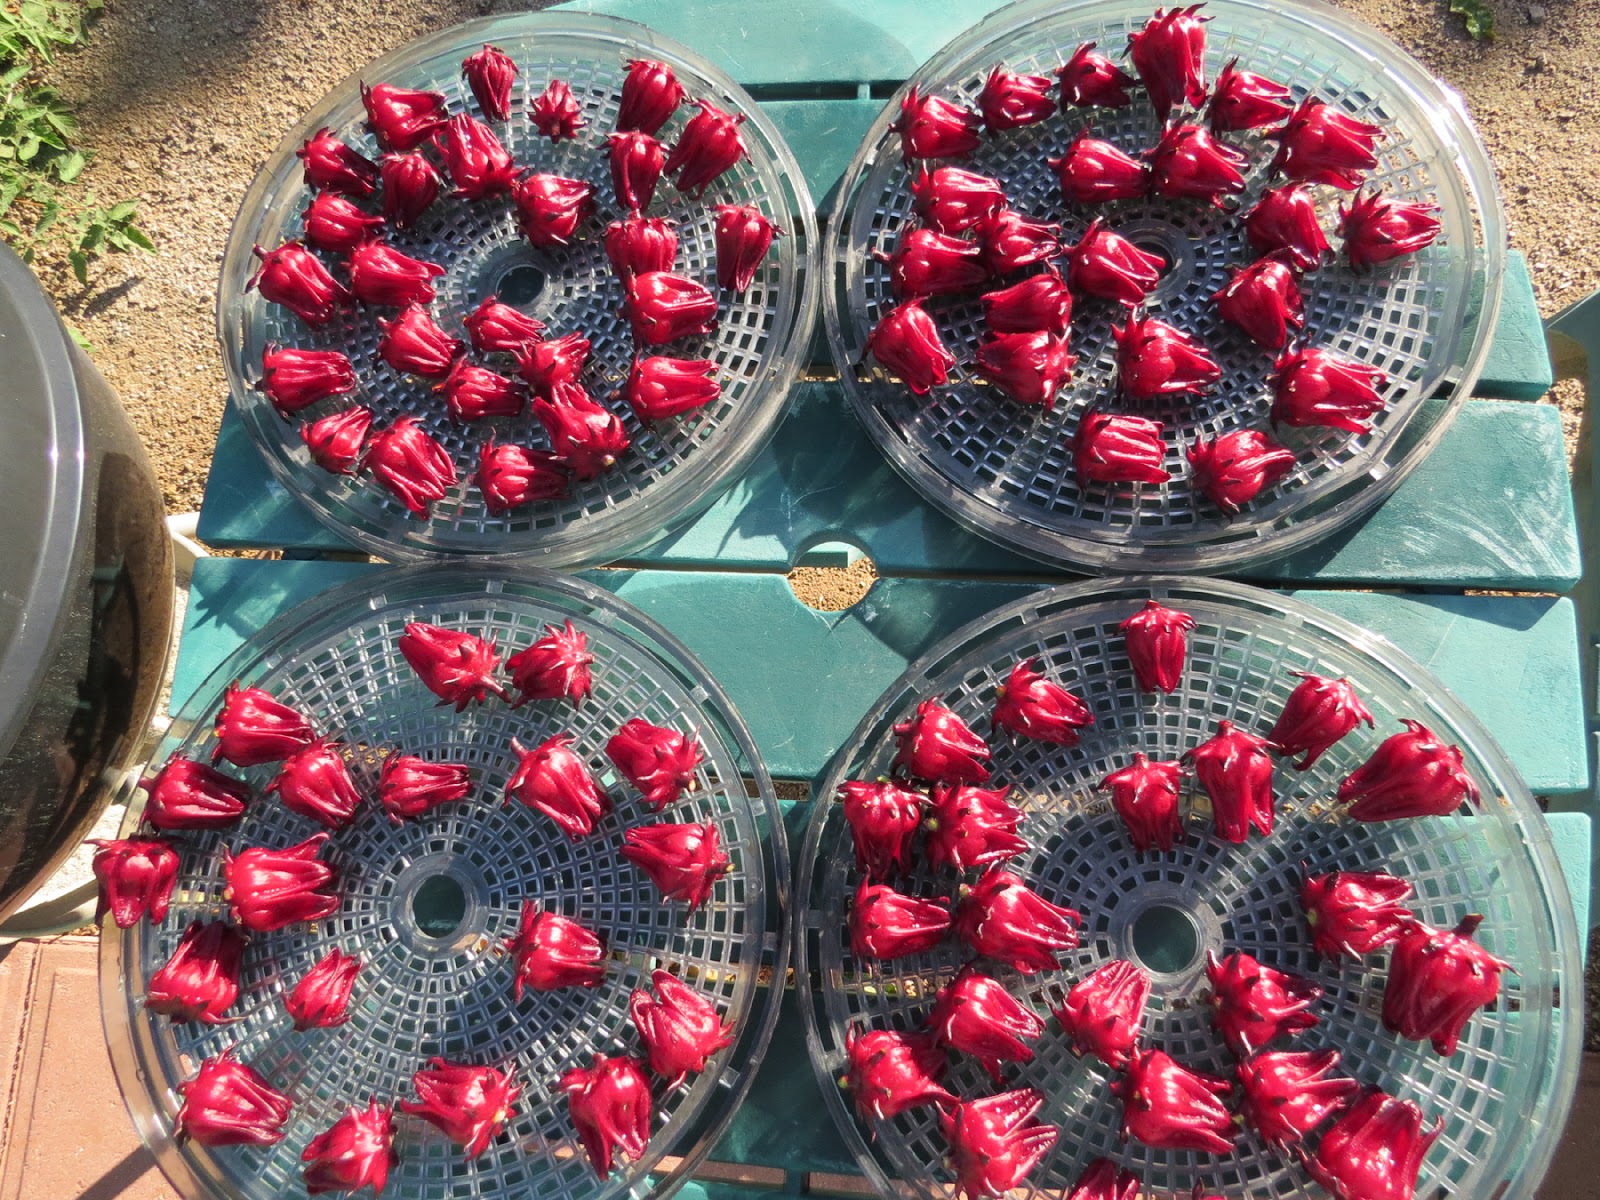
I started trays of the whole calyx and it is going to take longer to dry them, but I was trying to save my back a little.  I will see if the short cut is worth it :-)

. . .

I have been playing more with my food :-)  so watch for my next post on a great tasting condiment to add to your cooking enjoyment.  Straight from the garden!

Don't forget my 2017 month-by-month gardening calendar for yourself and holiday or birthday gifts.  You can use November and December NOW for garden sowing/planting information, maintenance and gardening tips.

Have a best day!

-- Catherine, The Herb Lady

If you enjoyed this post, subscribe in the upper side bar link, to get all my posts!

Disclaimer: Clicking on links on this blog may earn me a small commission if you purchase something. Your price does not change.

Sunday, October 30, 2016

Witching Hour Approaches to Ensure Garlic Harvest in the Spring - October 31st

Dear Folks,

To ensure a nice healthy crop of fat, plump heads of garlic to harvest in the Spring (late April  into May) here in the desert you need to have your garlic cloves planted by October 31st.


This gives the garlic all of the winter cold soil and air temps to develop a full head of garlic.  Without the cold, you will get a fat 'scallion' but no heads of cloves.

[I planted my garlic on October 1st and most of the leaves if I held them up straight would be 14-15 inches tall already.]

Plant extra if you would LIKE green garlic through the winter, harvest every other one to give room to the remaining growing plants. You can choose to harvest when they are this tall and/or when the base (clove) swells slightly and feels and looks like a scallion base.

Have a great time in your fall garden!


-- Catherine, The Herb Lady

If you enjoyed this post, subscribe in the upper side bar link, to get all my posts!

Disclaimer: Clicking on links on this blog may earn me a small commission if you purchase something. Your price does not change.

Wednesday, October 26, 2016

Sun Drying Roselle - Perfect Day For It!

Dear Folks,

It is supposed to be high 90s today, so it is the PERFECT time to sun dry edibles.

I've been trying to get to this for several days now and finally kicked myself into gear.  I spent over an hour harvesting them and separating the petals from the immature seed pod.

A bit of work but worth it to have the dried petals ready for use anytime I want to make something with them.  The fresh calyx need to be used within a few days of harvest, so drying the extra abundance and using our hot sun is a win/win.

I picked up these used trays a few years ago, without the electric base, because I was looking for a way to expand how much drying room I had.  I filled 4 trays and probably will get near a quart of dried petals when it is finished and they may even be finished today.

If not I bring the trays in overnight so they do not reabsorb moisture and then put them back out tomorrow when the sun is on the table.

I just love these jewel-like edibles!

If you have not grown Roselle (Hibiscus sabdariffa), you should consider sowing the seeds next April.  The leaves and the flower calyx are totally edible with a wonderful lemony / cranberry flavor - and oh, by the way - full of Vitamin C.

I am out of town for about a week and will resume posting when I get back.

I hope you have a wonderful time in your garden and kitchen with your garden bounty.


-- Catherine, The Herb Lady

If you enjoyed this post, subscribe in the upper side bar link, to get all my posts!

Disclaimer: Clicking on links on this blog may earn me a small commission if you purchase something. Your price does not change

Monday, October 24, 2016

Ramps Growing Trial Started.

Ramps-Courtesy of Wiki-Commons
Dear Folks,

Recently someone started a post on one of the Facebook groups I am a member of.  I try to answer questions and along the way I am learning too.  One of my readers called it to my attention with the wish that I look into growing Ramps and sharing the information with them.  YES! of course :-)

I looked into growing Ramps a year or two ago, but due to way-too-much-going-on, I never got further than checking some growing background.

Years ago I read about Ramps because of the story Rapunzel, where the pregnant wife craves Ramps.  Many other versions of Rapunsel has her craving radishes.  The word Rampion is alternately used for onions or radishes.  The husband steals some from the witches garden and the story goes on to the punishment by the witch and the story of Rapunzel's long hair.


RampsAllium tricoccum (commonly known as ramp, ramps, spring onion, ramson, wild leek, wood leek, and wild garlic) is a North American species of wild onion widespread across eastern Canada and the eastern United States. [source Wikipedia.]

So what is the allure of growing Ramps?  It is another wild edible, much loved and looked for in the Spring.  Ramps are also considered a spring tonic, which makes sense being a member of the onion family.

Cultivating them is the challenge, so I've begun what is a 3 stage trial test of seeds I just purchased.  I bought online from the Seedman.com.  I enlisted my friend Jacq Davis of Epic Yard Farm to start her own trial by sending her half of the seeds I received.

The instructions for growing this Forest Floor edible are interesting:

Sow outdoors and then wait 1-2 years for germination! The seed requires a warm, moist period to break root dormancy and a subsequent cold period to break shoot dormancy.  -- Seedman

OR, "Mix seeds with damp sand and seal in plastic bags and store in a warm (90 degrees) place for 60-90 days.  Then, place in cold (33-38 degrees) for 60-90 days, then sow."

Ramps grow in shady, forest floor conditions.

Here is the plan I am starting.  I just sowed 6 seeds in 2 different spots (3 each) in my gardens where there is quite a bit of shade, with regular watering.  I chose to put each seed in a jiffy pellets so I can keep them contained, then "planted" the pellets, covered with about a half inch of soil and topped with a sprinkle of compost.

This is TRIAL 1 - I am hoping the soil stays warm enough to start the "warm" conditioning, followed by our winter for the "cold" conditioning.

TRIAL 2:  I will sow seeds the same way in either late February or early March.  Based on our climate - I don't expect great things from Trial 2.

TRIAL 3:  I will sow the last of the seeds August 1st.  My hope is August/September will create the warm and following with winter cold, I hope to have really nice plants coming up in the Spring of 2018.

If Trial 1 works then some of the "you can't grow that here" thoughts may be happily answered with a Yes, we can! And, without the 1-2 year wait time.  Hopeful! :-)

My gut instinct is that Trial 3 will be the most successful.  We shall see.  These garden journeys are so much fun as I am always up to trying something wonderfully edible in the desert garden.

I would love to add "Ramps" to my month-by-month gardening calendar.

Have a great day in the garden.


-- Catherine, The Herb Lady

If you enjoyed this post, subscribe in the upper side bar link, to get all my posts! 

Disclaimer: Clicking on links on this blog may earn me a small commission if you purchase something. Your price does not change.


Thursday, October 20, 2016

Watermelon "Lemonade" and Hibiscus Roselle

Dear Folks,

We harvested the next big Bradford Watermelon this past Sunday, and in one of those "DARN!" moments, I dropped it!

I had been waiting on this one looking for the tendril to dry as the first one I harvested was really, really good, but could have stayed on the vine longer AND the seeds were not viable. So with this one harvested I thought we had a double winner, bigger, better fruit and with viable seeds.

After the melon crashed to the floor and we salvaged the pieces, the fruit looked a bit past its prime.  Good tasting but actually not as good as the first one.  However the fruit made wonderful drinking juice (making ""Lemonade" out of lemons) and the seeds are viable - Yippeee!

I now  have 1st generation Bradford Watermelons seeds to sow in January.  I am also going to put the germinating test seeds in some jiffy pellets and see if I can have happy transplants in January.  Watermelons are typically sown/planted in January/February.

My view on when to pick ripe, at least for this melon is going to be the "thump" test instead of looking for the tendril to dry.

My Roselle plants are just heavy with the calyx ready for harvesting and using.  I decided to dry some and they dried nicely in the sun.  The picture shows a fresh one and the dried petals.  The lemony / cranberry flavored treats can be used in teas and other dishes.

I had some left over turkey soup I had made, so I thought "turkey and "cranberry" and topped the hot soup with a small sprinkle of the roselle dried petals.

We agreed the flavor and contrast with the soups was delicious, the cranberry flavor was very subdued, so the over all taste was a lemony topping to the soup.  Very nice.  The petals softened some but were still a nice chewy texture to the soft noodles.

I will probably add them to dishes like Pasta Primavera.  I would suggest you try them in any dish which calls for lemon or lime additions.  You will be pleased.

Have a great day in the garden and you kitchen making delicious meals from your bounty!

-- Catherine, The Herb Lady

If you enjoyed this post, subscribe in the upper side bar link, to get all my posts!

Disclaimer: Clicking on links on this blog may earn me a small commission if you purchase something. Your price does not change.

Thursday, September 29, 2016

It's National Coffee Day - Tips, and Can We Grow It Here in The Desert - Giving it A Try!

Dear Folks,


Yes that is a coffee tree. I will talk about my experiment below.

I LOVE coffee. So much so that while I had to get off it twice on doctor's recommendations, I went back to my morning cuppa's each time.


I am rarely a purest on the subject of foods and recipes. Hummus, make it with any bean (or pea) you want. Burgers with blueberries in them -- check. Oatmeal as a side dish instead of rice -- check.

BUT when it comes to coffee after decades of office coffees that varied form week to sludge I want wonderful, fragrant, superior tasting coffee teach morning. I grind beans sometimes each day, but usually every several days. Store in a tight fitting glass jar in the frig waiting for me to make my morning coffees - 1 cup at a time!


I never liked iced coffee until several years ago when I saw a great short video on making it the perfect way.

I have enjoyed the Vietnamese Iced Coffee served in restaurants, even got the special filter (drip) which sits on the glass, but never got around to making it at home.

I can't find the video, but here is the simple trick. You are going to use your usual amount of grounds, whether pot or cut. Fill the pot or cup full of regular ice cubes - do not use mini cubes, you need the air space to make this ratio work out. Use 60% of the amount of water you normally use to make the coffee. Then make your pot or cup of coffee. Viola - Perfect Iced Coffee!!


There is apparently some science to this. The traditional way of making iced coffee it to 1) either make the coffee stronger and pour of ice, or 2) just pouring the usual hot coffee over ice. 1 usually tastes better than 2, but until you try to ice-in-the-pot method you won't have the BEST tasting coffee. Here is what happens. The very, very hot coffee is cooled immediately when it hits the cubes, immediately infusing the flavor with all of the "bright" notes coffee lovers want.


Give it a try and let me know what you think.


Recipe tips:

---Add some fresh coffee to your brown or beef gravy to add a rich note. If you do not over-use the coffee, no one can tell it is in there, it just tastes more flavorful.
---Of course any bakery chocolate can be enhanced with some coffee, add some brewed coffee, or I like to keep a jar of high quality espresso powder in the freezer for adding to recipes.

For Iced Coffee - how about replacing some of the ice cubes with Chocolate Ice Cubes!


My Version of Chocolate Ice Cubes
The original recipe, which I tried left grainy bits in the bottom of the cup not bad tasting, but I wanted all the flavor IN the coffee
7 ounces of milk
1 ounce of water
1 teaspoon of sugar
1/2 cup of Ghiradelli Cocoa (already has sugar in it.


In a small sauce pan add some of the milk, the water, sugar and cocoa. Turn the burner on medium and stirring constantly dissolve the sugar and cocoa. Then add the rest of the milk and heat to meld everything. DO NOT BOIL - it is not necessary - only heat to ensure the sugar and cocoa are dissolved.


Pour into ice cube tray and freeze - they do not get as hard as water ice cubes. Pop out (you may have to lift an edge of each with a knife) and store in container or ziplock bag.


Add one to your cup of coffee or 2 to a glass of milk for a cold "cocoa".

Here is the original recipe. Use the ratio of sugar suggested if you use unsweetened cocoa. Give the link a minute to work - it is translating from French.

Here is a fun link with what else you do with coffee and coffee grounds. 14 tips for using coffee and grounds. No 10 - feed acid loving plants. My container growing Blueberry plants (see the cover picture of my calendar in the sidebar showing my handful of blueberries) do well with my 1-2 times a month days worth of coffee grounds sprinkled on the soil

Growing Coffee In The Desert
I was inspired to once again try a coffee plant/tree in my garden - I was not successful before because I tried at the wrong time of year in the wrong place.  The inspiration came from a podcast over at Urban Farm with Scott Murray, a well known permaculture expert in California, who decided to create companion orchard.  He was growing avocado trees and interplanted with coffee!!  Okey dokey, the other tree I want to try in this experiment is avocado, but I will wait on purchasing one.

This is going to be one of my experiments where I keep my fingers crossed.  I picked up a Barbados (Acerola) tree from Shamus O'Leary this past February and could not resist purchasing a Coffee Tree from him.  Here is the challenge.  They are frost sensitive and usually brought indoors in the winter, even here.

When I received a Mango from a friend last year, I decided to create an "under story" grouping using specific orientation and a combination of evergreen (citrus and bay) and deciduous (plum).

So here is the positioning.  The Coffee is in front of an Orange tree.  To the left you can see Bay leaves, and to the right a bit of the Mango.  What you can't see is to the right - a huge Santa Rosa Plum.  The Coffee is facing south.  So protection from the intense Northern sun in the summer, a goodly amount of sun from the East in the winter, plus the Southern exposure in the winter.

My hope is the canopy of the bay and citrus will provide some frost protection, and I will plan on covering on freeze nights.

I will keep you posted on how it goes and grows.

REMINDER:  Free Seed Share and Lecture coming up Friday and Saturday.

Have a great day in your garden!


-- Catherine, The Herb Lady

If you enjoyed this post, subscribe in the upper side bar link, to get all my posts!

Disclaimer: Clicking on links on this blog may earn me a small commission if you purchase something. Your price does not change.

Thursday, September 08, 2016

Bradford Watermelon "Making Lemonade out of Lemons" or Salad out of Damaged Melon

Dear Folks,

When life gives you lemons (challenges) make lemonade!  That is the happy way of looking at something unexpected.  Well, folks, I've got a great recipe for you, simple and tasty using a damaged, immature Bradford Watermelon.

A couple of weeks ago I wrote about the heirloom Bradford Watermelon I am so excited about its progress in our gardens.

Then several days ago, Deane noticed damage to the end of the 'youngest' melon.  Darn, but we thought, well let it go for more seeds.  But I was keeping an eye on it and the damage was extending.  Several readers on facebook said to cut and toss as it would be taking energy from the plant.  True.  But I wanted to see what I could do with the remaining melon.

Back in early August while inspecting the plant, I accidentally broke a baby Bradford off and thought first about composting then realized it really looked like a zucchini and found it a wonderful tasting "cucumber/zucchini" type food.  Read about that here.

So I did harvest the damaged melon yesterday, cut the bad end. (It is either blossom end rot or a critter or bacteria got into it before I could get it up on a brick to keep it off of the soil.)

I cut the damage part off and tasted a slice of the good part and was again so impressed with the taste. Even though it is not fully ripe, the pink is slightly sweet and all of the fruit is pleasant (no bitterness at all) cucumber like taste and texture.

I put it aside and figure I would see about using at least some of it later.

I had errands to do and one of them was to Costco.  While going down an aisle I spotted marinated artichoke hearts and BINGO I knew what I was going to do with my unripe melon.  I LOVE artichoke hearts, marinated or otherwise.  I can eat bowls full.  I've made dips with them - so good and good for you, love to add them to so many things, not just salads but pasta too.  Some years ago I made an Artichoke / Bean Hummus dip for a demo at Boyce Thompson Arboretum.  It was devoured.

Preparing The Melon

I decided to remove the very, very thin skin with a potato peeler.  One of the remarkable things about the Bradford -- the tender, tasty skin -- if I had the time I would have tossed with a bit of oil and salt and roasted them to a crisp - maybe the next one.   :-)

I cut up the melon, removing the seeds (they are not mature enough to germinate) added an equal amount of artichoke hearts and since I did not get this done last night, today I will cut up some celery, add and toss.  The marinade from the artichoke hearts will be enough dressing.  I will think about adding some basil when it mix, but I'm wanting to keep that "cucumber/melon" flavor shining.

As an afterthought I could have saved the seeds, and like the skin tossed with oil and salt and roasted them.  I was tired when I got the chopping done so I did not think about this.  You did know watermelon seeds are edible didn't you? :-)  Just like pumpkin seeds they make a great roasted snack.

The amount of melon in the bowl is just a small part - I have about a half gallon container of more so we are going to be enjoying melon for a few days.  I will have to see what else I can make with this so-good fruit.  If I come up with some keeper recipes I will post.


Coming Up

FREE SEED SHARE - September 30th, 9 a.m. to Noon at the Mesa Farmers Market - watch for more details.

FREE lecture at Mesa Urban Garden, October 1st, 4:30 p.m. - Fall - "Planting Like It Is Spring" in the Desert Garden!  Watch for more details.

-- Catherine, The Herb Lady

Website

If you enjoyed this post, subscribe in the upper side bar link, to get all my posts!

Disclaimer: Clicking on links on this blog may earn me a small commission if you purchase something. Your price does not change.

Sunday, August 21, 2016

2017 Gardening Calendar - Publisher Discount - Hurray!

Dear Folks,

My publisher just released a DISCOUNT - good until AUGUST 24th 11:59 p.m.

25% off books and calendars

The code is case sensitive

AUG2016

This is a good deal if you are shopping for gifts - 25% on top of the Early Bird Pricing of 20% off.

Edible Landscaping 2017 Wall Calendar

Remember - you can use the information NOW for the coming fall months planting tips and help

Month-By-Month sowing/planting, garden maintenance and tips for USDA Zone 9b and above.

FYI - I never know in advance when my publisher will release a discount offer -- I try to let everyone know asap.

-- Catherine, The Herb Lady

If you enjoyed this post, subscribe in the upper side bar link, to get all my posts!

Disclaimer: Clicking on links on this blog may earn me a small commission if you purchase something. Your price does not change.

Thursday, August 18, 2016

2017 Gardening Month-By-Month Wall Calendar Is Out! Early Bird Pricing!

Dear Folks,


My 2017 Month-By-Month Wall Calendar Is Finished!

All the timely/seasonal gardening info you need to be successful in the desert and USDA Zone 9b and above.  Get your herbs, fruits, vegetables and edible flower growing on!

Earl Bird Pricing is in effect Until Midnight September 14, 2016

SRP is $19.95 BUT the Early Bird Price is $15.96
 

Know any family in the desert southwest or deep south who needs a little help?

Whether here in our wonderful Valley of the Sun, or in the Gulf, interior or Coastal areas USDA Zone 9b or above, it is more than the air temperatures or heat, it is about daylight hours and soil temperatures.

Some of the beloved foods like peas and kale like their feet cool and are happy with short daylight hours, while tomatoes and basil love their feet warm with long daylight hours.

If you are just considering starting or extending your garden, the 2017 calendar can be used this September and forward for all the seasonal planting/sowing and maintenance information, and then all of 2017 too!

What are you waiting for?

:-)

Calendar Link

Have a best day in the garden!

-- Catherine, The Herb Lady

Website

If you enjoyed this post, subscribe in the upper side bar link, to get all my posts!

Disclaimer: Clicking on links on this blog may earn me a small commission if you purchase something. Your price does not change.

Tuesday, August 16, 2016

September Planting Tips, And, Sowing with "Collars" and "Hats"

Dear Folks, 
September Planting Tips

September is a heavy sowing rather than transplanting time until near the end of the month, when you can do both. However, when transplanting be sure to harden off your seedlings before putting them in the ground. Our temps do not regularly fall below 90 until around September 29th.

Prepare soil for perennial planting -- edibles need superior draining soil, work in compost or well-rotted manure -- NEVER use fresh manure unless the garden will sit for 6-12 months before planting. If your soil is already healthy, you can ad a light dressing of compost or well-rotted manure.

"Collars"

First picture shows 2 collars made from paper towel or bathroom tissue tubes. These collars keep the soil pests like sowbugs, snails and slugs from your new seed/seedling.

Cut a 3 inch piece and bury half in the soil, nest the seed in and lightly cover with soil and water well.

ALL seeded areas need to be kept moist by sprinkling/watering every day until you see the seed break ground, then you can cut back on watering to encourage deep roots.

"Hats"

I've written about chicken wire hats before. These keep the birds and other critters off you seed areas and young seedlings.  Show in the 2nd picture is a "tube" hat.

They physically discourage them, while permitting all other necessary natural activity.

After a while you can remove the hat as the birds etc. have forgotten they are there. Why? The chicken wire physically stops them but they can still see through. Unlike bird netting which is both a physical and a visual barrier, so as soon as you remove the net they think dinner is served.

I have two short videos on my youtube channel showing how to use the chicken wire hats.

Make good use of your water meter during this temperature transitional month.

Labor day is when we usually fertilize our fruit trees (again on Valentine's day and then again on Memorial Day).

We can look forward to the fall temperatures and reduced moisture. Except for the storms we don't see day time temperatures below 90 from May 29th to September 29th. Getting seed in now sets the cool weather lovers up for germination at the right time.

Give your tomatoes that survived the summer a hair cut, working over several days, trimming off damaged stems. The fruit will start to set again once the night time temps stay below 80.

Cool weather annuals and biennials can be sown every 2-4 weeks (beginning in August) through end of November or December for a continuous crop through next spring.

Some of the longer maturity vegetables need to be sown EARLY. 90-120 day maturity foods like Cabbage, Broccoli, Cauliflower, Brussels Sprouts, Celery, Leeks, and Parsnips all need to be in the ground for 3-4 months before you can harvest them.

Berry Vines/Canes - October 1st: cut all canes, old and new, to ground after fruiting - commercial growers use this method.

Sow:
Anise
Beans (bush and pole beans in first week in September at latest)
Beets
Bok Choy
Broccoli
Brussels Sprouts
Cabbage
Cabbage, Ornamental
Calendula (Calendula Officinalis)
Caraway
Carrots
Cauliflower
Celery
Chard
Chervil
Cilantro
Cornflower/bachelor Buttons (Centaurea Cyanus)
Cucumbers
Dill
Endive (and Chicory)
Fennel, Leaf
Onions, Green
Greens
Kale, Ornamental Cabbage
Kale
Kohlrabi
Leeks
Lettuce (leaf lettuce, arugula, mustard greens etc.)
Marigold, Citrus Scented (Tagetes Nelsonii)
Marigold, Tangerine Scented (Tagetes Lemonii)
Mustard
Nasturtium
Parsley
Peas, English and Sugar / Snap Peas
Radishes
Scented Geranium
Snapdragon (Antirrhinum Majus)
Spinach
Sweet Alyssum
Sweet William Aka Pinks (Dianthus Barbatus)
Turnips


-- Catherine, The Herb Lady

P.S.  I had the worst time with formatting this post for some reason so I apologize for any issues. I would be happy to answer questions.

Website


If you enjoyed this post, subscribe in the upper side bar link, to get all my posts!


Disclaimer: Clicking on links on this blog may earn me a small commission if you purchase something. Your price does not change.

Monday, April 18, 2016

May Planting - Plant, Sow, Harvest Seeds, And Tips!

Dear Folks,
My Ripe Alpine Strawberries - Yesterday!!

If you are new to gardening in the desert, it is all about planting at the right (optimal) time for best success.

May is one of those months when desert gardeners get either excited (more flowers and fruit ripening) or apprehensive about the impending hot weather.

Timing is everything in our gardens, so sip a cup of iced sun tea and read on.

If you have children or grandchildren read my post on making Sunflower Houses or Teepees.

MAY PLANTING:
Artichoke, Jerusalem
Beans, Soy
Cantaloupe
Cucumbers
Eggplant
Fig Trees
Fruit Trees (With Care)
Melons, Musk
Okra
Peppers, Sweet
Peppers, Chilies
Potato, Sweet
Squash, Summer
Squash, Winter
Tomatillo
SEED IN:  Basil, Chive (Garlic or Onion), Epazote, Perilla, or Catnip-- making use of the canopy of flowering or vegetable plants.

EDIBLE FLOWERS TO PLANT:

Impatients Wallarana
Marigolds, including Tangerine Scented (Tagetes Lemonii), Citrus Scented (Tagetes Nelsonii)
Portulaca
Purslane
Roselle (sow)
Scented Geraniums
Sunflower

GARDEN TIPS for May
    By the end of the month harvest the rest of your potatoes, keeping the smallest ones as “seed” potatoes for next January — store in cardboard egg cartons in your crisper -- don't store near other vegetables or fruits.

Bee-Aware!
    As more and more flowers open and fill the air with their perfume, all the pollinators enjoy the garden as much as you, including bees.
    Swarming is where a new queen goes looking for new digs, taking with her some of the workers (as many as 50,000).  Swarming bees are a challenge to deal with because of the Africanization of the honey bee population.
    But intelligent handling of any contact will not result in a problem for you. First, the bees are not interested in you.  They are usually filled with honey for the new trip and interested in finding a new house before the supply runs out.
    Wear white or light colored clothing while gardening.
    Do not do stupid things to bees!  That should be self-evident, but some of the reports of bee encounters makes me wonder how we have survived as a species.
    If you are near a swarm or they get near you:
    a.  Move slowly and do not make aggressive moves.
    b.  Walk slowly to a house or car and get inside until the swarm moves off.  Keep all pets, children and other people from the area.
    c.  Do not go into the pool!  If the bees have been aggravated, they--will--wait--for--you!
    d. Usually the swarm will move off within a short time.
    e.  If they do not move off, then you have to call a professional service or the fire department.  They will kill the bees.  They do not have a choice because of the danger — and you do not have a choice as a homeowner — they either have to kill the swarm or you have a hive full of dangerous 'neighbors.'

Transplanting and Sowing

This time of year we are in one of those transition times, where going from mild to hot can occur in one felled swoop of heat.

Transplanting vs sowing can be a challenge as transplanting can stress the plants.

1) Harden the plants off by placing in the sun 1 hour then moving to shade, next day in sun 2 hours, move to shade - repeat until the plants have been in the sun for 4 hours and you can transplant then with a whole less stress and shock to the plant.  If the temps are already in the 90+ range double the days for each hardening, e.g., 2 days for 1 hour, then shade, 2 days for 2 hours then shade.  Your plants will thank you by being less likely to die as soon as they are put in the gorund!

2)  Use my "flower mulching" technique for transplant in warm/hot weather.  Get a six pack of flowers at the nursery and either plant your target plant (basil for example) and surround the basil with the flowers (about 5 inches apart), OR plant all at the same time -- imagine a 12 inch circle and plant the basil in the center and 4-6 flower plants around.  Flower mulching canopies the soil and shades the sides of the basil, while allowing the basil to get all the sun it needs.

Use edible flower plants like impatiens wallerana and portulaca to provide 'mulch' around the new transplants.  You can also use Sweet Allysum another edible flower but it can be a bully if it is really happy.  The portulaca does the gardener the supreme favor of dying off completely when the cool weather comes in the fall, although it may reseed next late spring.

3) Sow seeds under existing plants, just under the edge of the plant/flower canopy.

Both the "flower mulching" and the "edge sowing" are variations of the "nurse plant" concept seen in the desert where the cactus seed settles at the base of a Mesquite tree.  Shielded from birds and other critters, the seed, is held in place, watered with the rain and grows up with the mesquite protecting it.

Consider SWEET POTATOES to be planted in late May through early July.  They need 90-120 days of warm weather to grow properly.  I've planted in huge containers and in-ground using leaf cover as I do with the Irish potatoes.  In fact I sometimes use the same bed, planting the sweets after I harvest the Irish.

In case you don't know sweet potatoes, unrelated to the Irish (Solano) family, are completely edible, tuber, leaf and vine.

The sweets can produce an amazing amount of leaf and vine cover so be prepared.  Some varieties are more bushy than others.

Seed Saving

Catching the seed from winter crops like sugar peas, lettuces, celery, parsley, radishes etc. is a way to save money AND get stronger plants the next year.  “Regional adaptation” grows plants more and more suited to your backyard and the area you live.  Remember to perfectly dry them.  I store in paper envelopes labeled with harvest date, in a cool, dry, dark place until next planting time.

Looking at head to June and July, there is little suggested planting options for June, but by mid-July be ready to start seeding (not transplanting) for the fall garden.

If that sounds counter-intuitive, think about wanting pumpkins for Halloween or Thanksgiving and count backwards 90 - 120 days.

Mid-July you can under-seed tomatoes (choose short-maturity varieties) and basil for a fall crop, if you do not have tomatoes or want more.  Tomatoes give us two crops a year (spring and fall) if planted in February.  They stop setting flowers in the middle of the summer because the nights (not the days) are too hot for the pollen to activate.

Save Wood Herb Stems

Harvesting or pruning herbs?  Save woody parts to throw on the grill coals the last 15 minutes to add herb smoke flavor to the food - or better yet do it from the inside out, use woody, soaked branches of herbs to make kabob skewers.

. . .

My Month by Month planting Wall Calendar gives you my monthly tips at your "finger-tips".

Amazon

My Publisher's Site


My Beginners Guide to Edible Landscaping in the Desert is popular with those who want a quick reference guide.  "Edible Landscaping in The Desert Southwest: Wheelbarrow to Plate"

Amazon

My Publisher's Site


Have a wonderful Month in Your Garden and Kitchen!


-- Catherine, The Herb Lady
If you enjoyed this post, subscribe in the upper side bar link, to get all my posts!
Disclaimer: Clicking on links on this blog may earn me a small commission if you purchase something. Your price does not change.

Thursday, March 17, 2016

April Planting Tips and a "Green Pumpkin" Recipe Tip - Companion Planting Chart

Dear Folks,

It is St. Patrick's Day - what better day than to talk about green - as in growing and a cool cooking green pumpkin tip to keep tucked away for fall.

The picture at the right is showing planting "Christmas Lima Beans" (so named because they are frequently ready at Christmas Time), on either side of a sunflower.  This part of the garden is going to get a type of flood watering today.  With the warm weather it can bring in slugs, so I wanted to use and show you the use of cardboard collars to protect against snails, slugs and cut worms.  Top to bottom - I soaked the beans for 2 days, dug and loosened the soil, nestled the collars in, added the beans, covered and water inside the collar to settled the soil.  As they grow the beans will be able to grow up the sunflower stalk.


Companion Planting:  Part since and part observation.  There are many proven companion/non-companion plant combinations, i.e., some that play well together and others that do not.  For those of you who would like an easy reference chart, check this one out.


Geoff Lawton shared a nice companion planting chart you can download as a PDF.

 Green Pumpkin Recipe

Watched a video on youtube on a channel I subscribe to - all about cooking in the late 1700s around the time of the Revolutionary War.  This particular video showcased using pumpkin 3 ways for the soldiers in the field using pumpkins to supplement their diet.  I thought the use of a green pumpkin was a great one in particular.

The seeds probably won't be mature enough to save and grow, but I'm thinking if they have firmness to them, they can be roasted and eaten.

18th Century Cooking with Jas Townsend & Son Fried Green Pumpkin.

Recipes Here:

April Planting Tips


Time for my monthly heads up on what to plant.
As we move into the beginning of our 'warm' time, pay attention to your watering routine.
For many years I have kept a log of rain and temperatures for my gardens (far east valley, so temperatures may be different from yours), so I thought I would share some history for April.

April Rain and High / Low Temperatures
2010 Rain .2 / Temps 93/42
2011 Rain .75+ / Temps 98/38
2012 Rain .2+ / Temps 104/45
2013 Rain .1 / Temps 97/45
2014 Rain T / Temps 93/42
2015 Rain .2+ / Temps 94.3/45.5

Some of my observations so far this year are that 2012 was similar to this year.  We will see.

El Nino has had an impact starting last year and still being felt.  Our warm February/March compared to last year has had many of the plants blooming early / bolting early and generally behaving like it is April.

I expect a bit more of the same unusual behavior going forward -- so our respective gardening journey is continuing to be a learning experience :-)

APRIL PLANTING:

Artichoke, Jerusalem
Bean, Snap
Beans, Soy
Cantaloupe
Carrots
Cucumbers        
Garlic, Green
Jicama
Melons, Musk
Okra
Onion, Green
Peanuts
Peas, Sugar
Peas, Black Eyed
Peppers
Radishes

EDIBLE FLOWERS TO PLANT:

Impatients Wallarana
Marigolds, including Tangerine Scented (Tagetes Lemonii), Citrus Scented (Tagetes Nelsonii)
Portulaca
Purslane
Scented Geraniums
Sunflower
Sweet Alyssum

GARDEN TIPS for April
    Prune spring-flowering shrub fruit trees before flowering starts (April - May for shrubs like Pineapple Guava).
    If you planted your potatoes January 1st you can start checking the end of this month for usable size — just insert your fingers gently into soil. (See the file "Planting Potatoes")
    Get the children involved in gardening by helping them grow a Tee Pee or Sunflower House.
    Described in Linda Lovejoy’s fabulous book “Sunflower Houses,” either of these ‘hideaways’ will delight your budding gardener.
        a)  Create Tee Pees using 8-foot garden bamboo poles bundled and tied tightly 1 foot from the top.  Prepare the ground for the garden. Spread the legs of the Tee Pee — and anchor in the ground.  Plant pea, cucumber, or other edible vines at the base of each pole, and allow them to grow and cover the teepee.
        b) Sunflower Houses are created using the growing sunflowers for the poles of the house.  Prepare the planting area and decide how wide and long you want the house to be — ex. 4 x 6 — and draw the dimensions in the soil, leaving an opening for the ‘door.’  Mammoth sunflowers (those that grow over 6 feet) are best for this.  Plant the sunflower seeds 2 or 3 to a hole, about 1 foot apart all along the ‘walls’ of the house.  In between the sunflower seeds, sow edible vines like peas or cucumbers.  Given the water requirements, creating a trench for the walls will allow flood watering for the growing plants. These houses can be as elaborate as you and your children wish. Plant flower or strawberry beds along the outside walls;  herb and flower ground covers inside for a ‘carpet’ are limited only to the imagination. The vines grow up the sunflowers and if they are enthusiastic enough, will even grow over the top of a narrow room creating a ceiling.
        c) do teach the children about bees, leaving them alone and avoiding them when they are "working" the flowers.

. . .

My Wall Calendar has all planting information for vegetables, fruits, herbs and edible flowers, month-by-month in one convenient form to hang on your wall or use on your desk.

My Calendar Available through my publisher, Amazon, Changing Hands Online Book Store and Barnes & Noble.

Have a great time in the garden.

P.S.  I will be traveling beginning next week for about 2-3 weeks and will be off the grid.  Type at you when I get back!

-- Catherine, The Herb Lady
If you enjoyed this post, subscribe in the upper side bar link, to get all my posts!

Disclaimer: Clicking on links on this blog may earn me a small commission if you purchase something. Your price does not change.

Sunday, March 06, 2016

Stuffed Leaves - Dolma - Thrion - and Great Tasting Snack or Meal!!

My Stuffed Nasturtium Leaves
Dear Folks,

Spring!  Do you have tender grape, fig or nasturtium or other tender but sturdy edible leaves - maybe kale?

I love Dolma, I could eat my weight in them!

Dolma, or Dolmades are tender spring grape leaves filled with a grain mixture and simmered or steamed in a lemony broth.

These tasty foods are a staple of Middle Eastern and Mediterranean menus.

Their history is actually ancient, and fig not grape!  All the way back to the Greeks and Aristophanes referring to "Thrion" a stuffed fig leaf savory food demanded by Dicaeopolis.*

So the original Dolmas were made with fig leaves (chefs and cooks in Turkey still make dolmas with fig leaves too), then grape leaves, and that is the more common version available today.

Part of this is the available of canned or jars pre-cooked grape leaves, making it easy to whip up a batch whenever the cook/chef wanted.

Looking out my kitchen window back in 2012 I gazed at my huge (7-8 inches across) nasturtium leaves and got to thinking "what if" and bingo I went looking for a recipe to make my own version of dolma with my nasturtium leaves.

These turned out so good I posted the recipe and results at this link My recipe for stuffed nasturtium leaves.

Over the next couple of years I told myself I wanted to make them with some of our fig leaves and always thought of it too late - the fig leaves were leathery and tough -- you want tender and bright green.

Taking pictures of my gardens over the last few days the fig leaves are popping out fresh and bright green - and TENDER!  So I will try to make up a batch of both fig and nasturtium stuffed Dolma in the next couple of days.

I encourage you to try making these with your own tender leaves.  My recipe makes it easy to use any cooked grain of your choice (traditional is rice, but I used quinoa, I would recommend barley or whole wheat berry as good options) and then add other flavors to enhance the over all flavor.

Some of the first recipes I found when searching back then, called for using the pre-cooked leaves or pre-cooking before stuffing.  My recipe is an all-in-one-operation.  If you feel your leaves are a bit too tough you can blanch them for 1 minute to make more flexible.  Tough stems should be removed.  With fig, if you remove the stem, fold the center leaf to overlap so they hold the stuffing in. Working with tender leaves, makes stuffing, rolling and simmering an easy task

Important!  You must fit the dolmas in the pot tightly or they will un-ravel.  Use carrots or zucchini or similar cut vegetables to fill gaps and you will have a flavored vegetable side snack.


*"The precursor to dolmas is thought to be the Greek thrion a fig leaf stuffed with sweetened cheese."

http://ethnicspoon.com/dolmas/


"In Turkey they make their dolmades with fig-leaves rather than vine-leaves.Stuffed fig-leaf is one of the oldest ancient Greek recipes we possess, a dish called thrion (eggs, flour, honey and cheese baked in a wrapping of fig-leaf)."

http://edithorial.blogspot.com/2012/03/on-fig-leaves-and-victory.html

Specialty Produce information on using fig leaves in cooking.  This site has other recipe ideas for cooking with fig leaves.

http://www.specialtyproduce.com/produce/Fig_Leaves_7136.php


. . .

If you like this recipe check out my cookbooks in the side bar:  "101+ Recipes From The Herb Lady" and "A Victorian Style - Herb Inspired 12 Course Dinner"

And I'm post mini-lessons on my youtube channel - check it out on the side bar.

Consider subscribing to this blog and/or my youtube channel for regular updates on topics to help you in your edible garden and using the bounty!

Have a best week!
 

-- Catherine, The Herb Lady

If you enjoyed this post, subscribe in the upper side bar link, to get all my posts!

Disclaimer: Clicking on links on this blog may earn me a small commission if you purchase something. Your price does not change.

Wednesday, March 02, 2016

Thinning Peaches and way to use the thinned baby peaches

Dear Folks,

I decided to start doing some mini lessons on my youtube channel.  I started the channel some years ago but never got going because the camera was not my friend :-)

Since the first video I put up there, I have gotten far more comfortable taking stills which I use here on the blog and elsewhere and finally got more comfortable doing some video work.

I hope you find these helpful.

Thinning Peaches.  This has always been a chore for us because it made us so sad to pick off fruit we worked so hard to create a healthy environment for a happy tree.

Then I went looking for something to do with the thinned peaches and one of the folks over at the Valley Permaculture Alliance posted a recipe for pickling the baby peaches.  It works because the pit is not formed in the less than marble size fruit, so you get a kind of "crunchy olive".  The flavor is neutral so whatever liquids and spices you use will give you the flavor.

They were fun to make and eat.

Catherine's Lesson - Thinning Peaches

Powell Gammill's original post in 2012 that got me trying pickling the baby peaches.  Such a great "recycle" of what otherwise winds up compost.

The recipe I revised for my try at this.


In the picture I show using a toothpick to prick each peach.

PICKLED BABY PEACHES
[Pricking each peach is important to the pickling process.]  Can be used for any similar fruit which is routinely thinned, such as apricots.

5 Cups baby peaches (green almonds, apricots, probably baby oranges if you wanted to try them)
4 cups of vinegar
1 1/2 cups of honey
4 tablespoons of sugar
2 teaspoons of cloves
3 bay leaves
3 cinnamon sticks
2 teaspoons of coriander seed.


Rinse, de-stem and prick each peach from stem end almost through to the other end.

Bring vinegar, honey, sugar and cloves to almost a boil to completely dissolve honey and sugar.  Place peaches in a jar big enough to hold - or 2-3 smaller jars if you choose (I used a half-gallon mason).  Divide cinnamon, bay leaves and coriander seeds between jars if using multiples.  Pour heated vinegar solution in jars, make sure the peaches are covered - they float.  Cap and keep in a cooler place. Turn or shake the jars each day.  Steep for 4 weeks.  Once you open the jar(s) you will need to refrigerate them.


-- Catherine, The Herb Lady

If you enjoyed this post, subscribe in the upper side bar link, to get all my posts!

Disclaimer: Clicking on links on this blog may earn me a small commission if you purchase something. Your price does not change.

Sunday, January 17, 2016

February Planting, Frost, Hail and Fertilizer

Dear Folks,

FEBRUARY PLANTING:
[Pictured: Poor Man's Cloche]

VEGETABLES, FRUITS & HERBS TO PLANT

Artichoke; Asparagus; Basil; Bay; Bean, Lima; Beets; Bok Choy; Cantaloupe; Carrots; Chard; Citrus Scented Marigold (Tagetes Nelsonii); Collards; Corn; Cucumbers; Epazote; Fruit Trees; Jerusalem Artichoke; Lavender; Lettuce & Greens; Marigold; Marjoram; Melon, Musk Melon; Melon, Winter; Mint; Mustard; Onion, Sets; Onions, Green; Oregano; Peas; Peppers; Potatoes; Purslane; Radishes; Sage; Savory; Spinach; Squash, Summer; Strawberry; Thyme; Tomatoes; Turnips; Watermelon

EDIBLE FLOWERS TO PLANT:

Bee Balm (Monarda Didyma); English Daisy ; Hollyhock; Jasmine Sambac (Arabian); Pansies; Primrose; Purslane; Safflower; Scented Geraniums; Snapdragons; Sunflower; Sweet Alyssum; Tangerine Scented Marigold (Tagetes Lemonii)

Frost/Freeze:  Average last frost day is approximately February 15th, however frost and hail has been seen as late as the second week in March.  It is best to have your frost covers handy.

GARDEN TIPS for February

February is the transition time for the garden from Winter to Spring sowing, transplanting and harvesting.

There is still time to get a last batch of carrots, sugarpeas, lettuces and similar in the ground. Choosing short maturity varieties, particularly of the root veggies, will give you more harvesting success as the weather jumps to heat in a couple of months.

February is also the time to start your warm season plants like tomatoes, basil and peppers, to name a few.  But they may need some initial frost protection.  Keep in mind that they may actually stop growing if there is a cold day or several, which chills the soil.  Then they resume when the soil heats back up (an interesting phenomenon I finally caught on to several years ago).

The weird weather of the last couple of years in February/March with high temps followed by overnight chill/freeze (Global Weirding as Karis over at the Valley Permaculture Alliance put it so well), makes for some required diligence in the garden in February and March.  It pays to remain more mindful of what the weather will be rather than just sow and try to grow.

February is the end of the primary perennial best planting time in the valley (October - February).  What this means is that to ensure the best success for your perennials like rosemary, oregano and fruit trees, it is best to have them in the ground before the end of February and the beginning of our temperature increases.

New to-the-valley residents can be surprised by the common spring joke of "when is spring here?" and the answer is "do you remember that period in early March when it was about 78-83 or so degrees for about 2 weeks? - that was it!"

This of course is due to the sudden rise of temperatures from balmy mid 70s in late February / early March to the 90s by April 1st (or higher - we have had the rare 100+ degree days in late March or early April).

The plants just can't take the stress of dealing with putting down roots while the temperatures soar into the 90+ range in just a few short weeks.

Fertilize fruit trees now -- Use Valentine's day as the target -- (and again in late May (Memorial Day) and early September (Labor Day).
    Pecan trees need zinc sulfate, applied at the rate of 1 pound per trunk inch width.


ABOUT FROST
    The last frost date averages around February 15th, although we have had frost as late as March 1st or 2nd (usually the result of a late winter storm with hail).
    Frost in the Valley at the 1100 or lower elevations is usually limited to ‘soft frost’ where simple sheets or paper placed over sensitive plants (or moving potted plants beneath patios or trees) is sufficient to protect them. Hard/Killing frosts are rare particularly in February/March.
    For every 1000 feet over 1100 in elevation the last frost day is moved back 10 days and the possibility of hard (killing) frosts starts to occur.  At 2000 feet or lower, this is still a rare occurrence.
    Getting your edible seedlings in the ground as early as possible provides longer-produce seasons - especially with plants like tomatoes.
    Use homemade 'cloche' covers to protect seedlings -- cut the bottom of gallon milk containers or 2 liter soda bottles - clean very well to avoid mold -- place over plants each night until frost danger is past, remove during the day, or if you need to be gone for several days remove the cap to allow excess heat and humidity to escape.
    How do you know if we are finished with frost?  There are some examples in nature, but you still need to be prepared to cover sensitive plants through the 2nd week in March.
        a. Ant activity in the garden indicates the soil has warmed up sufficiently for them to start gathering food again.
        b. If the mesquite trees have started to bud out, it is unlikely to frost after that
        c. Be aware that a warm storm can contain some hail through March.

HAIL
    Here in the Valley we can have Hail on an expected basis in Spring, early Summer and Fall.
    The perfect conditions for Hail are warm OR WARMING soil, cool air mass coming in AND wind.

    February and March have the perfect combination of warming soil and a cool system moving in.  If you add wind you will generally get hail.
    So, while actual frost may not happen keep your frost protection covers and jugs handy in the event of hail to safeguard your new seedlings and transplants.

-- Catherine, The Herb Lady

My calendar can keep you on track for planting veggies, fruits, herbs and edible flowers at the right time through out the year. http://www.herbs2u.net/gardening.html

If you enjoyed this post, subscribe in the upper side bar link, to get all my posts!

Disclaimer: Clicking on links on this blog may earn me a small commission if you purchase something. Your price does not change.

Sunday, January 03, 2016

Around The Garden and Kitchen - End of 2015 - Beginning of 2016

Dear Folks,

My Celery Re-Seeded Seedlings
The very end of 2015 and the beginning of 2016 I snapped some pictures of what I and the garden were doing.

I bought some organic celery because mine is just sprouting in the garden, so as I usually do I cut the bottom off of the bunch and placed it in water.

Out in the garden I snapped a picture of what this will look like planted in about 35 days (pictured one was planted November 25).

The celery was for the beef stew with herbs and my dried bay leaf from the garden for New Year's Day Dinner.  Kitchen aromatherapy at its best with every things simmering in red wine and beef broth.

Stews are probably the easiest meals to prepare.  You can find recipes all over the place but, truly, you just need some basic ingredients and steps.  Not pictured was the cut of potato (I always leave the skin on), and the beef broth and red wine I used.  Cook on the stove top (2 hours) or in a slow cooker  (7 hours approx), with both needing to come to a boil and then simmer.

I sort of measure how much meat I have cooked up and cut celery, onion, carrots and potatoes to equal about 2-3 times the amount of meat.  This is all a preference.  Stew was always meant to be extended with vegetables, but can be more meat abundant if you choose.

Sear meat all over, quickly, in a bit of fat or oil of choice.  Add all of the herbs of choice (I used rosemary, thyme and oregano, dried bay leaf and black peppercorns - no salt at this point), stir for a minute or two, add meat and enough liquid to cover.  Add vegetables at one of two points, with the meat or half way through cooking if you prefer firmer vegetables (I like firm, but Deane likes very, very tender).  Reserve about a half cup of cold broth or wine for making a slurry with corn starch or flour to add at the end to thicken.  Bring to a boil, reduce to simmer and cover.  Take the cover off towards the end if cooking on the stove top for the last 30 minutes to reduce the liquid (BUT if keep some extra liquid handy to add if it is evaporating too quickly.  When the meat is tender, add about 3-4 tablespoons of corn starch in a jar with the reserved cold liquid, cap and shake well and pour in while stirring.  The stew will thicken right away.  Salt to taste.

Most of the time when making stew or soup I shred some greens from the garden to stir in at the least moment or shred into the bowl before adding the stew or soup.  It really perks up the flavor and texture.

I made some whole wheat penne pasta, shredded fresh arugula from the garden, and layered, into the bowl, the arugula, pasta and then the stew.  A tasty and satisfying meal.

The freezes around the garden have had some impact.  My nasturtiums take a hit when there are freezing temperatures, but the plants seldom die completely.  In the middle of some damage one of the lovely flowers.

Red Sails with Celery Seedlings
My Red Sails Lettuce and Celery seedlings just come up wherever and I let them as long as it is not an inconvenient location.

White Eggplant Frost Damage
My white eggplant sustained quite a bit of frost damage and I won't touch the plant until late February/Early March to prune the damage.  I'm hoping the plant will make it through and jump start production in the late spring, as opposed to mid to late summer.

I'itoi Onions
My I'itoi Onions are coming along nicely.  I harvested this past year only to split them (I used one for cooking), so now I have multiple plants and will do the same again this year, using probably only a couple of onions for cooking.

Saffron
The Saffron I planted in October is coming along, and I'm hoping this new location will give me the opportunity to harvest enough for one meal!

Sweet Peppers
I have several plants in the front gardens which have some dappled shade with a western exposure.  This sweet pepper loves the spot.

Pineapple - 2 years old
Out front I also have two 2-year old pineapple plants and I have high hopes that I might get a fruit off one or both of them.  The cold is getting to them, but keeping my fingers crossed.

One final photo.  For a project, I'm sprouting garbanzo beans and green lentils.  If you have not recently done any sprouting for use in salads, soups, stirfrys or stews, give them another look.

This is 36 hours after starting the overnight soak and 3 times a day rinse, in other words day 2.  They both immediately doubled in volume from the 1/4 cup I started with.

Choose glass and any type of top to allow rinsing and air circulation.  You can see lots of roots on the lentils on the right and the start of roots on some of the garbanzos on the left.

Once you have done the overnight soaking, keep the jars on their sides to allow the beans to spread out.  I learned the hard way some years ago keeping the jars upright resulted in a tangled mess of roots and hulls.

. . .

I am going to do an update on the Caper Plants in one of the next blogs.  It has been an interesting time with them in various parts of the garden.

I hope these images inspire you to try some new things.  Gardening is always an experiment but one filled with great expectations and hope and many successes.

I am always happy to answer your email questions (and of course if you stop by at the Mesa Farmers Market on Fridays), but I also will come to your home for a garden consultation or be a speaker at an event your group or company plans.  My contact page at my website.  Or email me direct at:

catherine at herbs2u dot net

Have a great week!


-- Catherine, The Herb Lady

If you enjoyed this post, subscribe in the upper side bar link, to get all my posts!

Disclaimer: Clicking on links on this blog may earn me a small commission if you purchase something. Your price does not change.