Garden, Plant, Cook!

Saturday, January 09, 2016

Cheese Lover? Homemade Cheeze-Its!

Dear Folks,

I love almost all cheeses. Not fond of blue cheese but I know many folks are so choose your preferred cheese for these crackers :-)

The other day when it was raining/pouring cats and dogs* I was having cabin fever and resorted to my go-to -- cooking!

I had wanted to try a homemade Cheeze-It recipe for a while.  I love them, also Cheetos, and indulge in either on a rare or limited basis because of all the chemical additions.

Right off the top I have to tell you this not low calorie or low fat.  I use real organic butter a really nice local cheese and unbleached white whole wheat flour but they are really great tasting!    Pictured are the finished crackers - the empty spot is the one I tasted :-)

A couple of tips.  Use a coarse grater for the cheese and the butter (frozen). Grating frozen butter is far easier than trying to incorporate cubes etc. into a dough.  I saw that tip on a recipe and grabbed it!

I used a great cheese from Arizona Farms (you can use any firm Cheddar or Cheddar like cheese.  I like white cheddar.  Yellow cheddar have annatto to color the cheese - a practice begun by Kraft because they did not think the housewife wanted white cheese.  Annatto is natural and derived from a plant, but still I wanted natural.  I bowed to the idea of a bit of color by adding a tiny amount of Paprika as the white whole wheat flour I used also was pale.

Also use your food processor or mixer with a paddle.  I tried my mixer with dough hooks and all it did was spin the cheese, butter and flour around into well floured strips.  I wound up dumping everything into the processor and it came together lickity-split.

If you go looking for Cheeze-It recipes you will see variations on chill, flour, roll - I like the idea of placing the dough between 2 pieces of wax paper and just rolling it out.  Saves adding extra flour (sometimes not a good thing) and cleaning your rolling pin of dough.

Roll, cut with pizza cutter - a pastry wheel gives a more authentic look if you have it.  I cut off the odd edges, and re-rolled to use up every bit of the dough.  You can probably see from the un-even sizes of the "squares" that my oft-repeated comment about myself (I can't cut a straight line with a ruler) applies.  But they still backed up okay. :-)

Once you have them cut into squares place on a parchment lined cookie sheet, or no-stick cookie sheet, separated slightly.  Poke with a fork or chopstick.  This makes it look more like the commercial one AND prevents them turning too puffy - unless you like puffy. :-)  They are supposed to puff slightly because of the butter flour combo.


I am really pleased with my first try at making these.  I erred on the side of using unsalted butter.  I would recommend using salted, keep the extra salt in the recipe, as these are meant to be salty tasting, just not AS salted as the commercial variety.

Deane loves peanut and really is enjoying these with peanut butter.  I like them out of hand.  They will be good on stews, soups or even as croutons on salads.

I may try a way to reduce the calories.  This batch came in at 1398 Calories, 51.13 grams of Protein and 13.98 Grams of Fiber for 67 crackers.  I will try something like substituting some of the butter for parmesan cheese.  1 ounce/tablespoon of butter or Parmesan have about the same amount of calories, but the Cheese will add 8 grams of protein for each ounce.  With the full fat cheddar, if I sub 3 ounces of Par for the butter, it would add 24 grams of protein to the batch.  May try this and post how it turns out.


I purchased the cheese from Tom Garrett one of the vendors at the Mesa Community Farmers Markets and he had to tell me about the new Arizona Farms Cheese he was carrying:  "Garlic, Black Pepper, White Cheddar" (he carries cheese curds and a variety of other cheeses).  I immediately bought it.  Used it to make a cheeseball at the holidays and then the rest for this recipe.  FYI Tom sells the cheeses, avocado oil and Maple Syrup at other markets too.


My Homemade Cheeze-Its
1 1/2 cups of coarsely shredded cheese, Cheddar or other firm cheese (natural or organic)
4 tablespoons / 4 ounces (1/2 stick) of frozen butter, coarsely shredded (organic)
3/4 cup of white whole wheat flour (I used King Arthur)
1/4 teaspoon of sea salt + more for sprinkling
1/8 teaspoon of paprika
1-3 tablespoons of ice water

Preheat the oven to 350.  Prepare your cookie sheet with parchment paper if using.

Toss the cheese and butter together lightly just to mix in.   Stir flour, salt and paprika together.  Place all in a food processor and pulse.  It will form a pebbly texture.  With the processor running, dribble in 1 tablespoon of ice water at a time, slowly and watch.  The dough will come together quickly and should hold together like a soft clay when ready.  Don't over use the water.

Roll out between to pieces of wax paper to an 1/8 or 1/4 inch thickness.  How thick you make is your choice and will only alter overall baking time.

Cut into squares with a pizza or pastry wheel.  Poke with a fork or chopstick before or after you place on the cookie sheet.  Bake for 8-14 minutes and WATCH them.  They should just brown ever so slightly around the edges, puff slightly and look dry.  Remove, cool, eat!  Store away from moisture.  Enjoy!


If you enjoy my recipes, check out my newest cookbook.  Available in print or ebook PDF at my Publisher's site.  Amazon, Barnes & Noble and Changing Hands should have it in about 4 weeks.
My first cookbook "101+ Recipes From The Herb Lady" is filled with herb inspired recipes focusing on using herbs and spices first to bring the full flavor of the dish out before adding salt and fats.


. . .

*The origin of pouring/raining cats and dogs is believed to relate back to the early centuries when roofs were made of thatch and straw and easily accessible by the family's cats or dogs because of the warmth of the straw and heat from the fires inside.  In a downpour the animals would slide off the roof e.g., raining cats and dogs.

I hope your weekend is great!


-- Catherine, The Herb Lady

http://www.herbs2u.net/home.html

If you enjoyed this post, subscribe in the upper side bar link, to get all my posts!

Disclaimer: Clicking on links on this blog may earn me a small commission if you purchase something. Your price does not change.

Friday, January 08, 2016

Sprouting Salads - REAL FOOD - FAST - Anytime Anywhere.

Dear Folks,

It must have been kismet that I decided to sprout some beans and lentils, inspired by a project I'm working on, that Greg Peterson at The Urban Farm, posted (a few days after I started my first batch) a podcast with a master sprouter, Peter Burke

Listen to this fun podcast, check out the Urban Farm website for sources and Peter's book and website for seed supplies.

One of the ongoing discussions about alternative methods of trying to grow more food in best and healthiest ways are around the idea of hydroponic, aquaponic, vertical gardens and other not-in-the-ground methods of producing food.  One of the other parts of the discussions are about how much of the alternative growing methods focus on lettuces and not much else.

WELL . . . here is where sprouting beans and other legumes along with grains, seeds and nuts comes more completely into focus.  Although there is not as much information on the nutrition of sprouted beans etc. vs. the dried and cooked, the "general" consensus is when harvested in the early stages of sprouting the sprouts have near identical nutrition to the dried bean, nut or seed.  If you check at the site below, you will see 100 grams (3.5 ounces measured dry or wet) of lentils dried as 9 grams of protein and 7 grams of fiber.  The sprouted ones show 9 grams of protein and the fiber is not listed but we can safely presume the fiber is equal or similar.

So spouting your legumes etc. is not just growing lettuce, it is growing a far more nutritious group of FRESH foods daily.

If you missed my post on 2016 The International Year of Pulses (legumes), here is the link where I have information on the dried via a great nutrition information site - called HealthAliciousNess.com - I gravitated right away to the name because I use a variant "herbalicious" for growing and using herbs in cooking.  :-)


So, back to my sprouting.  I used to sprout on a sort of regular basis many years ago, but it fell by the wayside when I fully realized I could grow everything OUTSIDE!  So much of the literature and emphasis years ago on sprouting was all about fresh greens, indoors, in the cold winter.

So I drifted away from sprouting.  I've come back full circle, in part because of the project (I will update with more info later - it is a cookbook), but also because of my cabin fever due to ALL OF THE RAIN we are having and the COLD weather which came with the year-end and new year.  I do not do cold well, even desert cold, and it gets worse for me each year so I time my garden activities for the mid-day if I can.

AND I have lovely greens etc. growing now in the garden, but I wanted to plant more and it ain't happening while it is cold or this rainy.

FYI Sow seeds in the garden AFTER the rain otherwise you risk them being washed away - or start in your choice of germinating medium and location then transplant out when the sun if back out - that is for winter gardening - hot weather starting and transplanting is done differently.

After I planted my potatoes on New Year's Day, out in the garden (my annual tradition to jump into new year gardening), I decided to soak some garbanzo beans and green lentils.  A quarter cup (1/4) each.  Since it has been a long time since I sprouted I misjudged on how much volume I would get and it just the two of us, so I had enough sprouts for 4 days for some stews, soups and salads :-)  The quarter cup each resulted in 3 cups of total sprouts in just a little over 2 days.

This was also the first ever time I sprouted garbanzos and lentils.  The Sprout People suggest tasting at all rinsing times to see when you like them best.  Once you get to that taste preference, refrigerate and use.  I really liked the nutty flavor of the garbanzos - different from the cooked bean or hummus, which I love. The lentils were very mild in flavor and tasty.  The combination worked great with a beef stew I made and a mixed green garden salad (I have red romaine, curly escarole, arugula and red sails lettuces growing along with my red scallions, dressed in my Limequat vinaigrette dressing made with avocado oil and my dried Mexican Oregano.

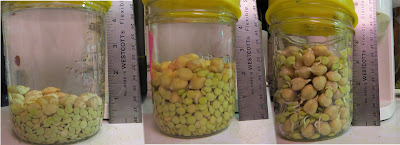
I began another batch only this time with 2 tablespoons of the green lentils and 1/4 cup of the garbanzo beans to try and get a better balance. It sort of worked :-)  The lentils just fluff more.  This batch started January 5th is ready today (7th) or the 8th depending on how long I want them to continue to growth. In the picture I wanted you to see just how much they grow.  Left to right as you look at the picture, Day one morning 10 a.m., that evening 7 p.m. already doubled, and this morning at 5 a.m. (the 7th) the volume is about triple and this is from 2 tablespoons of lentils and a 1/4 cup of garbanzo beans I will have right around 2 cups (that is a pin jar) when I refrigerate them this evening or tomorrow morning.

The nutrition of sprouted legumes is approximately the same as the cooked version and you have the option of cooking the sprouts, drying them, grinding them for dips etc.  Your choice, but to have some lovely fresh tasting veggies, when you might not otherwise have access to something to fresh, even from your gardens is a win / win.

As Peter Burke notes in the podcast, this is done with out special lights, trays or setups.  You can have a succession of just sprouts, as I'm showing, or micro greens as Peter notes, going for a daily fresh harvest.

If you are new to the idea of sprouting beans, seeds or nuts, there is a lot of info on The Sprout People site and also Peter Burke's site (link through the Urban Farm link at the top of this post).

How To Sprout

The basic is this, choose which WHOLE bean, seed, grain, or nut you wish to sprout.  Do keep in mind just how much they swell the ratio is from 2:1 all the way up to 5:1, so if you are not careful you can easily wind up with a gallon of sprouts, all at once from as little as a cup of starting dried.

Place in glass jar - mason jars work really well.  Sure you can buy sprouting set ups and there are lots of options out there but the good old glass jar works great.  You need a perforated lid for ease of rinsing and also to let air in so the wet sprouts don't mold etc.

Rinse very well to remove any dust and check for debris.  By their very nature legumes, seeds etc must be harvested dry and kept dry - they do not even rinse them at the farm or store because of the possibility of mold.

Then fill the jar so they are covered by at least twice as much water to bean ratio.

Set aside in a non-breezy area - counter, cupboard or pantry works, for 10-12 hours or overnight.  In the morning rinse well and drain well put the cap back on and lay the jar on its side shaking to get the beans to spread out in the jar*.

Your choice as to whether to rinse every 12 hours or 3 times a day - either works fine.  The point is to rinse well, drain well and return to resting position.

Taste at each rinse and observe for how long you want the shoots to grow and how you like the taste.  Anywhere from 2 to 7 or 8 days - its your choice. The shoots will start to develop tiny hairs (the true roots) after several days - some folks like that, some do not.

Give one final rinse when you like where they are at, drain well, cap with top (not the rinsing top) and refrigerate.  Use and enjoy.

* I learned the hard way yeas ago that if you leave the jar upright you get a huge MASS of tangled beans and shoots and if you have a husk from the seed - it is more difficult to rinse those away (if you choose - some folks like the extra fiber of the husk/hull).  Once rinsed and refrigerated you can store however it suits you, in jars or a special container or ziplock bags.  I use the mason jars for this also.

Sprouts are not just for people.  Chickens and Ducks love them too.  Lisa over at Fresh Eggs Daily sprouts the feed grains for her 'girls' and they love it.  She also has a sprouter cap tip which is a great idea.  When you see it you will realize there are many types of material that can be used as the "mesh" cover:  some are wire, some people have used cheese cloth (not a good idea the shoots will start to penetrate it and break when you try to get them out, and then there is the cover I show in my pictures.  These are OLD styles of plastic caps made specifically for sprouting in mason jars and I was lucky enough to be gifted these years ago by Deane's mom.  You can still probably find them with a google search.  I believe Jarden (Ball/Mason) has a special lid for the mason jars for sprouting.

If you, like I, have not sprouted beans etc. in a while, give it another go.  Simple, easy, fresh and REAL FOOD FAST!

Find my books at Amazon, Changing Hands online Bookstore, Barnes & Noble and My publisher.

MY SCHEDULE:

January 8 -- private lecture (not at Farmers Market due to schedule conflict)
January 13 -- private lecture
January 15 -- Mesa Community Farmers Market - every Friday 9 a.m. - 1 p.m.
January 22 -- FREE SEED SHARE at the Mesa Community Farmers Market
February 20 -- Saturday Lecture at Mesa Urban Garden (MUG) 1:30 p.m. Details TBD)


-- Catherine, The Herb Lady

Catherine is available for consulting and as a speaker.  Use the contact form on the website to inquire for your group or event.  You can email direct to:    catherine at herbs2u dot net

If you enjoyed this post, subscribe in the upper side bar link, to get all my posts!

Disclaimer: Clicking on links on this blog may earn me a small commission if you purchase something. Your price does not change.

Thursday, January 07, 2016

The Great Caper Caper Update aka Growing Capers in the Desert

Dear Folks,

If you love capers, hopefully you have been following my updates on the Great Caper Caper Mystery aka how to successfully germinate seed and grow caper plants in the desert.

The prior post on the project is here.

Follow this blog by subscribing in the upper side bar.

Suzanne Vilardi and I started this about 3+ years ago and we have been successful in our goals.  Growing a mother plant, harvesting seed, germinating seed and growing young plants.

Fast forward to this spring and summer when I planted some of Suzanne's first generation plants in various locations in my gardens to trial where they do best.

The good news is they did outstanding in full sun with minimal watering after they were established.

The bad news is this was THE year of the flea beetle which thrived in the soil because of our mild winter last year.

FYI - this year's cold winter should inhibit their activity in our gardens.  Purchase neem sprays or you can try BT powder if you see activity in the spring and summer.  STAY on it by doing daily bug inspection particularly around the broccoli family plants and greens like arugula (my arugula looked terrible until the invasion was over - then I pruned it back and new growth was delicious).  These pest are active at night and early morning hours before the sun hits the plants.

Established plants weather the infestations okay, but a young plant can struggle or die.

July, September, December, 2015
In the picture I show the healthiest of the young plants just going to town in July, then being attacked in September and what the poor thing looked like on December 31, 2015.  I have hopes of the plant making it through to spring - we will see and I will keep you posted.  I did try both BT and Neem Spray, but the infestation was too quick to try and keep up with the beetles - and they fly so you have to be really good at catching them in the sprays.  The BT is probably more helpful if you can target the plants when the weather is dry.  I had less success because the pests came out when we were getting some monsoon rain and it just washed the BT off. almost immediately.

I was particularly excited about this planting area because 1) it is in FULL sun, and 2) during the summer, after it got established, it was ONLY watered once a week (deep watering for about 2 hours), except for the summer rains, which are always hit and miss.  This area is also slightly recessed (the best way to set up gardens in the desert) so all moisture was held in the beds.

The Other Transplants and The Mother Plant

4 other plants did not make it past the first month or two after transplanting in April and it was just one of those things.  Not enough sun or the soil stayed too wet.  Capers are high drainage Mediterranean plants which love growing out of rock crevices in full hot sun.

The two other thriving transplants are in a more typical garden set up some folks may be using.  An established area with over head trees BUT with a West and South facing orientation, which means they got a lot of sun during the day, but were aided by a lot of duff mulch on the soils surface.  They are just under the drip line of the tree canopy.  This entire area, including trees was sprinkler watered every 2 days for an hour during the summer   Don't be mislead by the hour aspect sprinkler watering works but distributes the water over a larger area not focused only on the root system.

The Mother plant has been thriving for about 3+ years in a North West exposure, in the same duff/mulch conditions and has just loved it there.

On December 31, 2015, the Mother plant is now about 6 feet across and the two youngsters are 2 and 2.5 feet (the plant in between them is an artichoke).  The center picture in the collage is one of the young plants in July at about 7 inches tall.

This past fall I again supplied Suzanne with fresh harvested seeds and she just reported some spouting activity.

We have a facebook group page on the project.  It is a closed group you can ask to join.  We check for trolls before accepting group participants, so you can comfortably participate on the group once you are accepted.

Check out the facebook page devoted to this.

I am so happy this project has succeeded.  Perhaps one of the local farmers may choose to grow capers in the desert for commercial harvesting and it would be do in no small part to Suzanne's asking me about 4 years ago if I wanted to try and see if I could get a plant or two to grow - happily - here in the desert.

THANK YOU, Suzanne Vilardi  (Vilardi Gardens on Facebook) for asking and trusting me to partner with you on this - it has been a fun experiment that succeeded.

We expect plants to be for sale in late spring through Vilardi Gardens.

GARDENING

Through the rain.

This series of storms is just dumping a LOT of water on the valley and it is both an opportunity and a benefit (hopefully no flooding).  We are going to save at least a month's worth of watering bill because we turned off all of our auto watering features AND the property is totally bermed except for a small driveway, so we can capture up to 3 inches of standing water (and there was standing water in some of the gardens yesterday) before the berms over-flow.

SOW after the rains have finished otherwise you risk them being washed away.

PLANT  before or during rains because it helps the soil seal well around the plants.  If the plants are small cover with a poor man's cloche (gallon plastic jugs with the bottom cut off) to keep the tender growth from being pounded, but still taking advantage of the rain.

Seasonal Planting

Sowing and planting here in the desert is all about timing for best success.  We are at the end of the winter sowing and planting and getting into the beginning of spring sowing and planting.

That means you can still plant sugar peas, carrots, beets, lettuces and similar short maturity vegetables, along with bare root strawberries and asparagus, but you can start tomatoes, peppers, basil, eggplant and similar warm weather lovers inside for transplanting out on February 1st (using the cloche for the last few frost night protection.

My gardening wall calendar provides month by month planting info, gardening tips and maintenance help and, while dated, can be used as a perpetual reference - with pretty pictures from my gardens :-)

Amazon

Barnes & Noble

Changing Hands Online Bookstore.

My Publisher


-- Catherine, The Herb Lady

If you enjoyed this post, subscribe in the upper side bar link, to get all my posts!

Disclaimer: Clicking on links on this blog may earn me a small commission if you purchase something. Your price does not change.

Sunday, January 03, 2016

Around The Garden and Kitchen - End of 2015 - Beginning of 2016

Dear Folks,

My Celery Re-Seeded Seedlings
The very end of 2015 and the beginning of 2016 I snapped some pictures of what I and the garden were doing.

I bought some organic celery because mine is just sprouting in the garden, so as I usually do I cut the bottom off of the bunch and placed it in water.

Out in the garden I snapped a picture of what this will look like planted in about 35 days (pictured one was planted November 25).

The celery was for the beef stew with herbs and my dried bay leaf from the garden for New Year's Day Dinner.  Kitchen aromatherapy at its best with every things simmering in red wine and beef broth.

Stews are probably the easiest meals to prepare.  You can find recipes all over the place but, truly, you just need some basic ingredients and steps.  Not pictured was the cut of potato (I always leave the skin on), and the beef broth and red wine I used.  Cook on the stove top (2 hours) or in a slow cooker  (7 hours approx), with both needing to come to a boil and then simmer.

I sort of measure how much meat I have cooked up and cut celery, onion, carrots and potatoes to equal about 2-3 times the amount of meat.  This is all a preference.  Stew was always meant to be extended with vegetables, but can be more meat abundant if you choose.

Sear meat all over, quickly, in a bit of fat or oil of choice.  Add all of the herbs of choice (I used rosemary, thyme and oregano, dried bay leaf and black peppercorns - no salt at this point), stir for a minute or two, add meat and enough liquid to cover.  Add vegetables at one of two points, with the meat or half way through cooking if you prefer firmer vegetables (I like firm, but Deane likes very, very tender).  Reserve about a half cup of cold broth or wine for making a slurry with corn starch or flour to add at the end to thicken.  Bring to a boil, reduce to simmer and cover.  Take the cover off towards the end if cooking on the stove top for the last 30 minutes to reduce the liquid (BUT if keep some extra liquid handy to add if it is evaporating too quickly.  When the meat is tender, add about 3-4 tablespoons of corn starch in a jar with the reserved cold liquid, cap and shake well and pour in while stirring.  The stew will thicken right away.  Salt to taste.

Most of the time when making stew or soup I shred some greens from the garden to stir in at the least moment or shred into the bowl before adding the stew or soup.  It really perks up the flavor and texture.

I made some whole wheat penne pasta, shredded fresh arugula from the garden, and layered, into the bowl, the arugula, pasta and then the stew.  A tasty and satisfying meal.

The freezes around the garden have had some impact.  My nasturtiums take a hit when there are freezing temperatures, but the plants seldom die completely.  In the middle of some damage one of the lovely flowers.

Red Sails with Celery Seedlings
My Red Sails Lettuce and Celery seedlings just come up wherever and I let them as long as it is not an inconvenient location.

White Eggplant Frost Damage
My white eggplant sustained quite a bit of frost damage and I won't touch the plant until late February/Early March to prune the damage.  I'm hoping the plant will make it through and jump start production in the late spring, as opposed to mid to late summer.

I'itoi Onions
My I'itoi Onions are coming along nicely.  I harvested this past year only to split them (I used one for cooking), so now I have multiple plants and will do the same again this year, using probably only a couple of onions for cooking.

Saffron
The Saffron I planted in October is coming along, and I'm hoping this new location will give me the opportunity to harvest enough for one meal!

Sweet Peppers
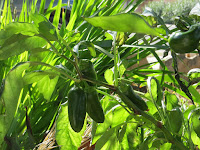
I have several plants in the front gardens which have some dappled shade with a western exposure.  This sweet pepper loves the spot.

Pineapple - 2 years old
Out front I also have two 2-year old pineapple plants and I have high hopes that I might get a fruit off one or both of them.  The cold is getting to them, but keeping my fingers crossed.

One final photo.  For a project, I'm sprouting garbanzo beans and green lentils.  If you have not recently done any sprouting for use in salads, soups, stirfrys or stews, give them another look.

This is 36 hours after starting the overnight soak and 3 times a day rinse, in other words day 2.  They both immediately doubled in volume from the 1/4 cup I started with.

Choose glass and any type of top to allow rinsing and air circulation.  You can see lots of roots on the lentils on the right and the start of roots on some of the garbanzos on the left.

Once you have done the overnight soaking, keep the jars on their sides to allow the beans to spread out.  I learned the hard way some years ago keeping the jars upright resulted in a tangled mess of roots and hulls.

. . .

I am going to do an update on the Caper Plants in one of the next blogs.  It has been an interesting time with them in various parts of the garden.

I hope these images inspire you to try some new things.  Gardening is always an experiment but one filled with great expectations and hope and many successes.

I am always happy to answer your email questions (and of course if you stop by at the Mesa Farmers Market on Fridays), but I also will come to your home for a garden consultation or be a speaker at an event your group or company plans.  My contact page at my website.  Or email me direct at:

catherine at herbs2u dot net

Have a great week!


-- Catherine, The Herb Lady

If you enjoyed this post, subscribe in the upper side bar link, to get all my posts!

Disclaimer: Clicking on links on this blog may earn me a small commission if you purchase something. Your price does not change.