Garden, Plant, Cook!

Showing posts with label homemade bouillon. Show all posts

Tuesday, June 07, 2016

I Harvested Onions, and Preserved with Sun and Crockpot.

Sun Dried-in Jars, Caramalized and Frozen
Dear Folks,

I harvested some onions yesterday and did several things with them.  I cut the roots off an replanted - I'm hoping for some green tops to harvest as needed (this works, just it maybe too hot now for the onions to sprout again.  We will see.

onion roots planted and covered
I also sun dried the green tops and cut 'scallion' separately.  The greens have a milder flavor so I have options AND, I caramelized a batch in the crockpot!.

I also distributed the extra greens through out the garden to discourage pest bugs. I don't expect it to last long as a deterrent but for now it is good.  It will dry and provide some mulch.

I already knew I wanted to dry some of the onions, but I had a lot of them.  3-4 of them filled my drying trays when chopped up.  I thought caramelized onions, but they take a long time and heat up the kitchen.  I frequently use the crock pot for cooking in the summer (I've even made bread) because I put it out on the patio and further keep the extra heat outside.

I went looking and found a recipe for caramelizing onions in a crock pot :-)

The suggestion was olive oil or melted butter.  And this was going to be different because I was not using big fat onions I was using large scallions.  I needed to get these out of the garden because the volunteer tomato and pichu berry were completely shading the onions.

(It takes about 10 months for onions to reach storage bulb size here in the desert (last year it was August.)

Cock Pot Caramelized Onions

Chop or thinly slice your onions and toss with olive oil or melted butter to coat all.  I chose to use olive oil, and put a thin amount in the crockpot first before I tossed the chopped with more.

Fill your crock pot about 3/4's full.  Turn on low and let cook for about 10 hours.

Worked like a charm.

The caramelized onions will only last about a week in the frig, so I decided to freeze in a ziplock.  The oil will allow me to break off chunks for use when I want to add to pasta, soup, or stew or use on a sandwich.

SOME NOTES:  The aroma and flavor of these is awesome.  Since I used scallions which had less density than a regular onion, I could have stopped at about 8 hours.  My wonderful scallions cooked down almost to a jam and the approximate 3 cups or so of chopped reduced to about 3/4 of a cup.  I was fine with that, but will keep the ratio reduction in mind for the future.  The recipe I based this on said 10 hours for regular caramelized onions but if you want "jam" cook for a couple more hours.

Since I was already sun drying the other onions in the sun, and it was HOT (yesterday when I started this it got to 109+) I thought I would see what would happen with a small amount of the olive oil tossed onion in the sun.  The result was significantly difference from the crock pot.  Obviously the sun did not mimic the crock pot heat and moisture.  We used most of the sun cooked onions on hot dogs last night and I'm using the rest of them when I use my potatoes for a potato salad later today.
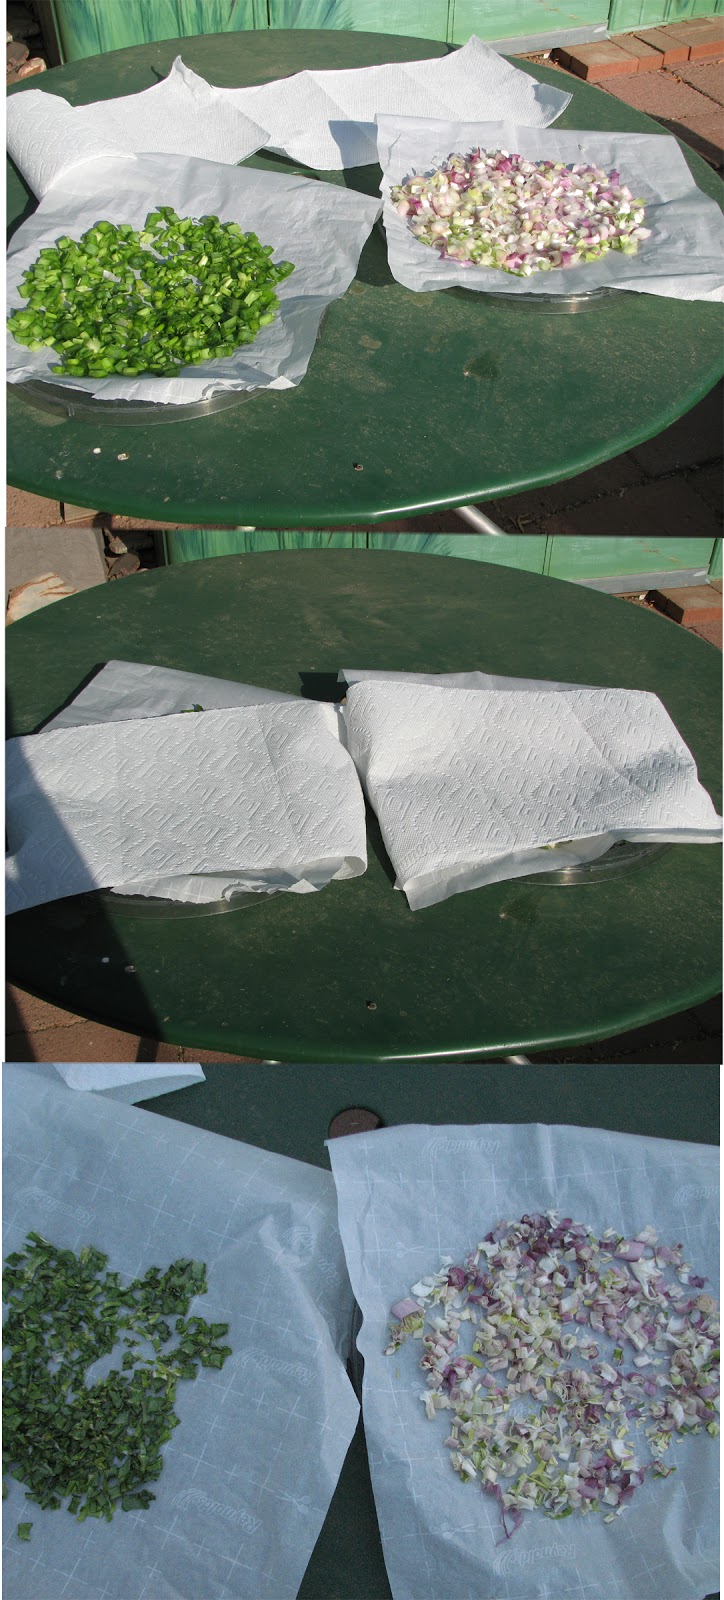
Sun Drying Onions

After chopping the sun does all the work.  The green parts dried in about half a day, but I had to take the white/red part (these are red onion / scallions) in overnight because they were not quite dry, put them out this morning for about 2 hours and they were perfectly dry.

I mentioned before that I had an opportunity to purchase a round set of dehydrator trays (without the motor) which allowed me to have more capacity for sun drying.

You can cover with paper towel as I show or one of those picnic mesh domes.  I also sometimes stack the trays with their cover.  This is nice and compact, but you need to rotate the trays, through out the day as, the top tray and sometimes the bottom one dry out fastest.

Anything that is not completely dry, bring in overnight so they do not start to reabsorb moisture.

As with cooking, sun drying or any drying method reduces the volume of the food with the moisture withdrawn.  They store very well in mason jars and are ready to use when I need dry.  I still have some dried from last summer and they are still fragrant and tasty.  Always store in the cool, dry and dark to preserve flavor and aroma.

Here are some links to a few of my prior blog posts on sun drying.

Homemade dried vegetable bouillon - a mix of my herbs and veggies

Sun Dried Tomatoes

Sun Drying Fruit and Herbs

Finally, while you are harvesting, don't forget to let some of your beloved veggies and herbs go to flower and seed so you can harvest the mature and dry seed for re-sowing later.

This is "regional adaptation" at its best.  What did great in your garden will produce subsequent generations of stronger and more adapted plants.

Find me on Facebook

Have a great week in, and "from" the garden,


-- Catherine, The Herb Lady

herbs2u.net

If you enjoyed this post, subscribe in the upper side bar link, to get all my posts!

Disclaimer: Clicking on links on this blog may earn me a small commission if you purchase something. Your price does not change.

Saturday, April 23, 2016

Oreganos To Know, Grow and Love.

Dear Folks,

I grow 3 types of Oregano and thoroughly enjoy them all.

Actually I grow a fourth Oregano for its beautiful flowers but not its flavor. Hopley's Purple Oregano   I don't have a picture right now - the ground around and under the plant is a purple confetti vision in the late spring.

The Origanum Family includes two of the three and also includes Marjoram (Origanum marjorana) which has a very different flavor from the Oreganos discussed today.

First up is Greek Oregano Origanum vulgaris hirtum.  The herb most associated with Italian and Greek cooking.  There is an Oregano called Italian Oregano but it is not THE herb most people think of.  Greek Oregano has a peppery bite strong enough to bite back a bit if you bite into the fresh leaf.

So associated with Italian foods like pizza and sauces to substitute a very, very mild tasting Oregano would simply not work flavor wise.

Most chefs call for using Greek Oregano dried, but it is a choice.  In the picture this patch of Greek Oregano also contains some of my Jerusalem Artichoke plants and some Nasturtium flowers.

Next is Syrian Oregano Origanum Maru.  Syrian Oregano is the Hyssop of the Bible and is also called Za'atar in the Middle East where it is the anchor herb for the spice mix by the same name.  When Syrian Oregano is not available English Thyme is often substituted, which is acceptable, but does not have nearly the complexity of the savory and almost sweet tasting herb.  One could call Za'atar the salt and pepper of the region.  It is used in many, many dishes.

The spice is a mixture of Syrian Oregano, Sumac Berries (lemony taste) and sesame seed.  It is a lovely spice mix.

Syrian Oregano has a slight gray coloring to the leaves.  In my bee post yesterday, I showed a bee on Syrian Oregano flowers.


The final Oregano is Mexican Oregano Lippia graveolens, a relative of Lemon Verbena.

This oregano has a wonderful flavor and fragrance.  I like to use this in vinaigrette dressings.

While each of the Oreganos has its own flavor and goes well with certain foods, I would encourage you to experiment with each of them.

Think of them as you would wine or beer varieties, experimenting with them singly and as a part of your own blend of go-to-mixes for what you love to make most.

For any herb place a pinch in your hand, rub it and smell.  If you are looking to try making a blend, add another herb, rub, smell, repeat.  Your nose - knows as your taste buds are unique to your sense of smell.

For an idea of making your own blends, how about making your own bouillon.  I knew I would get a good flavor and scent when I went about drying my own bouillon mix, but I was blow-away by just how wonderful it turned out.  Check out my post on sun drying your own mix of what grows in your garden.

Enjoy!   

Growing Oreganos

All three of these wonderful herbs grow very well here in the valley.  They like full sun but can tolerate some shade.

They are all hardy perennials, however in sustained killing frosts the Mexican Oregano can suffer damage.  In a super hard freeze about 8 years ago my 7 foot Mexican Oregano (with a trunk diameter of about 7 inches) died back, struggled to come back and finally did not make it.

Greek Oregano is a trailing ground cover with upright new growth.

Syrian Oregano is a low mounding bushy type of growth.

Mexican Oregano is a shrub.  My current plant is about 4+ feet tall depending on where you measure it.  It is kind of the "wild hair" variety of growth and takes pruning well.

All flower in the spring. All dry very well for storage.

The Greek and Syrian Oregano can be grown from seed (I got my Syrian seed from Bake Creek).  If you do want to transplant now or going into the heat, harden off the plants first by introducing them into the sun over the course of several days (1 hour first day, 2 hours second day, repeat until 4 hours in sun), then transplant, water in well and water every 2 days then back off watering to every 3 to help the roots grow down.  Gradually increase the amount of water with less frequency.  My established gardens are watered every 5 days this time of year and will go down to every 4 days as the heat goes higher.

I hope you decide to add one or more of these great herbs to your garden.  For best success, plant in the fall.  

. . .
 
You can find me on Facebook: 

My books and month-by-month planting calendar are available at my publisher's site page.or available through links on the sidebar here on the blog.


Have a great time in your garden!

-- Catherine, The Herb Lady

If you enjoyed this post, subscribe in the upper side bar link, to get all my posts!

Disclaimer: Clicking on links on this blog may earn me a small commission if you purchase something. Your price does not change.