Garden, Plant, Cook!

Showing posts with label sun drying. Show all posts

Wednesday, August 10, 2016

Baby Watermelon Fell Off Plant - What To Do? & Sun Drying Garlic

Dear Folks,

I'm back from vacation and cruising through the garden to see what happened while I was gone. While nudging the huge watermelon vine of an heirloom variety I'm trying I seed tiny baby watermelon.  Nudge the vine a little more (it is trying to get on to the lawn) and off drops a baby melon that was going good.  DARN!

Initially I was just going to compost it and dropped it temporarily back onto the ground.  Then I thought, it looks like a zucchini - should I try and cook it up?

I did some research on the internet and found references to cooking it, many with notes that the immature fruit can be bitter. Well, okay, taste it.  It tasted like zucchini.  Bingo!

Granted it is kind of small, but Deane loves all squash sauteed so, I added a bit of red bell pepper for color and volume and it turned out great.

Moral - any member of the cucumber, melon, or squash family baby (immature) fruit can be eaten. :-)

I decided it was time to dry some of my garlic (harvested a month or so ago).

When I have sun dried my garlic before I used the garlic press to squeeze the small bits out.  That worked 'okay' and it is great to use but the bits kind of clumped together so it is hard to measure for use.

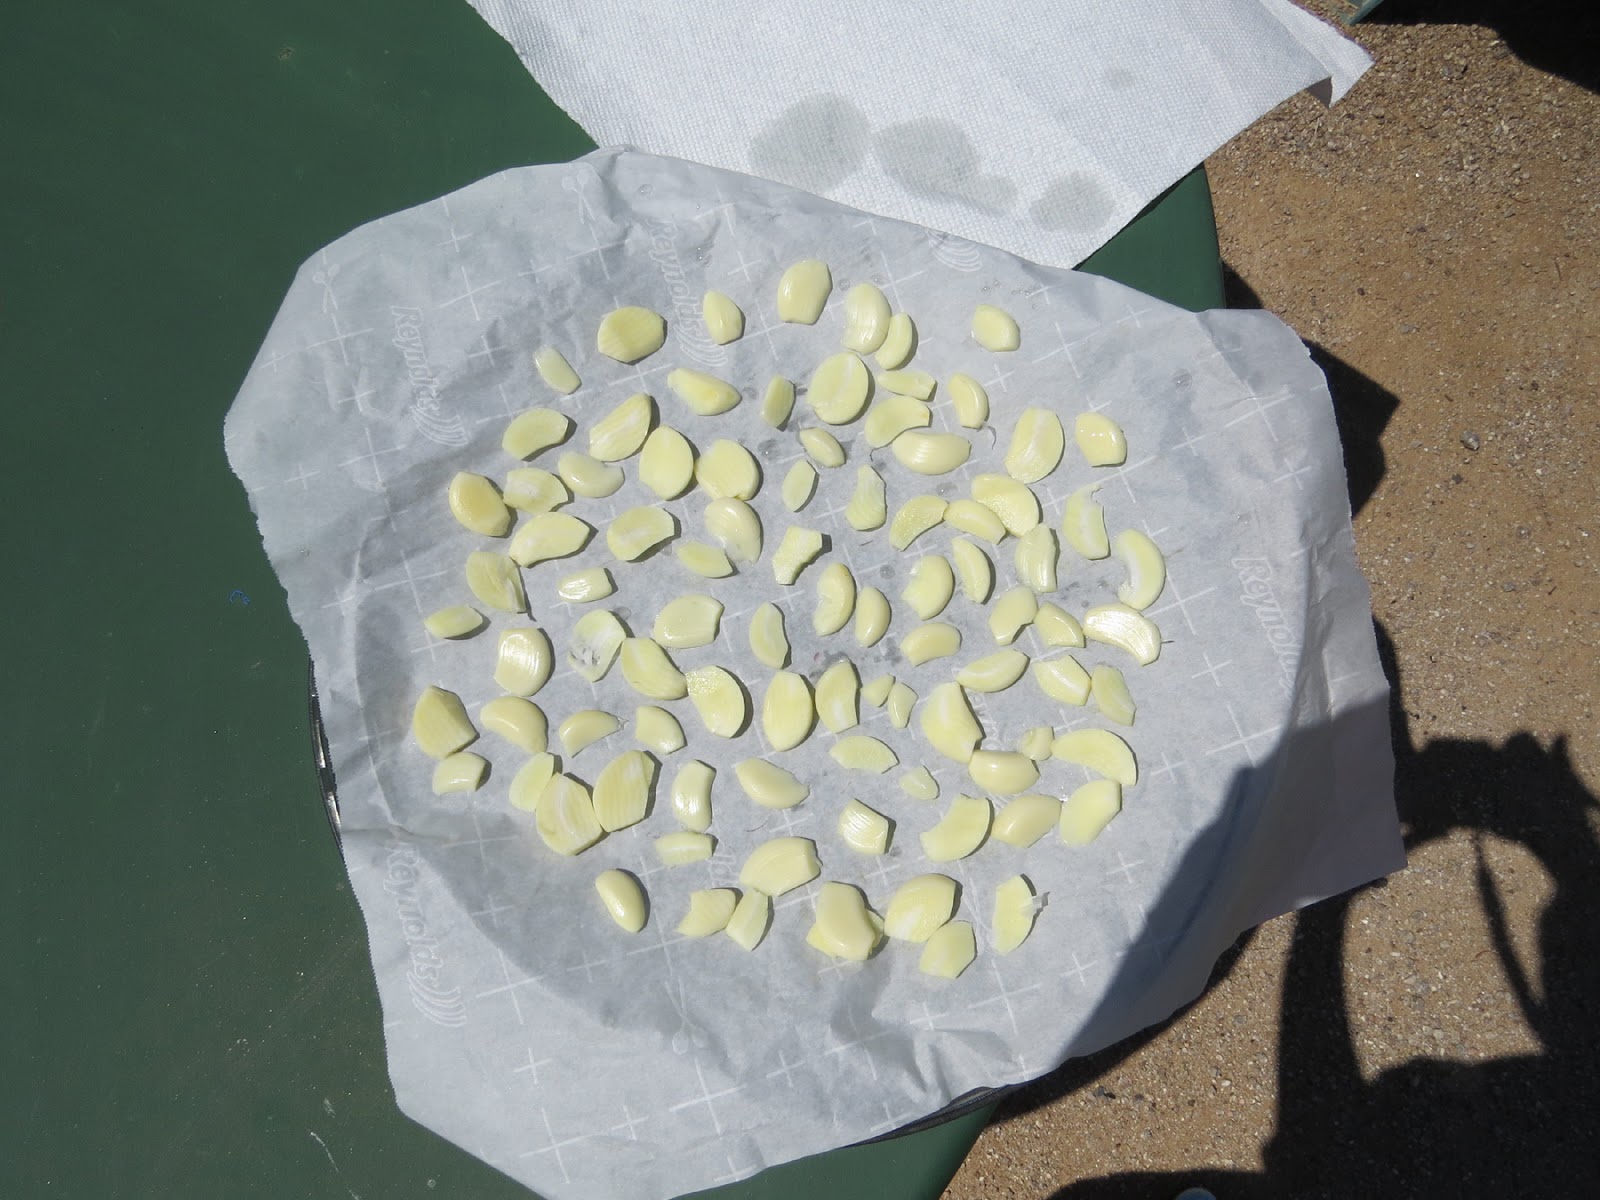
This time I decided to peel, trim and slice the cloves.  What you see is 3 heads, drying.  Now when they are completely dried I can use slices in cooking or grind a couple in my spice grinder for powder or granules, giving me options on how to use this wonderful herb.

Lecture

I am working with the Mesa Urban Garden to set up my next lecture there on Fall Planting.  Watch for the time and date.

On my website you can find links (Amazon etc.) to purchase my books etc.  If you enjoy my recipes you may like my cookbooks.  If you choose my publisher's source they frequently have discounts, so check for them.  The codes are case sensitive.

Farmers Market -- I will be back at the Mesa Farmers Market this Friday.  I plan on bringing Limequats, Purslane (verdolagas) and I will see what amount of sweet potato leaves I can bring also, along with fresh cut Basil.

Have a great day,


-- Catherine, The Herb Lady

Website

If you enjoyed this post, subscribe in the upper side bar link, to get all my posts!

Disclaimer: Clicking on links on this blog may earn me a small commission if you purchase something. Your price does not change.

Tuesday, June 07, 2016

I Harvested Onions, and Preserved with Sun and Crockpot.

Sun Dried-in Jars, Caramalized and Frozen
Dear Folks,

I harvested some onions yesterday and did several things with them.  I cut the roots off an replanted - I'm hoping for some green tops to harvest as needed (this works, just it maybe too hot now for the onions to sprout again.  We will see.

onion roots planted and covered
I also sun dried the green tops and cut 'scallion' separately.  The greens have a milder flavor so I have options AND, I caramelized a batch in the crockpot!.

I also distributed the extra greens through out the garden to discourage pest bugs. I don't expect it to last long as a deterrent but for now it is good.  It will dry and provide some mulch.

I already knew I wanted to dry some of the onions, but I had a lot of them.  3-4 of them filled my drying trays when chopped up.  I thought caramelized onions, but they take a long time and heat up the kitchen.  I frequently use the crock pot for cooking in the summer (I've even made bread) because I put it out on the patio and further keep the extra heat outside.

I went looking and found a recipe for caramelizing onions in a crock pot :-)

The suggestion was olive oil or melted butter.  And this was going to be different because I was not using big fat onions I was using large scallions.  I needed to get these out of the garden because the volunteer tomato and pichu berry were completely shading the onions.

(It takes about 10 months for onions to reach storage bulb size here in the desert (last year it was August.)

Cock Pot Caramelized Onions

Chop or thinly slice your onions and toss with olive oil or melted butter to coat all.  I chose to use olive oil, and put a thin amount in the crockpot first before I tossed the chopped with more.

Fill your crock pot about 3/4's full.  Turn on low and let cook for about 10 hours.

Worked like a charm.

The caramelized onions will only last about a week in the frig, so I decided to freeze in a ziplock.  The oil will allow me to break off chunks for use when I want to add to pasta, soup, or stew or use on a sandwich.

SOME NOTES:  The aroma and flavor of these is awesome.  Since I used scallions which had less density than a regular onion, I could have stopped at about 8 hours.  My wonderful scallions cooked down almost to a jam and the approximate 3 cups or so of chopped reduced to about 3/4 of a cup.  I was fine with that, but will keep the ratio reduction in mind for the future.  The recipe I based this on said 10 hours for regular caramelized onions but if you want "jam" cook for a couple more hours.

Since I was already sun drying the other onions in the sun, and it was HOT (yesterday when I started this it got to 109+) I thought I would see what would happen with a small amount of the olive oil tossed onion in the sun.  The result was significantly difference from the crock pot.  Obviously the sun did not mimic the crock pot heat and moisture.  We used most of the sun cooked onions on hot dogs last night and I'm using the rest of them when I use my potatoes for a potato salad later today.

Sun Drying Onions

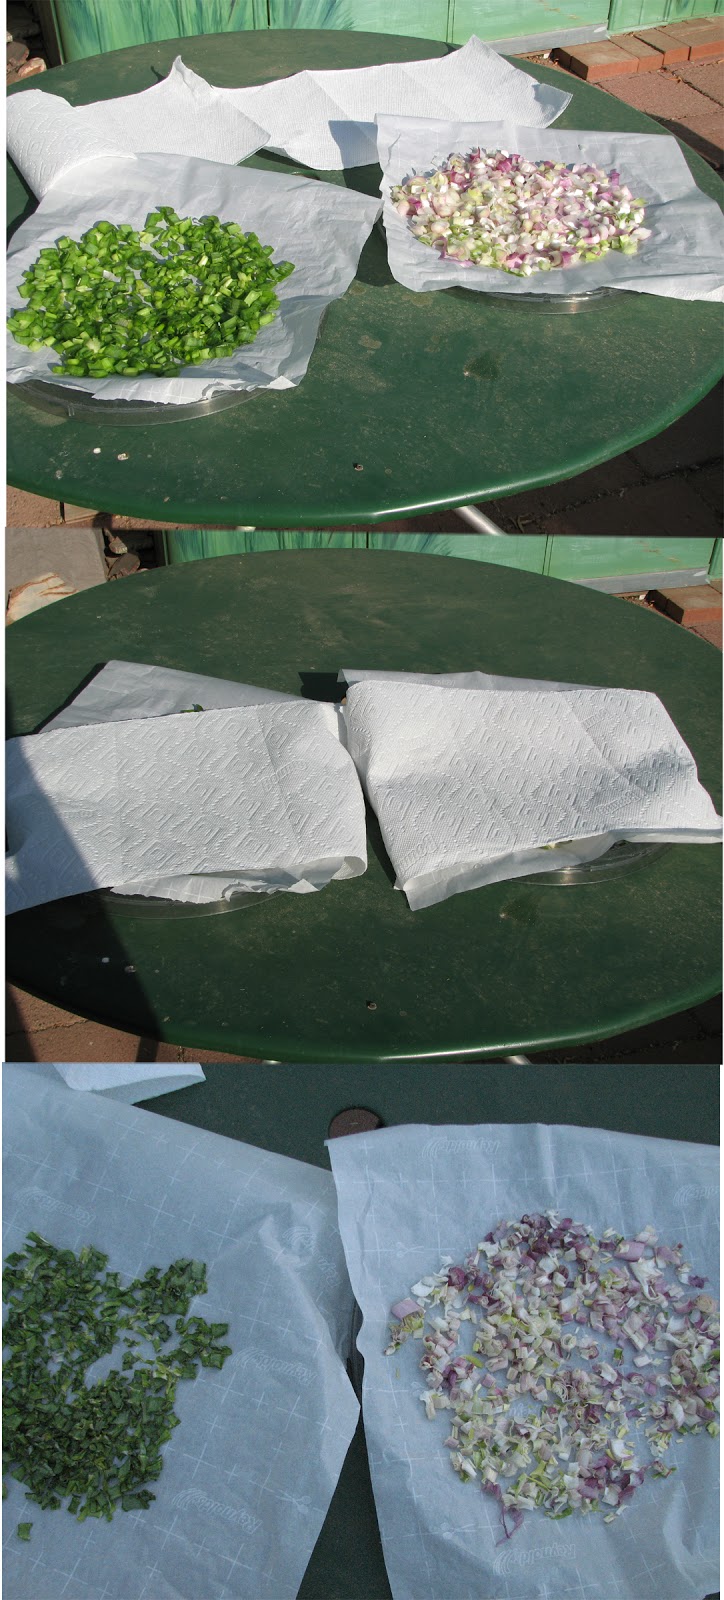
After chopping the sun does all the work.  The green parts dried in about half a day, but I had to take the white/red part (these are red onion / scallions) in overnight because they were not quite dry, put them out this morning for about 2 hours and they were perfectly dry.

I mentioned before that I had an opportunity to purchase a round set of dehydrator trays (without the motor) which allowed me to have more capacity for sun drying.

You can cover with paper towel as I show or one of those picnic mesh domes.  I also sometimes stack the trays with their cover.  This is nice and compact, but you need to rotate the trays, through out the day as, the top tray and sometimes the bottom one dry out fastest.

Anything that is not completely dry, bring in overnight so they do not start to reabsorb moisture.

As with cooking, sun drying or any drying method reduces the volume of the food with the moisture withdrawn.  They store very well in mason jars and are ready to use when I need dry.  I still have some dried from last summer and they are still fragrant and tasty.  Always store in the cool, dry and dark to preserve flavor and aroma.

Here are some links to a few of my prior blog posts on sun drying.

Homemade dried vegetable bouillon - a mix of my herbs and veggies

Sun Dried Tomatoes

Sun Drying Fruit and Herbs

Finally, while you are harvesting, don't forget to let some of your beloved veggies and herbs go to flower and seed so you can harvest the mature and dry seed for re-sowing later.

This is "regional adaptation" at its best.  What did great in your garden will produce subsequent generations of stronger and more adapted plants.

Find me on Facebook

Have a great week in, and "from" the garden,


-- Catherine, The Herb Lady

herbs2u.net

If you enjoyed this post, subscribe in the upper side bar link, to get all my posts!

Disclaimer: Clicking on links on this blog may earn me a small commission if you purchase something. Your price does not change.

Wednesday, May 25, 2011

Preserving The Bounty - Sun Drying

Dear Folks,

In the past we have canned our fruit. See also a note near the bottom on "pie kits."

And when I dry my herbs, I use the refrigerator (the modern refrigerators mimic the commercial freeze-dry process by constantly removing moisture from the air, thus drying the herbs in a process which keeps both more color and essential oils).

Our fruit production was way down this year due to the demise of trees and a more aggressive pruning of the remaining fruit trees.  So I decided to sundry some of the fruit and while I was at it - I dried some herbs in the sun also.

See my post from 2009 on sun drying tomatoes and letting the plants sprawl for maximum production in the desert garden.  http://edibleherbsandflowers.blogspot.com/2009/02/tomatoes-let-em-sprawl.html

We should take advantage of the free energy our Desert sun affords us (one of these days I'm going to get around to making a solar cooker).


Keep some things in mind when sun drying foods:

Bugs
Animals
Any weather other than hot and sunny

With fruits like apricots you need to dunk them in acidulated water (light lemon water) to keep them from browning too much.  Commercial dried fruit is usually sulfured and the lemon water works in the same way to keep them from browning too much.

You can see the fresh fruit just put in the trays, and the finished fruit along side of some dried conehead thyme and Syrian Oregano.  You will note that the fruit shrinks about half, and that I left the herbs whole (keeps more essential oils intact until ready to use).

The Process.  After rinsing off, and removing any damaged parts of the fruit, I cut the apricots in half, pitted them and dunked them in the lemon water (1 squeezed lemon to 1 quart of water).  You don't have to leave the fruit in very long.  I let them air dry cut side down so there was no moisture on the bottoms (skin side) of the fruit, then nested them into trays, cut side up.  It took 3 whole sun days to dry them to almost leather consistency - there was still a bit of give in the center of them.  I am storing them in the refrigerator as a precaution, but I'm very pleased with the way they turned out.

You will note that I used a pryex (Glass) tray and a metal tray lined with plastic wrap.  I would recommend that you try to use only glass.  I did not want the fruit coming in contact with the metal but the plastic draped over the edges of some of the outer fruit and spoiled them, before I noticed what was happening.

I used picnic bug tents to keep the bugs off the fruit while drying.  Since we did not have any humid or rainy days while this drying was going on, I left the trays out over night.  If you have overcast, rainy, or humid days, you should plan on bringing the trays in overnight and put them out again in the sun.  The process will take anywhere from 2-5 days depending on temperatures and humidity in the air.

Herbs will dry in 1-2 days depending on temperatures.  You will note I used paper towels to keep the bugs and debris off them while drying.  I simply rinsed them well and set them out between a layer of paper towels.

Once you get into sun drying your bounty, you may want to devise a hanging screen compartmentalized set up.  If you have ever seen shoe and sweater hanger storage arrangements for closets that is what some folks like to use.  Use weed cloth or screen material to build them.  Be aware that if fruits leak while drying cleaning the screening material may take a bit of elbow grease.  That is why I chose glass baking dishes.  Perforated grilling or broiling pans will work also, if you don't mind the metal to fruit contact.

The first batch of apricots I put out to dry several weeks ago made me think of the old adage "if you want to be a better house keeper get a cat" - if you forget anything about securing the food, the critters will find them!

I placed the dishes on the table and forgot to move the bench away from it and the squirrel promptly helped herself to the drying fruit!

Hope this gives you some idea of taking advantage of the sun for drying the bounty of your garden.

This morning I put out some of our summer apple slices. Since these are the crisp green kind and Deane likes his apples sweet I sprinkled them with cinnamon sugar after dunking them in the acidulated water.  Should taste wonderful!

One other 'preserving' technique I started using last year was making 'pie kits' mixing the cut up fruit with the suggested (from your favorite recipe) proportions of sugar, spices and a some flour, toss gently put in a zip lock bag, label and freeze.  If you have more freezer space than we do (why I use the ziplock, even though I prefer glass), use quart size canning jars to freeze.

When I made the pie kits and used them the first time, I discovered the thawed fruit produced too much juice to make a decent pie -- it tasted great just wound up looking like pie-soup!  So the next time I thawed the pie kit I drained the juice and boiled it down about a third and glazed the fruit with it before popping it into the oven - worked great.

Make the most of your bounty, share, use, and preserve!

-- Catherine, The Herb Lady

My books including recipes using fresh and dried ingredients for real flavor and gardening help for the new-to-the desert gardener.  Check out the publisher site http://stores.lulu.com/herbs2u