Garden, Plant, Cook!

Showing posts with label Arizona. Show all posts

Monday, June 13, 2016

Watering: The Right and Wrong Way to Water in The Desert & Other Hot Area Gardens

Dear Folks,

I posted this information on one of the facebook group pages this morning, thinking I would be just doing a short series of notes.  It turned out far longer and much read, so I decided I needed to turn it into a blog.

WATERING TIPS:

There really is a right way and a wrong way to water.

Wrong:  Irregular watering


Obviously plants need more water in the heat of the summer, but watering when you think the plant needs it as opposed to a schedule can cause things like cracked tomatoes, stressed plants (because the roots are not deep enough), and dead plants because the roots went from soggy/boggy to bone dry.

Because our gardens are large - they are on several types of automatic watering systems depending on the section.

I am not saying to go automatic systems - there is a fair amount of work to establish them initially.

However, what I noticed -- over many years -- is the mature/maturing plants ADAPT to a watering cycle.  Really they do.

Here is what happens:  (This not about new seeded areas or new seedlings - I will mention about seeded areas below).

You water deeply and then you allow the soil to start drying out.  The plant's roots follow the retreating water down as the soil dries.  And, this occurs more each time you deep water.  If you do not let the soil dry some, then the roots stay near the surface.

I recommend a moisture meter for the desert gardener - I think it is one of the best tools to learn the character of your garden.

Grass style watering -- 5 minutes a day, every day, will never give you healthy plants.

For established gardens - where the plants have been in for a couple of months, the meter should read on the 2-3 dry side before watering again, when the meter is inserted into the soil about 6 inches.

Our main gardens are now on a 4 day cycle and we can usually keep it at that through the summer. In the winter the timing will go up to 5 and than 6 day cycle.  Our trees are on 7 day year round.  In an exceptionally hot part of the summer, we may move the trees to 6 day cycle, but we have only had to do that once in many years.

Generally, water in the evening in the summer to minimize evaporation, and in the morning in the winter to minimize mildew.

How do you know you watered deeply enough?  Immediately after watering the bed or area, stick an 18 inch long skewer or rod straight down into the soil.  If you can't do this without impediment, you have not watered deeply enough.

DO look at your plants in the morning, before the summer day heats up.

DON'T look at them in the middle of the day, when the hot summer will cause many plants to wilt to preserve their moisture.

It may seem really impossible but I have grown plants on a 7 day water cycle - in the summer - adding a bit more water half way through (not a full watering cycle, just a good chug of the watering can at the root zone) if the temps are in the 110+ range.

The trick/tip is I grow densely (or with mulch) with as little or no soil surface showing so the plants provide their own "soil canopy" - not shading the plants, shading the soil.  This greatly minimizes evaporation (does not use more water because of the density) and keeps the soil cooler.

TRANSPLANTING:

Any time the temps are over 80 degrees harden off plants you intend to transplant.  Hardening off is just gradually introducing the plants to more sun each day:  1 hour today, then move into the shade (NOT indoors - you want them getting used to temp and sun), next day - 2 hours, then shade, etc. until they are in the sun for 4 hours and doing okay.  If we are in the 95+ and you really need to transplant, double the sequence - 1 hour the first 2 days, then 2 hours day 3-4 etc.  Taking a plant directly from the protected environment of the nursery or greenhouse and plunking it into the hot garden is going to almost ensure you either have a really, really strong plant or a dead one.   Transplant in the evening, give it a good soak and depending on the size of the plant (gal or 4 inch pot) you may need to give it a soak every day or every other day,  after several days, start increasing the amount of water while decreasing the frequency - from every day to every other day etc.

SEEDS/SEEDLINGS:

In mid-July we start "sowing" not transplanting for the fall garden.  The fall edibles like the cooling soil as the sun starts moving south.  New sown beds need to be watered every evening in the summer until you seed leaves, then you can back the watering to every other day, but increase the amount.

If you are sowing in an established bed, continue the regularly watering but water the seeded area every nigh.   When you start reducing the watering frequency, as the seeds emerge and grow, you are aiming at getting the seedlings on your regular water schedule.

A very light mulch over the seeded area will help minimize the heat impact and evaporation of the sun.  I also use chicken wire hats temporarily over new seeded areas to keep the birds off (I have a short video on my youtube channel showing how to use them.)

What happens if you water for a few days and nothing happens? 

I have folks tell me they did what I suggested, but nothing came up after several days or a week of watering each evening.  Many seeds take from about 7 days to more than a month to germinate.  When you stop watering the seed area, even for a day, what usually has occurred is the seed began to germinate - underground, the dormancy broken by the moisture - but if the seed hits a dry patch - when the watering stopped - the seed dies.

Below is a schedule I suggest - it is only a guide not a bible

As the temperatures rise, a guide (this is only a guide!) For mature gardens would be:


  70s water every 5-6 days for all but trees
  80s water every 4-5 days for all but trees
  90s water every 3-4 days for all but trees
  100s water every 2-3 days for all but trees
 

CONTAINERS:

I do have some LARGE containers and a raised bed.  They are watered every two days in the summer and every 3 days in the winter.

If you have to use small containers, snug them all together, to minimize the heat impact on most of the exterior surfaces.


Spaghetti Tube Watering System - Movable.

I thought I would add an illustration of a simple setup - which you can take with you if you are renting or getting ready to move. This will cost about $100 dollars depending on how many "heads" you need and if you choose to go with an automated timer.

I use this set up on my raised beds. The system works like this - you purchase a roll of black hose and one end cap to block the end and a female coupling to attach to your hose bibb. The automated timer is available from different companies with 1 or 2 outlets each with its own timer. The spaghetti tubing is also available in rolls and you cut the lengths to 1) go directly to the base of a plant OR 2) to allow you to center a spray head (first image) among plants / areas - the spray width is adjustable. I prefer the spray head, but the single spout (seen in image 2) is workable for a single plant. There are connectors to punch a hole in the hose, and attach the tubing. It goes together quickly and there is a tool for doing the punching you can purchase which does a uniform job of punching the holes - a knife will work but you have to be careful not to puncture through too big a hole. I've been using this set up for years.

As I need to, I replace a length of spaghetti (short or longer) and change the head from single or spray as needed or back and forth. I had to replace the timer after about 6 years and the batteries about every 2+ years. I hope this gives you a good option when a fully automated (dug in) system is out of the cost (and a lot of work) range or a soaker hose is not doing the job.  ( Soaker hoses soak "down" not "out" so if the plants are not near or beside the hose they may not get enough water.)


I hope these tips help you in your growing.


-- Catherine, The Herb Lady

http://www.herbs2u.net/

If you enjoyed this post, subscribe in the upper side bar link, to get all my posts!

Find me on Facebook

Disclaimer: Clicking on links on this blog may earn me a small commission if you purchase something. Your price does not change.

Tuesday, June 07, 2016

I Harvested Onions, and Preserved with Sun and Crockpot.

Sun Dried-in Jars, Caramalized and Frozen
Dear Folks,

I harvested some onions yesterday and did several things with them.  I cut the roots off an replanted - I'm hoping for some green tops to harvest as needed (this works, just it maybe too hot now for the onions to sprout again.  We will see.

onion roots planted and covered
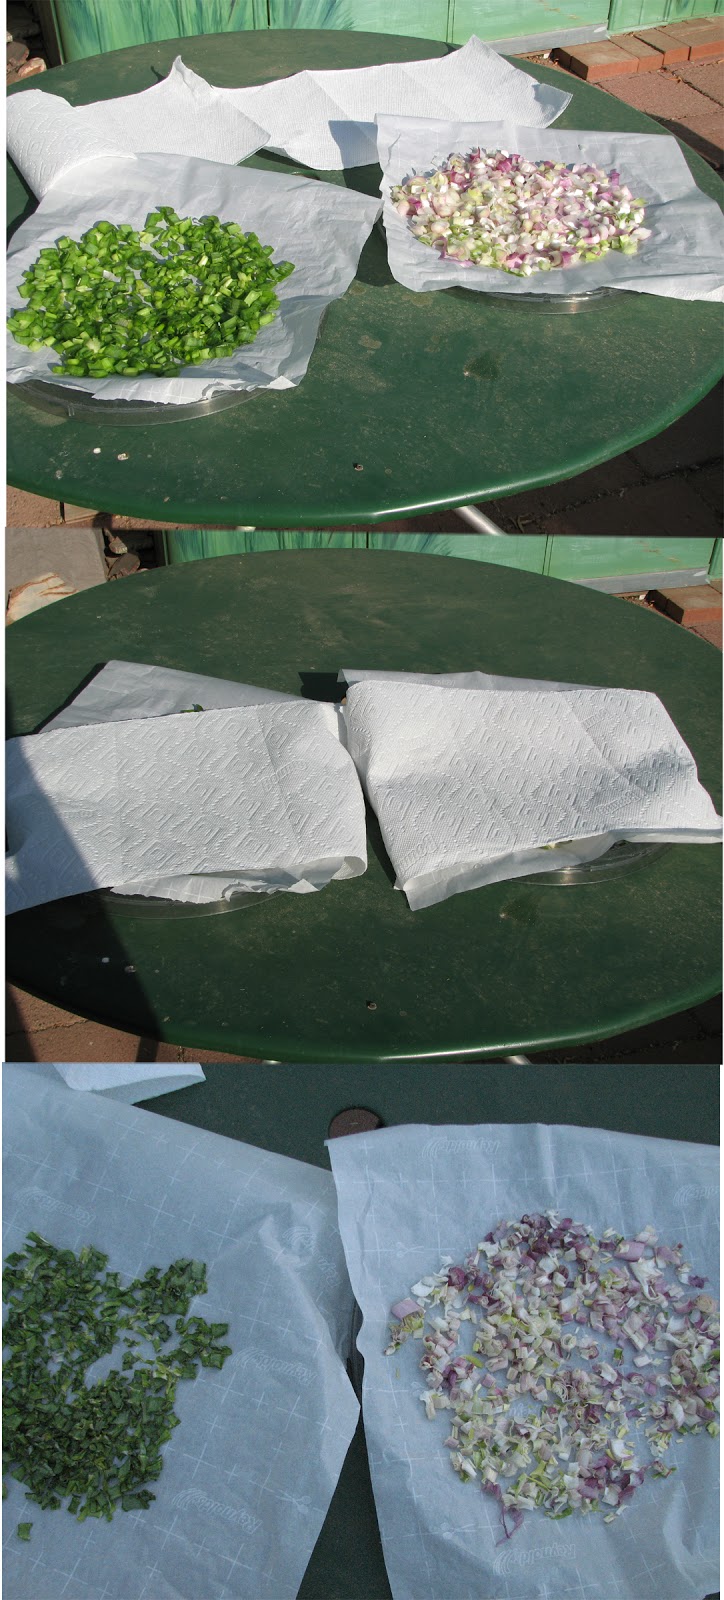
I also sun dried the green tops and cut 'scallion' separately.  The greens have a milder flavor so I have options AND, I caramelized a batch in the crockpot!.

I also distributed the extra greens through out the garden to discourage pest bugs. I don't expect it to last long as a deterrent but for now it is good.  It will dry and provide some mulch.

I already knew I wanted to dry some of the onions, but I had a lot of them.  3-4 of them filled my drying trays when chopped up.  I thought caramelized onions, but they take a long time and heat up the kitchen.  I frequently use the crock pot for cooking in the summer (I've even made bread) because I put it out on the patio and further keep the extra heat outside.

I went looking and found a recipe for caramelizing onions in a crock pot :-)

The suggestion was olive oil or melted butter.  And this was going to be different because I was not using big fat onions I was using large scallions.  I needed to get these out of the garden because the volunteer tomato and pichu berry were completely shading the onions.

(It takes about 10 months for onions to reach storage bulb size here in the desert (last year it was August.)

Cock Pot Caramelized Onions

Chop or thinly slice your onions and toss with olive oil or melted butter to coat all.  I chose to use olive oil, and put a thin amount in the crockpot first before I tossed the chopped with more.

Fill your crock pot about 3/4's full.  Turn on low and let cook for about 10 hours.

Worked like a charm.

The caramelized onions will only last about a week in the frig, so I decided to freeze in a ziplock.  The oil will allow me to break off chunks for use when I want to add to pasta, soup, or stew or use on a sandwich.

SOME NOTES:  The aroma and flavor of these is awesome.  Since I used scallions which had less density than a regular onion, I could have stopped at about 8 hours.  My wonderful scallions cooked down almost to a jam and the approximate 3 cups or so of chopped reduced to about 3/4 of a cup.  I was fine with that, but will keep the ratio reduction in mind for the future.  The recipe I based this on said 10 hours for regular caramelized onions but if you want "jam" cook for a couple more hours.

Since I was already sun drying the other onions in the sun, and it was HOT (yesterday when I started this it got to 109+) I thought I would see what would happen with a small amount of the olive oil tossed onion in the sun.  The result was significantly difference from the crock pot.  Obviously the sun did not mimic the crock pot heat and moisture.  We used most of the sun cooked onions on hot dogs last night and I'm using the rest of them when I use my potatoes for a potato salad later today.

Sun Drying Onions

After chopping the sun does all the work.  The green parts dried in about half a day, but I had to take the white/red part (these are red onion / scallions) in overnight because they were not quite dry, put them out this morning for about 2 hours and they were perfectly dry.

I mentioned before that I had an opportunity to purchase a round set of dehydrator trays (without the motor) which allowed me to have more capacity for sun drying.

You can cover with paper towel as I show or one of those picnic mesh domes.  I also sometimes stack the trays with their cover.  This is nice and compact, but you need to rotate the trays, through out the day as, the top tray and sometimes the bottom one dry out fastest.

Anything that is not completely dry, bring in overnight so they do not start to reabsorb moisture.

As with cooking, sun drying or any drying method reduces the volume of the food with the moisture withdrawn.  They store very well in mason jars and are ready to use when I need dry.  I still have some dried from last summer and they are still fragrant and tasty.  Always store in the cool, dry and dark to preserve flavor and aroma.

Here are some links to a few of my prior blog posts on sun drying.

Homemade dried vegetable bouillon - a mix of my herbs and veggies

Sun Dried Tomatoes

Sun Drying Fruit and Herbs

Finally, while you are harvesting, don't forget to let some of your beloved veggies and herbs go to flower and seed so you can harvest the mature and dry seed for re-sowing later.

This is "regional adaptation" at its best.  What did great in your garden will produce subsequent generations of stronger and more adapted plants.

Find me on Facebook

Have a great week in, and "from" the garden,


-- Catherine, The Herb Lady

herbs2u.net

If you enjoyed this post, subscribe in the upper side bar link, to get all my posts!

Disclaimer: Clicking on links on this blog may earn me a small commission if you purchase something. Your price does not change.

Sunday, February 08, 2015

New! MOBILE "Desert Gardening Perpetual Calendar"

Dear Folks,

Many of you know and have purchased (thank you!) my brand new Wall Calendar designed specifically for gardening with edibles in the desert.

With all of the "mobility" tech devices out there, I thought a downloadable version of the calendar would be helpful.

While the calendar is for 2015, all of the month-by-month planting information, gardening maintenance, and tips don't change. The planting and "To-Do" chores are the same next February as this February.

I do plan on bringing out a new Wall Calendar each year with new pictures from our gardens and any additional tips I can pass on to you, however both the wall calendar and the digital calendar can be treated as a PERPETUAL calendar.

So, I created a PDF version of the calendar.


See information below on PDF readers.

WHY purchase a digital edition?

Convenience!  That is the primary reason everyone has a smart phone or eReader handy.

Let's say you are out shopping and think:  "Now what plants / seeds did I need to get this month?"  Check the calendar on your device.

You are discussing things you would like to do in the garden with friends or family and you are away from home - check the calendar on your device!

Your friend or relative knows you garden and asks what to can they plant?   Check the calendar on your device!

The PDF file is $6 (the wall calendar is $16.96 plus shipping).  I think my wall calendar is beautiful and useful (and so do many of you), but something that is even more convenient for you and if it will get you growing more of your own food, I don't mind one bit if you go the less expensive way, plus have a calendar that will work from year to year.  (There is a preview under the picture on the site.)

Desert Gardening Success - Perpetual Calendar


PDFs can be read on any device which has a PDF reader, Adobe supplies these all free as a download.  You can also store the file on all of your devices: phone, ereader and computer

Here is a link for Adobe's free mobile app for smart phones and iPad

http://www.adobe.com/products/reader-mobile.html

Adopbe has a free "digital editions" app for certain other eReaders

http://www.adobe.com/solutions/ebook/digital-editions.html

And, if you do not the Adobe PDF reader on your computer or laptop, you can get it free here.

http://www.adobe.com/products/reader.html

Mac version of the Adobe PDF reader

http://www.adobe.com/support/downloads/product.jsp?platform=macintosh&product=10


If you would like the wall calendar here is the link for it.

You may wish to check out the PDF version of my cookbook 101+ Recipes from The Herb Lady

There is also a preview under the cover picture.


Helping you grow more of our own food, successfully!

Have a great day in the desert garden,


-- Catherine, The Herb Lady

Saturday, January 16, 2010

More on Growing Potatoes

Dear Folks,

I received a question from School_Junque about planting potatoes in stacked tires, after my December 14th posting on planting potatoes on New Year's Day.

I wrote more on that subject of planting potatoes in Arizona on the google group site for my irregular newsletter, which I have been writing for 10 years. You can go to that site at google groups. Click on the page "Question: When do I plant Potatoes in Arizona?" That google group page has a bit more information on planting at different elevations here in Arizona and mentioned staked tire planting.

Stacked tire planting is a nice old fashioned recycling idea to create 'free' gardening containers. My reader's question was: How many "eyes" would I plant in a bed the size of a tire?

A potato cut into pieces for planting or using small seed potatotes is the standard way of growing potatoes. Each section of cut potatoe should have 2-3 eyes. These and seed potatoes should be planted a foot apart or they can be planted closer together. Obviously stacked tire planting will depend completely on the size of the tires -- I've seen a tractor tire wrestled into duty.

My reader is at a 4000 feet elevation but the issue of how hot a stacked tire container will get in the summer in Arizona is still pertinent - hot, meaning the soil temperature will be hotter in the tire container garden then if the plants were grown directly in the ground, a light colored container, or as my December post showed - a raised bed. To some extent the whole idea of using stacked tires was not just to recycle something for another use but exactly because the tires would attract and hold more heat - a good idea for extending the season on either side of winter, but not necessarily for growing during our summer.

If you were at an elevation of 4,500 to 6,000 you could start plants in a stacked tire container a bit before last frost in hopes of creating a 'cold frame' where you would cover the opening at the time with glass or stiff plastic, at night an open it up during the day slightly.

A better idea for the hotter lower areas if you do not want to or can't make a wood frame as I showed in the December post, then get some chicken wire and make a 2-4 foot wide circle or square frame. 18 inches high should be adequate. Just make sure the potatoes are not planted near the edges to avoid exposure of the growing roots to the sun.

For you gardeners in the low desert, you can still get some potatoes in by mid-February.

The rains are coming this week so get some things in the ground today and tomorrow - I would hold off putting any seeds in until after the rains -- from all reports the amount of rain we will see this week is going to be substantial and you don't want things washed away.

You can start all the warm weather seeds like tomato, basil, chives, peppers, eggplant etc. in starter pots - kept warm and protected from frost either inside or in a green house.

TIP: Cheap greenhouse

I use a bakers rack for starting seeds and cuttings.

I created a green house of sorts by draping some plastic material (clear plastic table cloth type stuff) over the bakers rack in a sunny area of the garden. On nice days I take the plastic off completely. Works great - not as fancy as some greenhouses, but equally effective. Most of the time I don't even have to do more than create a canopy of the plastic over the top and not even bother making it come down the sides -- kind of like a clear-top patio cover.

If we get the amount of rain the weather folks think we will - we should have the additional benefit of a lovely wild flower display in early March!

Happy gardening!

-- Catherine, The Herb Lady

Tuesday, October 27, 2009

My Ginger Project

Dear Folks,

I love using ginger and several times I've tried to grow it, and failed - another of my trowel and error experiments from which I hope to benefit and pass the lessons learned on to you.

Exactly one month ago I planted ginger in 3 places in the garden. Pictured here is one of the plants coming up -- I took the picture this morning.

As a tropical herb, ginger root is actually the rhizome of the plant Zingiber officinale. (The botanical plate here is from Kohler's Medicinal Plants, published in 1887 by Franz Eugen Köhler. (Tumeric and cardamon and galangal are also members of the zingiberaceae family.)

I have tried several times to grow ginger and I did not pay enough attention to what it needed to germinate from the rhizome "roots" - they need warm soil to germinate. Next year I'm going to get the ginger pieces in the ground in August, to ensure enough warm soil growth because I am not sure at this point that the current plants will have enough root growth on them to get them through the winter cooler soil and air temps -- but we will see.

As with my garlic experiment I would like to have my own local supply of ginger rather than purchasing the chain-store Asian imported varieties. According to the general growing information on ginger it requires an even longer growing season than garlic - about 10 months, so I figure that my best possible harvesting time will be in June or July.

Ginger is an amazing food plant with many health benefits on top of the great taste. Growing up my mother "dosed" us with ginger ale or mint tea any time we had tummy aches. True ginger ale sold commercially (many are artificially flavored) still is good for tummy problems for most people. Ginger tea or ginger added to chicken broth is also good for sore throats and respiratory-related ills like colds and allergies. And some folks like candied ginger for headaches.

I adapted a recipe from Ming Tsai for making my own candied ginger and resulting ginger syrup to make home made ginger ale.

You need equal parts of peeled and sliced ginger, granulated sugar and water - example 1 cup of peeled and sliced ginger - make slices the same size 1/8 to 1/4 inch thick - choose firm unblemished ginger, 1 cup each sugar and water. In a pot heat to dissolve sugar in water (I like to use an organic granulated sugar*) add ginger and simmer until the syrup is reduced by about 1/3 to 1/2 - thicker syrup is much stronger.

Have a plate on which you have sprinkled more sugar. Using tongs, take the ginger pieces out, drain over the pot and lay on the sugar, single layer. Turn the syrup off. Turn the ginger slices to coat the other side. Ready a cookie sheet lined with aluminum foil and preheat oven to 225. Dry candied ginger in the oven for 2-3 hours until they are leathery, but not brittle.

Shake off excess sugar into the syrup pot, and store candied ginger in glass jar - does not have to be refrigerated. Add a bit more water to the syrup pot and bring back to a boil (I like to capture every drop of the ginger/sugar). Remove from heat and pour into a sterile bottle. Cap and refrigerate - will last about a month.

To make ginger ale, mix 1/4 cup of syrup with 3/4 cup of cold sparkling water of choice (seltzer, club soda, Perrier etc.) Optional slice of lemon and/or a sprig of mint completes a very refreshing drink which just happens to be good for you too.

* If you want to try making the candied ginger with honey or agave nectar reduce the proportion from 1 cup of sugar to 3/4 cup of honey or agave nectar.

. . .

I added a gift subscription option to the reminder gardening service. Click here for information.

-- Catherine, The Herb Lady

Tuesday, September 22, 2009

Grab the meter to check soil moisture

Dear folks,

Worth repeating tip.

It is that time of year as we transition into cooler air and soil temperatures that the moisture content of the garden can fluctuate widely.

The same conditions occur in the reverse in Spring when we transition into hot times in the valley.

Today, for instance, we are having high "Albuquerque" style winds and this will desicate the most hardy plant surfaces and top soil. Interim watering may be needed if you are on a set schedule.

At other times you may find the cool nights and milder days have not caused as much evaporation, so you need to make sure you are not keeping the soil soggy, which contributes to root rot and mineral leach.

Moisture meter to the rescue! This really is one of THE most important tools in a gardener's kit - and instantly helpful as it gives you an immediate reading of the soil moisture, whether ground or container.

Generally, 2-3 on the dry side is time to water most edibles. Some exceptions are mint and new seedlings or transplants, which may need a bit more constant moisture (that does not mean soggy, folks).

Meters come in plain/simple - just the moisture content; and more bells - moisture, light and pH. Most edibles here in the valley are not that sensitive to pH levels, but the light component of these types of meters are helpful for those of you trying to find the best placement for container gardens. Remember all the edibles need 4-6 hours of direct sun a day.

Pictured here is the simple kind. This link takes you to a purchasing/detail page on Amazon. I'm happy to report, though, that most of the garden nurseries in the valley carry at least the simple version of this meter.

. . .

Reminder service to better gardening success in the Valley. Folks there is only about a week left to get the reminder service permanently at the reduced rate of $15/year. Click here for information and to sign up. That page also directs you to other locations which may benefit out of state family members with similar growing conditions. You can give the reminder service as a gift - just specify that in notes when payment is made.

Have a great time in the fall garden,


-- Catherine, The Herb Lady

Saturday, August 16, 2008

Enroll in the New On-Line Class

Dear Folks,

Enrollment is now open in my new On-Line Class -- click on this post's title to go to the archive newsletter page to learn more details about registering etc. Class begins September 2nd. Timed to get you successfully gardening by the end of week 4 and cooking before the holidays, this economical program will satisfy tight schedules and gas-squeezed families.

This class is a 12-Week program called "Good Looks, Good Scents, Good Eats!" which takes you from garden dirt to table meals. Designed for the desert gardener, the information will still be helpful for other area gardeners.

How to succeed in gardening year round with edibles in the desert
Herbs Anise to Zahtar
Delicious meals using real food from your gardens for real flavor

Questions can be directed to:

info at herbs2u dot net

-- Catherine, The Herb Lady