
Dear Folks,
When Stevia finally became available (approved by the FDA for the US) for purchase as a sweetener or substitute for sugar in foods I stood up and clapped. You may have also been doing a happy dance along with a couple of million-billion people.
But as the products begun to roll out I was not happy with what I thought of as mis-direction information - so like I always do when I get curious, I went searching for information.
I've written about so-called "stevia" products in the past here on the blog. Use the search function on the side bar to find posts of interest to you.
Cargill and Coca Cola were probably instrumental in getting the FDA to relent and finally allow Stevia to be sold as a sweetener, but the trade off is a plethora of pseudo-stevia products which are only "stevia" because they contain some form of the Stevioside (the technical name for the element which gives the sweetness).
As I've noted on other posts I was really, really concerned about Truvia's "natural flavor" ingredient. Sigh. Well it did not take long to find out that "natural flavor(s)" is so generic you can't find out what "it" is and further a company can literally create something in the laboratory and call it a trade secret. This is not about boiling juice down to make a concentrate, but manufacturing, in the fullest sense of the word, food components.
Think "pink slime" - the public became outraged over the manufacturing process which included adding ammonia to the 'processed' meat.
The public needs to get outraged over this on-going hijacking of the word 'natural'.
You know those cautions some of our more knowledgeable wise-people keep suggesting about 'do not buy anything with ingredients which you can't pronounce or sound like chemicals'?
How about NSF-02, the name for the natural flavor modifier patented by PureCircle producer of PureVia™ ? Except you won't see that reference on the package ingredients list, you will see "natural flavors".
Companies like Merisant (owner of PureCircle), Coke and Cargill in concert with the FDA have created a whole new "natural" created in laboratories and natural in original source material only and who knows what else they introduced which is not natural but can still be called 'natural' because the FDA in using their fuzzy logic says they can. Remember the 'pink slime' is called natural and safe.
Read up on NSF-02 here
This is so different from a farmer or orchardist coming up with a hybrid of an edible (JohnnySeeds' "Partenon (F1) organic seed" which is a zucchini hybrid). F1 refers to a hybrid, and Johnny's carries organic and some non-organic seeds. FYI They signed on to the safe seed pledge to not knowing carry GMO seeds.
I think as consumers, if we have be told through labels and advertising something is natural and there are unrecognizable names on the ingredients IT AIN'T NATURAL!
If it does not say 'licorice or strawberry or vanilla' flavoring on it and only says "natural flavors" when describing a vanilla ice cream or cookie IT IS NOT NATURAL.
Here is a list of so-called Stevia products I deem UN-NATURAL*:
Truvia
Purevia
* a new to me product just came out within the last couple of months - name escapes me - but it too has "natural flavor" in the ingredients - be informed.
Sort of okay:
Stevia In The Raw (in addition to stevia uses dextrose - usually derived from corn - so my question is do they use GMO corn).
My Preference:
SweetLeaf -- contains stevia and inulin soluble fiber for bulk - inulin is one of the recommended fibers for health -- www.sweetleaf.com (I do not know where they get the vegetable fiber for the inulin, but they won an award from Vegetarian Times - so I think that kind of testimonial is worth a look/try.)
Let's be vocal and mindful in our both our concerns about where and how our food is sourced, but also always, always read the labels and make conscious good choices for ourselves and our family.
I am not a purist per se, it just about trying to, most of the time, make informed choices. Do I have guilty pleasures? Sure. I'm human and have been around long enough (quite awhile in fact) that I have seen the good stuff, the processed stuff, the realization of the need to ask questions about WHERE the food comes from, and a renewed focus on unintended consequences.
Convenience food always has consequences, whether the convenience is some-one-made-it-easy, to some-one-made-it, i.e, created out of a laboratory. In the least worse case, the food is nutritious, made of good stuff and you have to decide what to do with the packaging. In worst case, it has negative consequences on your health, environment, and community. Given the ongoing debate on health care and costs, there is a very radical concept being floated that people who continuously make unhealthy choices should pay more for health care -- chew on that for a while and ponder this generalized statement:
"Buying organic or natural food is too expensive." Someone posted that on facebook recently.
My Response:
$ cheap food
$$ to purchase mostly healthy food choices
$$$$ to purchase cheap/poor/manufactured food + supplements +doctor visits +medicine +hospital care, to compensate for the poor food.
-- Catherine, The Herb Lady
Wednesday, April 11, 2012


Sunday, April 01, 2012
Sunchokes Are Up!
Dear Folks,

Back on February 19th I planted Sunchokes (Jerusalem Artichoke, Helianthus tuberosus) after reading up more on its great nutrient values. A member of the sunflower family, and only a distant cousin of the globe artichoke (Cynara cardunculus var. scolymus), this plant is grown for its roots and not the unopened flower bud of the globe artichoke.
So now I have both 'aritchokes' growing in our gardens. The globe artichokes in fact are producing nicely now.
As I do with many edibles that I have not grown before I have planted the sunchokes in 3 different locations to see where they do best.
The top photo is in a pot, the next one is in an area we call the Meadow because it receives sun only in the middle 3-5 hours of the day, and the final photo is in a patch of parsley (with some Greek Oregano).
In the parsley patch I planted about 6-8 tubers, so far only one is "up" that we can tell. In the meadow and pot I planted a single tuber and both are doing very well.
You can read the "planting" post here for more info on why I decided to grow these.
I have two tubers left in my crisper and we are grilling today, so I'm going to give them a try on the grill - will let you know how they turn out.
Most information on growing sunchokes talks about how invasive they can be, which is why I chose the spots I did - so I can keep an eye on them :-) My plan is to harvest in late summer/early fall and see what kind of production I get. I am pleased that the tubers I purchased have good staying power in the crisper.
As a member of the sunflower family, you can plant the sunchokes in the same time frame as sunflowers -- February through June. I do know of a local farmer who is harvesting sunchokes now, so they would most likely have been planted in early - mid fall.
I purchased my chokes from Whole Foods, but if you are in the East Valley, you may wish to check out Love Grows for what they have available.
Gardening Tip:
You will notice with the sunchoke in the pot that there are several other plants growing. I planted strawberry spinach, a basil and a bell pepper. When I am planting something that is not a transplant, i.e., seed or tuber type plants, and I want to keep track of them AND remember to make sure they are watered properly I plant small plants to remind me there is something growing there. Competition for nutrients is seldom a problem, but I can always top off with more compost.
Have a great day in the garden,
-- Catherine, The Herb Lady

Back on February 19th I planted Sunchokes (Jerusalem Artichoke, Helianthus tuberosus) after reading up more on its great nutrient values. A member of the sunflower family, and only a distant cousin of the globe artichoke (Cynara cardunculus var. scolymus), this plant is grown for its roots and not the unopened flower bud of the globe artichoke.
So now I have both 'aritchokes' growing in our gardens. The globe artichokes in fact are producing nicely now.
As I do with many edibles that I have not grown before I have planted the sunchokes in 3 different locations to see where they do best.
The top photo is in a pot, the next one is in an area we call the Meadow because it receives sun only in the middle 3-5 hours of the day, and the final photo is in a patch of parsley (with some Greek Oregano).
In the parsley patch I planted about 6-8 tubers, so far only one is "up" that we can tell. In the meadow and pot I planted a single tuber and both are doing very well.
You can read the "planting" post here for more info on why I decided to grow these.
I have two tubers left in my crisper and we are grilling today, so I'm going to give them a try on the grill - will let you know how they turn out.
Most information on growing sunchokes talks about how invasive they can be, which is why I chose the spots I did - so I can keep an eye on them :-) My plan is to harvest in late summer/early fall and see what kind of production I get. I am pleased that the tubers I purchased have good staying power in the crisper.
As a member of the sunflower family, you can plant the sunchokes in the same time frame as sunflowers -- February through June. I do know of a local farmer who is harvesting sunchokes now, so they would most likely have been planted in early - mid fall.
I purchased my chokes from Whole Foods, but if you are in the East Valley, you may wish to check out Love Grows for what they have available.
Gardening Tip:
You will notice with the sunchoke in the pot that there are several other plants growing. I planted strawberry spinach, a basil and a bell pepper. When I am planting something that is not a transplant, i.e., seed or tuber type plants, and I want to keep track of them AND remember to make sure they are watered properly I plant small plants to remind me there is something growing there. Competition for nutrients is seldom a problem, but I can always top off with more compost.
Have a great day in the garden,
-- Catherine, The Herb Lady
Sunday, March 25, 2012
My Bread Recipe - Finally
Dear Folks,
For a couple of years I have been struggling to get a bread recipe that really worked for me without trying to win the Ms Universe title for biceps. I can't knead dough - too much achy joint issues. Buying a really good mixer with dough attachment is an option Deane said he would give me, but I really wanted to get something that was so easy for me, it would work for everyone.
I also wanted to use a sourdough starter to give extra flavor.
Some of my early attempts were tasty but wound up more like 'hardtact" rather than the fluffy / airy bread I was looking for. Having grown up on WonderBread and in more recent years falling in love with ciabatta - I wanted the best of all worlds, whole wheat with fluffy texture, able to take additions like herbs and cheese and still come out nutrient dense, tasty and passing the "Deane" test for hardiness (he did NOT grow up on WonderBread and considers it down there with rice cakes - totally unsatisfying).
So, as sometimes happens Deane gave me the probable answer to my quandary of why the bread would not rise properly no matter how much yeast I used etc. (I'm sure I was doing other things wrong also).
Potato!
Early bread makers used potato water to create yeast and also to make good tasting bread.
I'm not using the water -- a whole small potato (2 inches approx) peel and all grated into the mix.
This bread comes out as a very thick batter and you can add more flour to approach a very, very soft dough - but here is the great part - TRULY NO KNEADING! Done in under 3+ hours start to enjoying including rising. In the picture, the front 2 slices are the raisin/walnut bread and the back is the basic bread.
 The basic recipe is for a single loaf - at the end I give you the approximate ingredients to double it to make 2 loaves at a time. Personally the one loaf at a time suits us - just us two, but we share with neighbors. I use my toaster/over to bake so I don't heat up the whole kitchen and I can make a loaf quickly for variations (Deane likes raisins and walnuts). The last loaf I made had fresh rosemary and grated Parmesan in it.
My Bread Recipe
1 cup of starter*
1 2" potato, rinsed, but not peeled
1 cup of warm water
1 teaspoon yeast
3/4 teaspoon of salt (do not use kosher - sea or regular table salt is fine)
2 tablespoons of ground flax seed (you don't need this but I like the extra health/nutrient impact)
1 cup of flour (I use an organic "white" whole wheat -- it really is a whole wheat, just a lighter variety -- I will most frequently use 50/50 of this with organic all purpose flour)
1/4 cup of finely grated parmesan cheese (any hard cheese will work)
Optional: Any fresh or dried herb about a tablespoon or to taste
In a bowl, put starter. Grate the potato right into the starter. Add yeast and warm water and stir well. Add cheese, salt and flax seed (and herbs if using) and stir well. Add flour all at once and stir to make a thick batter. You can add more flour if you like.
Turn into a well oiled/sprayed loaf pan, cover and let rise. (I turn another loaf pan over - canted a little to let air in. It takes from 90 minutes to about 2 hours to rise to near the top of the pan.
Place on a tray, put 2 ice cubes on the tray and put in a cold oven. Set to 400 degrees (I use glass pans - if using metal increase temperature to 425) and set the timer for 45 minutes. When done the loaf should ring hollow when tapped. Turn out on a cooling rack. Enjoy.
Raisin Bread - with the extra moisture the next time I'm going to decrease the temperature to 375 and back for 55 minutes. The center was just a little extra moist than I thought it should be.
1/4 - 1/2 cup each raisins and nuts. Add to mix before you add the flour and stir well to mix.
*I have sometimes failed and sometimes succeed with starters before and this time I have what I think of as the best method. First I use the organic white whole wheat flour. I keep the starter in the frig. The day I want to make bread I take it out to warm up on the counter for an hour or two. Then I feed it, and take the 1 or 2 cups I need for the recipe. I let it sit on the counter for an hour to get going a little and then back into the frig until the next time. If you made bread every day or 2 you could certainly keep the starter on the counter.
To double the recipe:
2 cups starter
1/2 cup ground flax seed
1 1/2 teaspoons yeast
1 1/2 teaspoons salt
potato small to just a bit larger (you don't need to double the potato exactly)
1 cup of warm water
2 to 2 1/2 cups of flour (start with 2 cups and add more if you need to thicken the batter more)
Cheese
herbs
Follow directions above for 1 loaf. 2 loaf pans fit on my toaster oven tray side by side almost with room in the middle of the tray for a couple of ice cubes.
The ice cubes give a nice crust.
The potato is providing extra sugar / starch for the yeast to feed on.
Flax Seed - flax seed has to be ground to be properly digested by us humans. If you want to add other whole seeds give it a try or sprinkle on top of the batter before rising.
Rising and air bubbles. One of my loafs had a nice big air bubble in it when finished baking. I corrected this in the next loaf by using my wooden spoon handle to poke down through the batter about 15-30 minutes into rising, then let it finish rising. That seemed to take care of large air bubbles :-)
I hope you get a chance to try this recipe. Comment on what variations you come up with. My friend Kathy who gave me the original starter used rye flour one time with the starter. No reason not to try making rye bread, maybe with dill and caraway - yum.
Have a great week,
-- Catherine, The Herb Lady
For a couple of years I have been struggling to get a bread recipe that really worked for me without trying to win the Ms Universe title for biceps. I can't knead dough - too much achy joint issues. Buying a really good mixer with dough attachment is an option Deane said he would give me, but I really wanted to get something that was so easy for me, it would work for everyone.
I also wanted to use a sourdough starter to give extra flavor.
Some of my early attempts were tasty but wound up more like 'hardtact" rather than the fluffy / airy bread I was looking for. Having grown up on WonderBread and in more recent years falling in love with ciabatta - I wanted the best of all worlds, whole wheat with fluffy texture, able to take additions like herbs and cheese and still come out nutrient dense, tasty and passing the "Deane" test for hardiness (he did NOT grow up on WonderBread and considers it down there with rice cakes - totally unsatisfying).
So, as sometimes happens Deane gave me the probable answer to my quandary of why the bread would not rise properly no matter how much yeast I used etc. (I'm sure I was doing other things wrong also).
Potato!
Early bread makers used potato water to create yeast and also to make good tasting bread.
I'm not using the water -- a whole small potato (2 inches approx) peel and all grated into the mix.
This bread comes out as a very thick batter and you can add more flour to approach a very, very soft dough - but here is the great part - TRULY NO KNEADING! Done in under 3+ hours start to enjoying including rising. In the picture, the front 2 slices are the raisin/walnut bread and the back is the basic bread.
 The basic recipe is for a single loaf - at the end I give you the approximate ingredients to double it to make 2 loaves at a time. Personally the one loaf at a time suits us - just us two, but we share with neighbors. I use my toaster/over to bake so I don't heat up the whole kitchen and I can make a loaf quickly for variations (Deane likes raisins and walnuts). The last loaf I made had fresh rosemary and grated Parmesan in it.
My Bread Recipe
1 cup of starter*
1 2" potato, rinsed, but not peeled
1 cup of warm water
1 teaspoon yeast
3/4 teaspoon of salt (do not use kosher - sea or regular table salt is fine)
2 tablespoons of ground flax seed (you don't need this but I like the extra health/nutrient impact)
1 cup of flour (I use an organic "white" whole wheat -- it really is a whole wheat, just a lighter variety -- I will most frequently use 50/50 of this with organic all purpose flour)
1/4 cup of finely grated parmesan cheese (any hard cheese will work)
Optional: Any fresh or dried herb about a tablespoon or to taste
In a bowl, put starter. Grate the potato right into the starter. Add yeast and warm water and stir well. Add cheese, salt and flax seed (and herbs if using) and stir well. Add flour all at once and stir to make a thick batter. You can add more flour if you like.
Turn into a well oiled/sprayed loaf pan, cover and let rise. (I turn another loaf pan over - canted a little to let air in. It takes from 90 minutes to about 2 hours to rise to near the top of the pan.
Place on a tray, put 2 ice cubes on the tray and put in a cold oven. Set to 400 degrees (I use glass pans - if using metal increase temperature to 425) and set the timer for 45 minutes. When done the loaf should ring hollow when tapped. Turn out on a cooling rack. Enjoy.
Raisin Bread - with the extra moisture the next time I'm going to decrease the temperature to 375 and back for 55 minutes. The center was just a little extra moist than I thought it should be.
1/4 - 1/2 cup each raisins and nuts. Add to mix before you add the flour and stir well to mix.
*I have sometimes failed and sometimes succeed with starters before and this time I have what I think of as the best method. First I use the organic white whole wheat flour. I keep the starter in the frig. The day I want to make bread I take it out to warm up on the counter for an hour or two. Then I feed it, and take the 1 or 2 cups I need for the recipe. I let it sit on the counter for an hour to get going a little and then back into the frig until the next time. If you made bread every day or 2 you could certainly keep the starter on the counter.
To double the recipe:
2 cups starter
1/2 cup ground flax seed
1 1/2 teaspoons yeast
1 1/2 teaspoons salt
potato small to just a bit larger (you don't need to double the potato exactly)
1 cup of warm water
2 to 2 1/2 cups of flour (start with 2 cups and add more if you need to thicken the batter more)
Cheese
herbs
Follow directions above for 1 loaf. 2 loaf pans fit on my toaster oven tray side by side almost with room in the middle of the tray for a couple of ice cubes.
The ice cubes give a nice crust.
The potato is providing extra sugar / starch for the yeast to feed on.
Flax Seed - flax seed has to be ground to be properly digested by us humans. If you want to add other whole seeds give it a try or sprinkle on top of the batter before rising.
Rising and air bubbles. One of my loafs had a nice big air bubble in it when finished baking. I corrected this in the next loaf by using my wooden spoon handle to poke down through the batter about 15-30 minutes into rising, then let it finish rising. That seemed to take care of large air bubbles :-)
I hope you get a chance to try this recipe. Comment on what variations you come up with. My friend Kathy who gave me the original starter used rye flour one time with the starter. No reason not to try making rye bread, maybe with dill and caraway - yum.
Have a great week,
-- Catherine, The Herb Lady
Sunday, March 18, 2012
In the Garden and the Finished Corned Beef
Dear Folks,
 What's growing in our front yard? An Artichoke! Along with a lot of ornamentals and some edible additions I have been slowly adding over the last couple of years -- including this transplanted artichoke last fall.
We have the main plants in the back edible gardens, but this is the first artichoke of the year.
Later in the season I let the last of the artichokes go to flower because they are just flat out gorgeous. The plant slowly dies back during the summer and sends out new 'pups' in the fall to be left alone or transplanted elsewhere. Did you know artichoke hearts are in the top 10 antioxidant foods? Great stuff.
 On March 6th, getting ready to go to my relatives to stay with her for her second routine surgery, I harvested from the garden to take with me. Asparagus, sugar peas, white and red alpine strawberries, blood and navel oranges and pink grapefruit. This is why I garden with edibles. Oh boy!

On March 6th I posted about my decision to do my own "corning" for our St. Patrick's Day dinner of Corned Beef and Cabbage. Click here for the post
I have been wanting to do this for several years after Martha Stewart showed how she did it. My timing simply did not work until this year - you have to allow a couple of weeks for the process. Check that first post for the explanation and origin of "corning" actually a brining/pickling process for inexpensive cuts of meat and also preserving.
First - it turned out great! The verdict is in from my meat and potatoes guy and myself - absolutely the way to go! When you are used to a commercial taste of something, it is always a challenge to recreate the taste when you want a healthier alternative. This home-corned beef was a tasty as the commercial kind and Deane even liked that he could taste the individual spices giving it a more complex flavor. It was not too salty and just as tender as the commercial product.
As a taste comparison I purchased a commercial corned beef to cook separately from mine.
The Picture at the right shows the cut up vegetables and the two types of meat. You will see in my notes below the explanation of why my beef (on the right) is NOT pink and that is a good thing :-) The plate in the first frame shows the three spices I added to the cooking (not brining) part. Conehead thyme, some of my dried bay leaves and some black peppercorns.
The last frame shows the cooked meats, mine on the left this time and the commercial product on the right.
CORNING BEEF
My first experiment with corning beef for St. Patrick's Day (2012).
Note: Traditionally corned beef (actually a pickling/brining process) uses saltpeter, sodium nitrate or "pink salt" to maintain the pinkish color. Since I'm doing my own corning I wanted to control the ingredients and did not want to add nitrates to the meat. Therefore the cooked meat is more un-browned steak in color. We did not find that unappealing.
1 1/2 pounds of grass-fed beef brisket (Red Mountain Cattle Company)
1 teaspoon each mustard seed, coriander see and black peppercorns
1 small stick of cinnamon
2 bay leaves, broken
1/4 cup of organic sugar
1/2 cup of kosher salt
about 3 cups of water
1 non-reactive dish or pan large enough to hold the piece of meat plus liquid
1-2 glass dishes or plates to weigh down the meat (some say any plate, but I did not want any un-glazed china to be in contact with the meat)
1 glass cover or plastic wrap
1 tray large enough to hold the dish to contain any spills
Grind the seeds and peppercorns to a coarse ground, grind the cinnamon just to break up.
Dissolve sugar and salt in water. If boiling to do this, let cool before proceeding.
Pierce the meat multiple times on one side to infuse more flavor.
Place meat in the dish, rub spices over one side. Use brine to completely cover the meat. Add dishes or plates to weigh down and cover all. The meat MUST be completely covered at all times.
Place on tray and refrigerate for 2 weeks. You can turn the meat once part way through but it is not necessary. Re-check periodically to make sure the meat continues to be completely covered.
I did not use all the brine and thought I would not, which is why I added the spices first to the meat.
Cooking.
Drain but DO NOT rinse the meat the day you want to cook it.
Traditional Corned Beef, Vegetables and Cabbage in a crock pot.
Onion
Potatoes
Carrots
Cabbage
3 sprigs of thyme (I used conehead)
2 bay leaves
1/2 teaspoon black peppercorns
Corned Meat
In a crock pot, place rinsed and coarsely cut onion, potatoes and carrots. (I used small red -unpeeled potatoes and a variety of heirloom carrots.)
Place the herbs and peppercorns on top of the vegetables, add meat and just cover with water, the meat will try to float, so do not over-add water.
Cover and turn on low for 8 hours. Test a piece of meat for tenderness. 8-9 hours is typical for cooking time. Add hot water if too much evaporates before finished. Remove meat and keep warm. Turn heat to high and add cabbage quarters and cook for 30 minutes.
Serve and enjoy your own corned beef.
Meat Options: The brisket from Red Mountain had almost no fat on it, compared to commercial briskets. However, the next time I make this I am going to try a round steak or round roast for a little more tender cut of meat. I may need to reduce the cooking time to compensate for that.
Crock Pot vs. Stove Top.
I like to use a crock pot for this kind of cooking and I had a lecture the day of, so it worked out great for me. You can certainly do this on the stove top, simmering everything for about 4 hours give or take. Just test for tenderness before adding cabbage in the final 20-30 minutes (depends on how crispy you like your cabbage).
Have fun with your bounty!
-- Catherine, The Herb Lady
For beginner gardening help or ideas for using edibles in the kitchen, check out my books:
"Edible Landscaping In the Desert Southwest: Wheelbarrow to Plate"
"101+ Recipes From The Herb Lady"
Available through my publisher or Amazon, Barnes & Noble or your favorite bookseller can order it for you.

We have the main plants in the back edible gardens, but this is the first artichoke of the year.
Later in the season I let the last of the artichokes go to flower because they are just flat out gorgeous. The plant slowly dies back during the summer and sends out new 'pups' in the fall to be left alone or transplanted elsewhere. Did you know artichoke hearts are in the top 10 antioxidant foods? Great stuff.
 On March 6th, getting ready to go to my relatives to stay with her for her second routine surgery, I harvested from the garden to take with me. Asparagus, sugar peas, white and red alpine strawberries, blood and navel oranges and pink grapefruit. This is why I garden with edibles. Oh boy!
On March 6th I posted about my decision to do my own "corning" for our St. Patrick's Day dinner of Corned Beef and Cabbage. Click here for the post
I have been wanting to do this for several years after Martha Stewart showed how she did it. My timing simply did not work until this year - you have to allow a couple of weeks for the process. Check that first post for the explanation and origin of "corning" actually a brining/pickling process for inexpensive cuts of meat and also preserving.
First - it turned out great! The verdict is in from my meat and potatoes guy and myself - absolutely the way to go! When you are used to a commercial taste of something, it is always a challenge to recreate the taste when you want a healthier alternative. This home-corned beef was a tasty as the commercial kind and Deane even liked that he could taste the individual spices giving it a more complex flavor. It was not too salty and just as tender as the commercial product.
As a taste comparison I purchased a commercial corned beef to cook separately from mine.
The Picture at the right shows the cut up vegetables and the two types of meat. You will see in my notes below the explanation of why my beef (on the right) is NOT pink and that is a good thing :-) The plate in the first frame shows the three spices I added to the cooking (not brining) part. Conehead thyme, some of my dried bay leaves and some black peppercorns.
The last frame shows the cooked meats, mine on the left this time and the commercial product on the right.
My first experiment with corning beef for St. Patrick's Day (2012).
Note: Traditionally corned beef (actually a pickling/brining process) uses saltpeter, sodium nitrate or "pink salt" to maintain the pinkish color. Since I'm doing my own corning I wanted to control the ingredients and did not want to add nitrates to the meat. Therefore the cooked meat is more un-browned steak in color. We did not find that unappealing.
1 1/2 pounds of grass-fed beef brisket (Red Mountain Cattle Company)
1 teaspoon each mustard seed, coriander see and black peppercorns
1 small stick of cinnamon
2 bay leaves, broken
1/4 cup of organic sugar
1/2 cup of kosher salt
about 3 cups of water
1 non-reactive dish or pan large enough to hold the piece of meat plus liquid
1-2 glass dishes or plates to weigh down the meat (some say any plate, but I did not want any un-glazed china to be in contact with the meat)
1 glass cover or plastic wrap
1 tray large enough to hold the dish to contain any spills
Grind the seeds and peppercorns to a coarse ground, grind the cinnamon just to break up.
Dissolve sugar and salt in water. If boiling to do this, let cool before proceeding.
Pierce the meat multiple times on one side to infuse more flavor.
Place meat in the dish, rub spices over one side. Use brine to completely cover the meat. Add dishes or plates to weigh down and cover all. The meat MUST be completely covered at all times.
Place on tray and refrigerate for 2 weeks. You can turn the meat once part way through but it is not necessary. Re-check periodically to make sure the meat continues to be completely covered.
I did not use all the brine and thought I would not, which is why I added the spices first to the meat.
Cooking.
Drain but DO NOT rinse the meat the day you want to cook it.
Traditional Corned Beef, Vegetables and Cabbage in a crock pot.
Onion
Potatoes
Carrots
Cabbage
3 sprigs of thyme (I used conehead)
2 bay leaves
1/2 teaspoon black peppercorns
Corned Meat
In a crock pot, place rinsed and coarsely cut onion, potatoes and carrots. (I used small red -unpeeled potatoes and a variety of heirloom carrots.)
Place the herbs and peppercorns on top of the vegetables, add meat and just cover with water, the meat will try to float, so do not over-add water.
Cover and turn on low for 8 hours. Test a piece of meat for tenderness. 8-9 hours is typical for cooking time. Add hot water if too much evaporates before finished. Remove meat and keep warm. Turn heat to high and add cabbage quarters and cook for 30 minutes.
Serve and enjoy your own corned beef.
Meat Options: The brisket from Red Mountain had almost no fat on it, compared to commercial briskets. However, the next time I make this I am going to try a round steak or round roast for a little more tender cut of meat. I may need to reduce the cooking time to compensate for that.
Crock Pot vs. Stove Top.
I like to use a crock pot for this kind of cooking and I had a lecture the day of, so it worked out great for me. You can certainly do this on the stove top, simmering everything for about 4 hours give or take. Just test for tenderness before adding cabbage in the final 20-30 minutes (depends on how crispy you like your cabbage).
Have fun with your bounty!
-- Catherine, The Herb Lady
For beginner gardening help or ideas for using edibles in the kitchen, check out my books:
"Edible Landscaping In the Desert Southwest: Wheelbarrow to Plate"
"101+ Recipes From The Herb Lady"
Available through my publisher or Amazon, Barnes & Noble or your favorite bookseller can order it for you.
Wednesday, March 14, 2012
Greening - Advertising's Illusion - Re-Visited
Dear Folks,
A comment from a reader got me looking at a blog post I did January 3, this year.
Greening-Advertising's Illusion of Information
In that I discussed how the words and information 'seemingly' imparted to the consumer were sometimes a lot about what they left out.
An anonymous reader commented: I have read an article about fructose and it's not good. According to the article it can be the causes of obesity, heart diseases, liver diseases and insulin resistance.
Since Anonymous made reference to fructose and not High Fructose Corn Syrup, I went to wikipedia for some clarification on sugars.
Fructose by wikpedia
This is an excellent and scientifically approached discussion.
Some points:
Fructose - fruit sugar - (not HFCS) occurs naturally in fruits, honey and other plant types.
Sucrose (table sugar from plants like sugar cane and sugar beets) is also a plant sugar - commercially the typical white table sugar goes through a process to reduce the original plant juice to crystal, then refined to make it white - organic sugar (I personally use this) is the least refined of table sugars. Sucrose is a natural combination of fructose and glucose.
High Fructose Corn Syrup is a manufactured (lab) created sweetener (and is very different from original corn syrup). HFCS winds up with a chemical composition similar to sucrose but which behaves differently in the body.
Pure fructose has a low glycemic index (good for diabetics) because it has to be processed almost entirely by the liver first.
Sucrose is partially processed by the liver but primarily processed through the stomach which is why it is bad for diabetics - it reaches the blood too quickly.
HFCS has a structure similar to sucrose, but chemically it behaves differently when metabolized in the body.
While some of the earlier reports on HFCS effects on ghrelin and leptin levels (those amino acids which trigger urges like eat / satiety) have been revised, the one glaring point in the wikipedia article is on the fact that HFCS has to be mostly processed through the liver first.
all fructose must be metabolized in the liver. The livers of the rats on the high-fructose diet looked like the livers of alcoholics, plugged with fat and cirrhotic AND Excessive fructose consumption is also believed to contribute to the development of non-alcoholic fatty liver disease.
With all the work our livers have to do in our processed food lives do we really need to consume things that make the liver really sick?
Besides making wiser choices in the foods you buy and consume, consider adding a member from the broccoli family every day to your dinner plate -- it aids the health of the liver. Broccoli is consider one of the best examples, but radishes, kale and cabbage are also great - your liver will be grateful :-)
-- Catherine, The Herb Lady
A comment from a reader got me looking at a blog post I did January 3, this year.
Greening-Advertising's Illusion of Information
In that I discussed how the words and information 'seemingly' imparted to the consumer were sometimes a lot about what they left out.
An anonymous reader commented: I have read an article about fructose and it's not good. According to the article it can be the causes of obesity, heart diseases, liver diseases and insulin resistance.
Since Anonymous made reference to fructose and not High Fructose Corn Syrup, I went to wikipedia for some clarification on sugars.
Fructose by wikpedia
This is an excellent and scientifically approached discussion.
Some points:
Fructose - fruit sugar - (not HFCS) occurs naturally in fruits, honey and other plant types.
Sucrose (table sugar from plants like sugar cane and sugar beets) is also a plant sugar - commercially the typical white table sugar goes through a process to reduce the original plant juice to crystal, then refined to make it white - organic sugar (I personally use this) is the least refined of table sugars. Sucrose is a natural combination of fructose and glucose.
High Fructose Corn Syrup is a manufactured (lab) created sweetener (and is very different from original corn syrup). HFCS winds up with a chemical composition similar to sucrose but which behaves differently in the body.
Pure fructose has a low glycemic index (good for diabetics) because it has to be processed almost entirely by the liver first.
Sucrose is partially processed by the liver but primarily processed through the stomach which is why it is bad for diabetics - it reaches the blood too quickly.
HFCS has a structure similar to sucrose, but chemically it behaves differently when metabolized in the body.
While some of the earlier reports on HFCS effects on ghrelin and leptin levels (those amino acids which trigger urges like eat / satiety) have been revised, the one glaring point in the wikipedia article is on the fact that HFCS has to be mostly processed through the liver first.
all fructose must be metabolized in the liver. The livers of the rats on the high-fructose diet looked like the livers of alcoholics, plugged with fat and cirrhotic AND Excessive fructose consumption is also believed to contribute to the development of non-alcoholic fatty liver disease.
With all the work our livers have to do in our processed food lives do we really need to consume things that make the liver really sick?
Besides making wiser choices in the foods you buy and consume, consider adding a member from the broccoli family every day to your dinner plate -- it aids the health of the liver. Broccoli is consider one of the best examples, but radishes, kale and cabbage are also great - your liver will be grateful :-)
-- Catherine, The Herb Lady
Tuesday, March 06, 2012
In the Garden and Corning Beef
Dear Folks,
 Asparagus up and we are harvesting daily; kale up in the pot project; and corning beef.
Our asparagus bed has been going long enough that we can enjoy about 6 weeks of harvesting. The first official harvest was February 26th, and Deane also took a shot of the bed. Once they get going they can grow several inches in a day. We usually harvest in the afternoon and try to catch them at about 8-10 inches cutting off at the soil level. Any taller and most of the lower portion is too woody for straight eating or sauteing - although perfectly usable for making soups as they cook down well. In the picture you see green and purple. The purple variety tends to put out really thick stems. The older the roots the more robust the growth.
Asparagus straight from the garden is sweet - reminds me of corn in that just cut from the plant the ears of corn are sweet enough to eat raw.
 In my project of illustrating the concept of container gardening the next photo shows the kale coming up. Just to left is one of the sugar peas taking off and doing well. On the other side of the pot, not shown, one radish seed came up. Many of the violas planted have died back as the edges dry out far quicker than the center of the pot (one of the points I try to keep pointing out to gardeners).
Got to the original post to view the slide-show video and explanation. click here.
I will be posting updates on how the pot project goes along - the goal is to have tomatoes, squash, sugar peas and subsequent edibles available. The questions to be answered are: does it work; how much is usable; cost ratio and related issues. Stay tuned :-)

Next is a recipe of sorts. With St. Patrick's Day coming up and the fact that Deane and I love corned beef, I looked into 'corning' my own beef (actually from the farmers market rancher) for a couple of years and finally this year I had the timing right to get it started.
So why bother? Well, if you are like most folks who shop for corned beef, some of it is really fatty. That is point one. Point two is what the heck is in commercial corned beef?
Let me explain the origin of the word and recipe. Corning is a type of pickling in a salt brine with or without herbs and spices. "Corn" comes from and Old English reference to the large pieces of kosher-type salt ("which is used to describe any small hard particles or grains." -- Wikipedia -- so corning something was the process of curing meat. In typical commercial recipes potassium nitrate (saltpeter) or sodium nitrite is used to preserve the beef's pink color. Sample recipes on the internet also call for either of those - sometimes using the term "pink salt." I really wanted to NOT use either of them and asked Deane if he minded if the result was not pink and he said as long as it tasted good he did not care, it is going to be cooked with cabbage and potatoes anyway.
I will post the completed recipe when the whole meal is finished after St. Patrick's Day.
Like many old fashioned recipes corning came about as a method to preserve food and also make good use of cheap (tough) cuts of meat. Also, like many old time recipes that were a sort of 'peasant' food it has become an enormously popular meal in America.
A couple of points if you want to go look for a recipe to try yourself.
1) The herbs and spices are not necessary but add extra flavor.
2) The meat has to be brined completely covered in the liquid - which usually requires weighing it down with a plate.
3) The container and plate must be NON-reactive
4) It must be refrigerated. In olden days it was done in a crock and kept in a cool dark place.
5) Some recipes suggest to make absolutely sure you have a salty enough brine you place a whole fresh egg (in-shell) in the brine before proceeding - if it does not float - it is not salty enough. The Salt is the keep to the preservation.
6) Brining time is shown as anywhere from 5 days to 2 weeks. Longer is simply saltier.
I am going to brine mine for 2 weeks, and as I have a lecture scheduled for St. Patrick's Day morning, I will be doing the dinner in a crock pot.
One last point. While the recipe usually calls for the cheap brisket cut, you can certainly - and I intend to also - try a nicer cut of meat the next time to get that nice flavor. Left over sandwiches here we come!
My Lecture:
The BTA's annual Spring Sale is March 10 - 25 (Friday March 9th is a special preview discounted sale for members - consider becoming a member and supporting this wonderful garden/museum). My lecture is March 17th, 10:30 - Noon - free with admission - I will be presenting on successful gardening in the desert.
http://ag.arizona.edu/bta/events.html

And one more photo of the reclaimed mint bed. This shows the sugar peas and corn planted Feb 1st and 4th respectively on February 26th doing very well.
I am looking forward to more of the delicious peas (our 3 other mature sugar pea plants are giving us about 1-2 cups of pods per week and are just great to snack on raw and I use them a lot in pasta primavera recipes. Yesterday (March 6th) I planted two varieties of bush beans which should get going about the time the peas may get knocked out by the heat.
I am off to a relatives to stay with her while she has routine surgery. Back next week.
Have a great time in the garden and kitchen.
-- Catherine, The Herb Lady
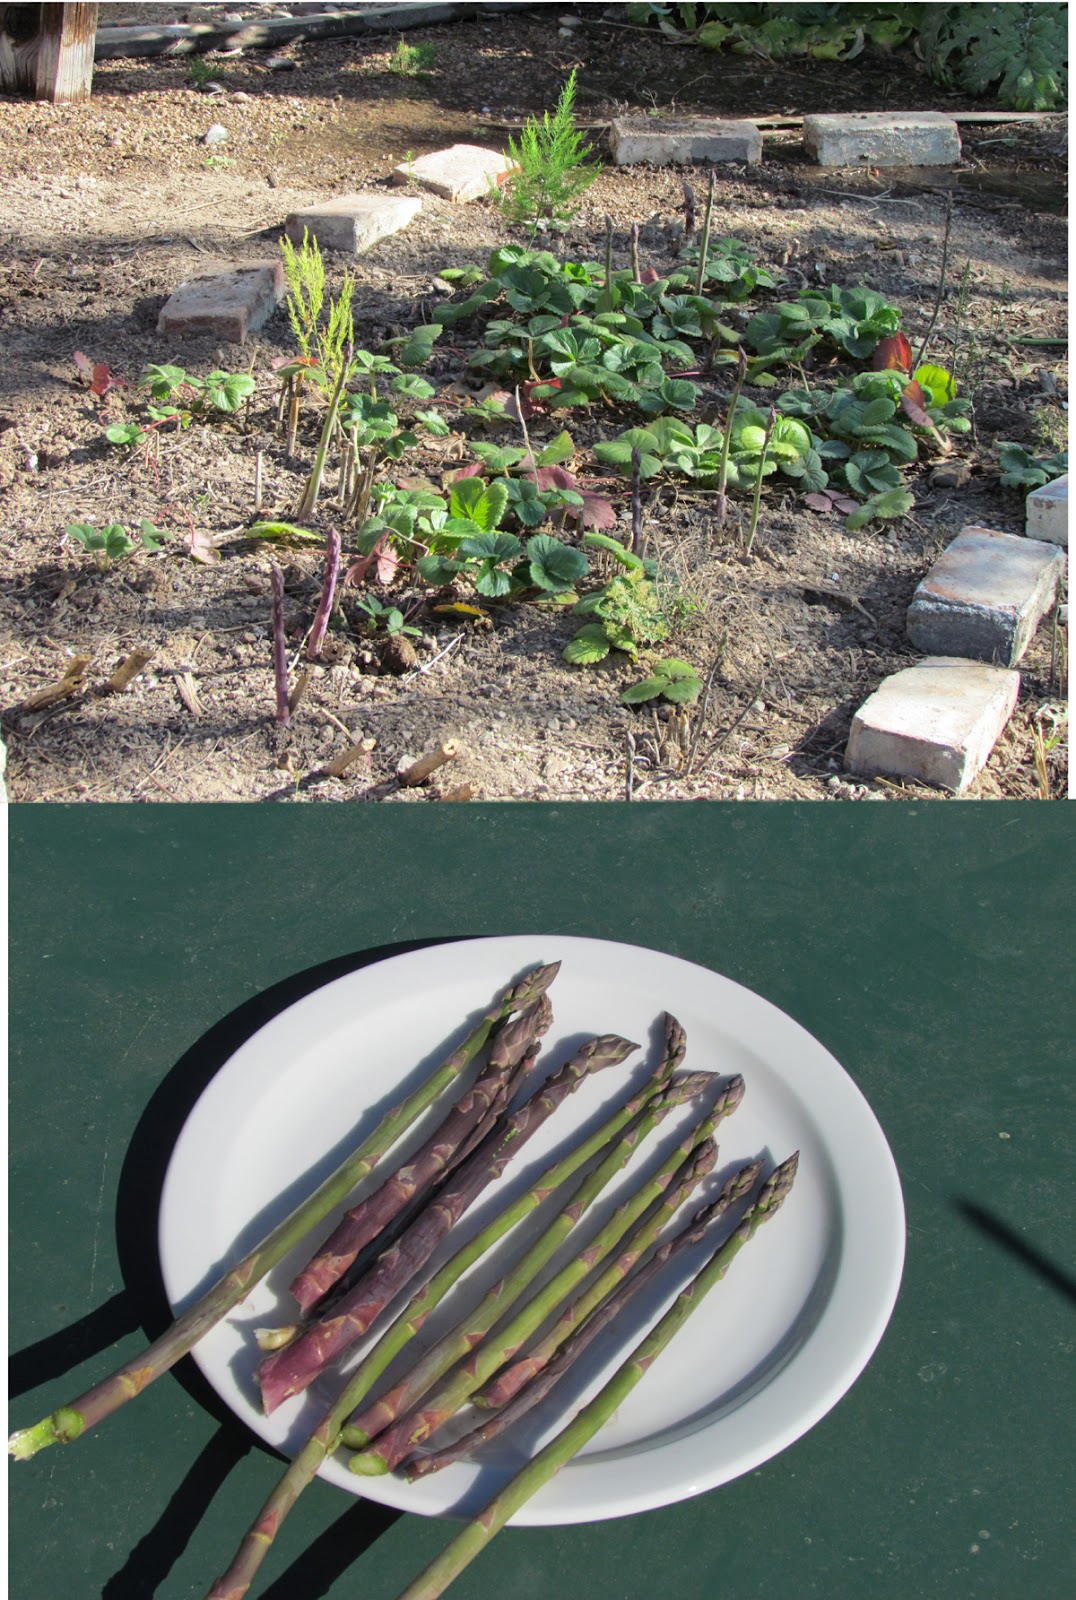 Asparagus up and we are harvesting daily; kale up in the pot project; and corning beef.
Our asparagus bed has been going long enough that we can enjoy about 6 weeks of harvesting. The first official harvest was February 26th, and Deane also took a shot of the bed. Once they get going they can grow several inches in a day. We usually harvest in the afternoon and try to catch them at about 8-10 inches cutting off at the soil level. Any taller and most of the lower portion is too woody for straight eating or sauteing - although perfectly usable for making soups as they cook down well. In the picture you see green and purple. The purple variety tends to put out really thick stems. The older the roots the more robust the growth.
Asparagus straight from the garden is sweet - reminds me of corn in that just cut from the plant the ears of corn are sweet enough to eat raw.

Got to the original post to view the slide-show video and explanation. click here.
I will be posting updates on how the pot project goes along - the goal is to have tomatoes, squash, sugar peas and subsequent edibles available. The questions to be answered are: does it work; how much is usable; cost ratio and related issues. Stay tuned :-)

Next is a recipe of sorts. With St. Patrick's Day coming up and the fact that Deane and I love corned beef, I looked into 'corning' my own beef (actually from the farmers market rancher) for a couple of years and finally this year I had the timing right to get it started.
So why bother? Well, if you are like most folks who shop for corned beef, some of it is really fatty. That is point one. Point two is what the heck is in commercial corned beef?
Let me explain the origin of the word and recipe. Corning is a type of pickling in a salt brine with or without herbs and spices. "Corn" comes from and Old English reference to the large pieces of kosher-type salt ("which is used to describe any small hard particles or grains." -- Wikipedia -- so corning something was the process of curing meat. In typical commercial recipes potassium nitrate (saltpeter) or sodium nitrite is used to preserve the beef's pink color. Sample recipes on the internet also call for either of those - sometimes using the term "pink salt." I really wanted to NOT use either of them and asked Deane if he minded if the result was not pink and he said as long as it tasted good he did not care, it is going to be cooked with cabbage and potatoes anyway.
I will post the completed recipe when the whole meal is finished after St. Patrick's Day.
Like many old fashioned recipes corning came about as a method to preserve food and also make good use of cheap (tough) cuts of meat. Also, like many old time recipes that were a sort of 'peasant' food it has become an enormously popular meal in America.
A couple of points if you want to go look for a recipe to try yourself.
1) The herbs and spices are not necessary but add extra flavor.
2) The meat has to be brined completely covered in the liquid - which usually requires weighing it down with a plate.
3) The container and plate must be NON-reactive
4) It must be refrigerated. In olden days it was done in a crock and kept in a cool dark place.
5) Some recipes suggest to make absolutely sure you have a salty enough brine you place a whole fresh egg (in-shell) in the brine before proceeding - if it does not float - it is not salty enough. The Salt is the keep to the preservation.
6) Brining time is shown as anywhere from 5 days to 2 weeks. Longer is simply saltier.
I am going to brine mine for 2 weeks, and as I have a lecture scheduled for St. Patrick's Day morning, I will be doing the dinner in a crock pot.
One last point. While the recipe usually calls for the cheap brisket cut, you can certainly - and I intend to also - try a nicer cut of meat the next time to get that nice flavor. Left over sandwiches here we come!
My Lecture:
The BTA's annual Spring Sale is March 10 - 25 (Friday March 9th is a special preview discounted sale for members - consider becoming a member and supporting this wonderful garden/museum). My lecture is March 17th, 10:30 - Noon - free with admission - I will be presenting on successful gardening in the desert.
http://ag.arizona.edu/bta/events.html

And one more photo of the reclaimed mint bed. This shows the sugar peas and corn planted Feb 1st and 4th respectively on February 26th doing very well.
I am looking forward to more of the delicious peas (our 3 other mature sugar pea plants are giving us about 1-2 cups of pods per week and are just great to snack on raw and I use them a lot in pasta primavera recipes. Yesterday (March 6th) I planted two varieties of bush beans which should get going about the time the peas may get knocked out by the heat.
I am off to a relatives to stay with her while she has routine surgery. Back next week.
Have a great time in the garden and kitchen.
-- Catherine, The Herb Lady
Monday, February 20, 2012
Sunchokes and what is happening in the garden

Dear Folks,
Thought I would visually catch you up on garden activity.
First up is an updated (day 18) on the new garden bed reclaimed from a mint monster. One of the crook neck squash plants collapsed. Not sure why, you can see the other looks good and so does the lettuce. Not shown, I transplanted another nearby and am leaving the other one in, in case it decides to revive.
You can read the original blog post on this new bed at this link.

Click here for the original recipe post.
Some extra edible ideas for these great cool weather lovers. The immature seed is a burst of horseradish flavor. suitable for making dressings and mustard/horseradish type sauces. Just do not over do it.
If you like the idea of the stuffed leaves, consider stuffing the flowers also. Very pretty. Both the flowers and leaves can be shredded into salads or folded into mashed potatoes for their nice peppery bite.
And my newest garden experiment is Sunchokes, Jerusalem Artichokes -- a member of the sunflower family - not the artichoke family (Helianthus tuberosus).

They can be eaten raw or cooked. I will be researching some fun recipes to try and write about. For the time being I saved out some to shave raw into a salad tonight and I'm also going to roast a couple with some onion and try them that way. I will let you know how they turned out. The raw taste is nice: Crunchy, slightly sweet, close to a jicama taste and crunch by lighter.
So one ONE MORE plant? As I like to explain to folks if I eat it or drink it I want to try growing it here in the garden. The more healthy, multi-tasking edibles in our gardens the better for us and hopefully for you to also try.
Some facts about the Sunchokes.
As a member of the sunflower you can expect a tall 5-7+ feet plant with sunny wild type flower heads. A perennial repeater that means it will grow, produce more under-ground tubers, flower, seed and then die back. Reportedly if it is happy in your garden it can be invasive, so my plan and recommendation to you is to harvest ALL the tubers in the fall, then replant what and where you want them, rather than let them run amok - I have been there with plants and it is not a good idea :-)
Because they are very high in the fiber Inulin as opposed to carbohydrates, they are very healthy alternatives to potatoes (although do not drop potatoes from your diet they are good for you also, particularly the colored ones and if you leave the skins on them).
At 110 calories per cup, their high nutrient density including potassium is particularly noted. The wikipedia link below has complete nutrient content info.
You can read up more at the wikipedia site.
If you have a nice sunny, well draining spot in the garden, consider adding this tuber to your garden.
In addition to the in-ground spot I chose for mine I am also trying out a single tuber in a large pot, and will track that progress for you.
Have a great week,
Catherine, The Herb Lady
Wednesday, February 15, 2012
Farmers Market/Garden Beef Stew
Dear folks,
 I made my version of Beef Burgundy yesterday for our Valentine's Day dinner (Deane is your basic meat and potatoes guy who will try a lot of things, but I try to give him a 'guy' dinner when I can :-)
This stew came together so nicely with a selection of herbs from my garden (I am The Herb Lady :-) and meat, potatoes and carrots from the Mesa Farmers Market - also some additional carrots from my garden.
About the herbs. From left to right, sort of, are red celery (see my post yesterday about this variety), red scallion, green garlic, lavender, conehead thyme, golden rain rosemary, and flat-leaf parsley..
Since yesterday turned out to be a dismal day, stew was the perfect dinner for the day.
Some of the vendors I got ingredients from were:
Funny Farms
Chic-a-bee
Crooked Sky
Red Mountain Cattle (grass fed beef)
One Windmill
And we finished off dinner with Nicki (Cup Cake Cafe) chocolate cake pops - oh my!!
MY BEEF BURGUNDY
 One of the wonderful things about stews is the ability to just wing-it with proportions. Deane loves carrots so more carrots than potatoes. I did this in a crock pot, so we could do some errands in the morning (one of those domestic realities - it is Valentine's Day, so we went shopping for things like paper towels, and some staple food items :-)
Stewing beef 1-4 pounds
1 cup of beef broth
2 tablespoons of red wine vinegar
5 red potatoes
7 medium size carrots
bottle of red wine (I used a Malbec - in the past I have used burgundy, Shiraz, and I would use an Italian Chianti or Valpolicella too)
flour
1/2 teaspoon peppercorns
pinch of sea salt
1 tablespoon olive oil
1 tablespoon butter
1 each scallion and green garlic
small bunch each of parsley and celery leaves
1 sprig each rosemary, lavender and thyme
Chop carrots and potatoes into good size chunks.
Rinse meat, place in a bowl and sprinkle with enough flour to coat each piece. Don't rinse bowl.
Melt butter and oil together in a good size skillet and brown meat on all sides. Set meat aside. Deglaze pan with broth or wine, scraping up all and pour into the crock pot. Add wine or some of the broth to the flour used to dredge the meat, stir and set aside for thickening later.
Tie herbs in a bundle or push all down one side of the pot, place meat in bottom and add potatoes and carrots. Add remainder of broth, all the vinegar and enough red wine to just cover. Add peppercorns.
Turn crock pot on high for 1 hour, the reduce to low temperature and cook for about 6-7 hours more. Beef should be fork tender.
Stir up reserved flour/wine mixture, add more flour and wine or broth as needed to make a slurry for thickening. Ladle some of the stew liquid into a pot, bring to a boil and add slurry. Stir until thick and add back into the crock pot. Stir and serve with rolls, a salad if you like and enjoy!
Then have the cake pops!!
Have a great day,
-- Catherine, The Herb Lady
 I made my version of Beef Burgundy yesterday for our Valentine's Day dinner (Deane is your basic meat and potatoes guy who will try a lot of things, but I try to give him a 'guy' dinner when I can :-)
This stew came together so nicely with a selection of herbs from my garden (I am The Herb Lady :-) and meat, potatoes and carrots from the Mesa Farmers Market - also some additional carrots from my garden.
About the herbs. From left to right, sort of, are red celery (see my post yesterday about this variety), red scallion, green garlic, lavender, conehead thyme, golden rain rosemary, and flat-leaf parsley..
Since yesterday turned out to be a dismal day, stew was the perfect dinner for the day.
Some of the vendors I got ingredients from were:
Funny Farms
Chic-a-bee
Crooked Sky
Red Mountain Cattle (grass fed beef)
One Windmill
And we finished off dinner with Nicki (Cup Cake Cafe) chocolate cake pops - oh my!!
MY BEEF BURGUNDY
 One of the wonderful things about stews is the ability to just wing-it with proportions. Deane loves carrots so more carrots than potatoes. I did this in a crock pot, so we could do some errands in the morning (one of those domestic realities - it is Valentine's Day, so we went shopping for things like paper towels, and some staple food items :-)
Stewing beef 1-4 pounds
1 cup of beef broth
2 tablespoons of red wine vinegar
5 red potatoes
7 medium size carrots
bottle of red wine (I used a Malbec - in the past I have used burgundy, Shiraz, and I would use an Italian Chianti or Valpolicella too)
flour
1/2 teaspoon peppercorns
pinch of sea salt
1 tablespoon olive oil
1 tablespoon butter
1 each scallion and green garlic
small bunch each of parsley and celery leaves
1 sprig each rosemary, lavender and thyme
Chop carrots and potatoes into good size chunks.
Rinse meat, place in a bowl and sprinkle with enough flour to coat each piece. Don't rinse bowl.
Melt butter and oil together in a good size skillet and brown meat on all sides. Set meat aside. Deglaze pan with broth or wine, scraping up all and pour into the crock pot. Add wine or some of the broth to the flour used to dredge the meat, stir and set aside for thickening later.
Tie herbs in a bundle or push all down one side of the pot, place meat in bottom and add potatoes and carrots. Add remainder of broth, all the vinegar and enough red wine to just cover. Add peppercorns.
Turn crock pot on high for 1 hour, the reduce to low temperature and cook for about 6-7 hours more. Beef should be fork tender.
Stir up reserved flour/wine mixture, add more flour and wine or broth as needed to make a slurry for thickening. Ladle some of the stew liquid into a pot, bring to a boil and add slurry. Stir until thick and add back into the crock pot. Stir and serve with rolls, a salad if you like and enjoy!
Then have the cake pops!!
Have a great day,
-- Catherine, The Herb Lady
Tuesday, February 14, 2012
My Newest Garden Bed
Dear Folks,
 After allowing the wonderful Kentucky Colonel spearmint to completely overrun a bed (don't every do that!!), I decided we needed to take it back and use if for more food producing plants.
A note about the spearmint: It is a glorious herb, I use it to flavor water, drinks, in egg, chicken or tuna salad mixes, sometimes in salads, always in tabouli and other dishes I can't think of right now.
It is just that I did not need an 8 x 10 foot bed of it :-)
Deane did all the really hard work - and I do mean HARD - as the roots had amassed to the combined size of tree trunks. It required moving all the pavers you see to get every single root. I then sifted the soil (you see it on the tarp at thee back of the top portion of the picture) to get all the rest of the roots out. We then mixed back in about 50/50 good compost/soil mix and I planted - a lot. You will notice the flowers. If you saw my video post yesterday on setting up an container garden, I use flowers for multiple purposes. And always edible flower options in food producing beds.
The flowers are pretty to look at while the garden gets going; they act as a soil condition and moisture level barometer; they attract pollinators to the garden and finally, you can eat them too!
You can see the chicken wire hats placed over seeded in areas. This keeps the birds and critters out while the plants get going. After there is good growth I remove the hats. The critters seem to forget the plants are there (although I am going to have to keep a watch for the squirrel).
The foreground part of the photo shows the crook-neck squash and just to the right you can see the lettuce seeds sprouting. Since my tomatoes wintered over and are producing I want more lettuce for salads.
Here is what I planted in this garden. I will try to post another update in about 45 days when much of the growth should be rolling along well.
Corn and sugar peas on the north side - running east to west. (So the rest of the garden gets good morning to afternoon sun.
So far I have seeded in lettuce, carrots, radishes (up already and it is only at day 13), celery, two types of turnips, beets, and kale. I transplanted a sorrel and catnip from the old bed. I transplanted Green Zebra and a San Marzano tomato (trying the San Marzano for the first time here), a dark opal basil and Za'atar herb, purple tomatillo and orange bell pepper. The flowers are a mix of johnny jump-up type and other violas.
A note about the celery. I am experimenting this year with a red-stemed celery variety. So far what happened in another bed was the realization that the bed did not get enough direct winter sun. The plants came up, they are healthy, but not nearly as tall as I expected. Good flavor, just not a lot of the plant. BTW this variety called "Red-venture" is grown in part because of the lycopene in the stems, but also because you can harvest a few stems at a time working from the outside, instead of having to take out the whole bunch.
I am Very Late in trying more of the seed but this new bed has great sun exposure so I can see the kind of growth which I can expect next fall when I plant again, at least from a 'how-does-it-grow' with enough sun standpoint. Celery is a real challenge in the desert garden because of the long growing season requirement. I don't expect this late season experiment to produce the reputed 2 foot plants (because we will be moving into the heat), but any growth will be useable.
A note about the Za'atar herb. I got the seeds from Bakers Nursery and it is reported to be 'the' za'atar herb native to the Middle East for which the spice mix is named. Until the leaves are a good size, I won't know if this is a new-to-me plant or Syrian Oregano, and plant often described as za'atar (a great plant, but botanically I am not sure it is THE herb in question).
That's all for now folks,
Have a great day in the garden.
-- Catherine, The Herb Lady

A note about the spearmint: It is a glorious herb, I use it to flavor water, drinks, in egg, chicken or tuna salad mixes, sometimes in salads, always in tabouli and other dishes I can't think of right now.
It is just that I did not need an 8 x 10 foot bed of it :-)
Deane did all the really hard work - and I do mean HARD - as the roots had amassed to the combined size of tree trunks. It required moving all the pavers you see to get every single root. I then sifted the soil (you see it on the tarp at thee back of the top portion of the picture) to get all the rest of the roots out. We then mixed back in about 50/50 good compost/soil mix and I planted - a lot. You will notice the flowers. If you saw my video post yesterday on setting up an container garden, I use flowers for multiple purposes. And always edible flower options in food producing beds.
The flowers are pretty to look at while the garden gets going; they act as a soil condition and moisture level barometer; they attract pollinators to the garden and finally, you can eat them too!
You can see the chicken wire hats placed over seeded in areas. This keeps the birds and critters out while the plants get going. After there is good growth I remove the hats. The critters seem to forget the plants are there (although I am going to have to keep a watch for the squirrel).
The foreground part of the photo shows the crook-neck squash and just to the right you can see the lettuce seeds sprouting. Since my tomatoes wintered over and are producing I want more lettuce for salads.
Here is what I planted in this garden. I will try to post another update in about 45 days when much of the growth should be rolling along well.
Corn and sugar peas on the north side - running east to west. (So the rest of the garden gets good morning to afternoon sun.
So far I have seeded in lettuce, carrots, radishes (up already and it is only at day 13), celery, two types of turnips, beets, and kale. I transplanted a sorrel and catnip from the old bed. I transplanted Green Zebra and a San Marzano tomato (trying the San Marzano for the first time here), a dark opal basil and Za'atar herb, purple tomatillo and orange bell pepper. The flowers are a mix of johnny jump-up type and other violas.
A note about the celery. I am experimenting this year with a red-stemed celery variety. So far what happened in another bed was the realization that the bed did not get enough direct winter sun. The plants came up, they are healthy, but not nearly as tall as I expected. Good flavor, just not a lot of the plant. BTW this variety called "Red-venture" is grown in part because of the lycopene in the stems, but also because you can harvest a few stems at a time working from the outside, instead of having to take out the whole bunch.
I am Very Late in trying more of the seed but this new bed has great sun exposure so I can see the kind of growth which I can expect next fall when I plant again, at least from a 'how-does-it-grow' with enough sun standpoint. Celery is a real challenge in the desert garden because of the long growing season requirement. I don't expect this late season experiment to produce the reputed 2 foot plants (because we will be moving into the heat), but any growth will be useable.
A note about the Za'atar herb. I got the seeds from Bakers Nursery and it is reported to be 'the' za'atar herb native to the Middle East for which the spice mix is named. Until the leaves are a good size, I won't know if this is a new-to-me plant or Syrian Oregano, and plant often described as za'atar (a great plant, but botanically I am not sure it is THE herb in question).
That's all for now folks,
Have a great day in the garden.
-- Catherine, The Herb Lady
Monday, February 13, 2012
My first video post on youtube!
Dear Folks,
I just posted my first video - actually a narrated slideshow - on youtube. I have been wanting to do instructional videos for a long time. The challenge has been what to start with, when and all the 'first time' things with using a new tool.
Since I recently decided to do a container project to demonstrate "how" to grow successfully in a pot in the desert, this turned out to be a good launch to what I hope will be a serious of helpful posts on youtube.
I hope to keep all future ones relatively short in the 3-8 minute or so range to make quick, but detailed discussions of the subject matter.
I welcome your thoughts and questions.
Have a great time in the garden!
-- Catherine, The Herb Lady
Sunday, February 12, 2012
My Pasta Sauce
Dear Folks,
 I made up a batch of my sauce yesterday, and thought I would share it with you. Near the bottom of this post I have a link to a Lasagna recipe I posted last year using the sauce. I add and subtract herbs as I have the urge or what is fresh in the garden.
I froze some of our tomatoes last fall, a couple of pieces of Parmesan cheese rind (the part that is too hard to grate makes a great flavor enhancer for sauces), and then added some fresh tomatoes from the garden, a sprig of oregano, some basil (both left whole), a whole white onion diced, and a whole stick of unsalted butter. Yes, I know not low-fat, but this luscious recipe is a treat every once in a while. It is my interpretation of Marcella Hazan's famous "Crazy Sauce" where she used butter, an onion cut in half and canned tomatoes, cooked down to an incredible amalgam of flavor and texture. Marcella removed the onion and tossed it at the end of the cooking, but I thought that was a bit wasteful, so I went with dice and keeping it in for additional flavor. I initially added herbs at the end, but now I like to leave sprigs in during the cooking, remove the hard stems at the end and sometimes sliver some fresh basil in right before serving.
I make up for the fat in sauces like this by going with a very high protein/fiber pasta component. I like Barilla Plus for their very high protein and fiber Angel Hair pasta, and in yesterday's dish I added chopped sugar peas from our garden to the pasta while cooking, strained and added to the sauce with some cooked Italian sweet sausage. (The pasta takes only 6-7 minutes to cook so adding the peas at the same time resulted in a nice crisp cook texture of the peas and their wonderful sweet flavor.)
MY SAUCE
Several pounds of tomatoes (the volume is flexible) I do not peel my tomatoes - I want the fiber of the skin, but if I have very large tomatoes I will core them.-- you can cut them into small sections if you like.
1 stick of unsalted butter
1 onion diced
a piece or two of Parmesan cheese rind (these freeze great for the next time you make sauce)
A spring of Greek Oregano
some basil if you have it
Place everything in a pot bring to a boil, and reduce to simmer, uncovered, until as thick as you like it (mine took about 3 hours yesterday). I mashed a bit at the end because I wanted some chunks, but mostly a thick sauce consistency. Use the largest pot you can to avoid splatters, the sauce will bubble.
I am looking forward to a big harvest of tomatoes this summer and planning on canning my sauce for the winter.
I use whatever tomatoes I have growing or find interesting at the farmers market. I have done a golden sauce with just yellow tomatoes and it was heavenly, with a far lighter tomato almost sweet flavor.
I am trying a roma style tomato in the garden and we will see what I get :-)
LASAGNA RECIPE
Here is my vegetable lasagna recipe posted last year. Think "out side the noodle" for delicious variations.
http://edibleherbsandflowers.blogspot.com/2011/04/lasagna-different-version.html
. . .
Our asparagus are coming up - oh boy!
What's growing in your garden that you are bringing to your table?
-- Catherine, The Herb Lady

I froze some of our tomatoes last fall, a couple of pieces of Parmesan cheese rind (the part that is too hard to grate makes a great flavor enhancer for sauces), and then added some fresh tomatoes from the garden, a sprig of oregano, some basil (both left whole), a whole white onion diced, and a whole stick of unsalted butter. Yes, I know not low-fat, but this luscious recipe is a treat every once in a while. It is my interpretation of Marcella Hazan's famous "Crazy Sauce" where she used butter, an onion cut in half and canned tomatoes, cooked down to an incredible amalgam of flavor and texture. Marcella removed the onion and tossed it at the end of the cooking, but I thought that was a bit wasteful, so I went with dice and keeping it in for additional flavor. I initially added herbs at the end, but now I like to leave sprigs in during the cooking, remove the hard stems at the end and sometimes sliver some fresh basil in right before serving.
I make up for the fat in sauces like this by going with a very high protein/fiber pasta component. I like Barilla Plus for their very high protein and fiber Angel Hair pasta, and in yesterday's dish I added chopped sugar peas from our garden to the pasta while cooking, strained and added to the sauce with some cooked Italian sweet sausage. (The pasta takes only 6-7 minutes to cook so adding the peas at the same time resulted in a nice crisp cook texture of the peas and their wonderful sweet flavor.)
MY SAUCE
Several pounds of tomatoes (the volume is flexible) I do not peel my tomatoes - I want the fiber of the skin, but if I have very large tomatoes I will core them.-- you can cut them into small sections if you like.
1 stick of unsalted butter
1 onion diced
a piece or two of Parmesan cheese rind (these freeze great for the next time you make sauce)
A spring of Greek Oregano
some basil if you have it
Place everything in a pot bring to a boil, and reduce to simmer, uncovered, until as thick as you like it (mine took about 3 hours yesterday). I mashed a bit at the end because I wanted some chunks, but mostly a thick sauce consistency. Use the largest pot you can to avoid splatters, the sauce will bubble.
I am looking forward to a big harvest of tomatoes this summer and planning on canning my sauce for the winter.
I use whatever tomatoes I have growing or find interesting at the farmers market. I have done a golden sauce with just yellow tomatoes and it was heavenly, with a far lighter tomato almost sweet flavor.
I am trying a roma style tomato in the garden and we will see what I get :-)
LASAGNA RECIPE
Here is my vegetable lasagna recipe posted last year. Think "out side the noodle" for delicious variations.
http://edibleherbsandflowers.blogspot.com/2011/04/lasagna-different-version.html
. . .
Our asparagus are coming up - oh boy!
What's growing in your garden that you are bringing to your table?
-- Catherine, The Herb Lady
Monday, February 06, 2012
Apple Pie - Oh My - Blossom to pie - What's a pie kit?
Dear Folks,

Yesterday I made an apple pie from one of my frozen pie kits, and yesterday Deane took the photo of the new blossoms on our Golden Dorsett apple tree.
Last June and July I experimented with "pie kits" as a way of preserving the bounty of our fruit trees. I made peach, apricot and apple. The apple pie yesterday was the last of the kits, so now I can't wait until fruit maturity this summer to make some fresh and more frozen to enjoy through the year.
What's a pie kit? Basically you prepare the fruit with all sugar and spices as you would for fresh, and then freeze it. I used ziplock bags although if you have quart mason jars you might like that as a better option if you have the freezer space. Label with date and fruit type.
Now comes the time when you want to make the pie. First (disclaimer) I buy commercial pie crusts - I REALLY have to kick myself into learning how to make a good crust. I've just always been a better cook than a baker :-)
Have your pie crust(s) ready. Then thaw out the pie kit, in a colander, in a bowl to catch the juices. When completely thawed, pour the juices into a sauce pan, bring to a boil and reduce by 1/3 to 1/2.
I found the first time I just poured the whole thawed kit into the crust there was too much liquid (as the freezing/thawing process releases a lot of juice) and a lot of it was lost oozing out of the pie while it baked.
THE Pie Recipe
Have a bowl of water with a bit of lemon juice, to keep fruit from darkening after cutting.
Core and cut up 6-8 apples into half inch slices (I personally do not peel my fruit - I like the texture and fiber it gives to the pies). I found with thicker slices there was a lot of 'air' in the filling and the pie would collapse once the apples began to bake down. You want about 3-4 cups of sliced fruit. For apricots or peaches you will usually need more fruit to make the volume.
Once you have all the fruit cut, drain in a bowl
MIX well together
sprinkle of salt (about 1/8 to quarter teaspoon)
2/3 cup of mixed 50/50 white and brown sugar
1 teaspoon cinnamon (Use the real good stuff - Ceylon)
2 tablespoons of flour
Sprinkle over the cut fruit, toss well but gently. Spoon into freezer bags or quart mason jar, label, date and freeze.
TO BAKE
Have your crust ready. Keep the crust that will be the bottom, chilled or frozen. I like to make cut outs from the top crust and then use the cut outs to decorate the pie.
Have about 1 tablespoon of butter cut into slivers ready, chilled
1 teaspoon of cinnamon sugar
Thaw the fruit, catch the juice and boil the juice down by 1/3 to 1/2.
Preheat oven to 450 along with any tray you will be putting the pie on.
Place fruit in pie shell, pour reduced juices over, dot with the butter.
Place the top crust on, crimp edges to retain juices, sprinkle with cinnamon sugar.
Bake for 15 minutes. Reduce oven temperature to 350 and continue baking until you can see the juices bubbling and the crust is nice and brown. Ovens vary - it will be another 30-45 minutes (for a total of 45-60 minutes). Check at the 30 minute mark (at that point a total of 45 minutes) after you turn the oven down.
For peach pie you have the same process. If apricots, Deane likes the pie with more sugar to compensate for apricots nice tang.
Use your freezer to take full advantage of the bounty your fruit trees give you.
Last year I also did a blog on sun drying the fruit - they turned out really well.
http://edibleherbsandflowers.blogspot.com/2011/05/preserving-bounty-sun-drying.html
Enjoy our spring!
-- Catherine, The Herb Lady

Yesterday I made an apple pie from one of my frozen pie kits, and yesterday Deane took the photo of the new blossoms on our Golden Dorsett apple tree.
Last June and July I experimented with "pie kits" as a way of preserving the bounty of our fruit trees. I made peach, apricot and apple. The apple pie yesterday was the last of the kits, so now I can't wait until fruit maturity this summer to make some fresh and more frozen to enjoy through the year.
What's a pie kit? Basically you prepare the fruit with all sugar and spices as you would for fresh, and then freeze it. I used ziplock bags although if you have quart mason jars you might like that as a better option if you have the freezer space. Label with date and fruit type.
Now comes the time when you want to make the pie. First (disclaimer) I buy commercial pie crusts - I REALLY have to kick myself into learning how to make a good crust. I've just always been a better cook than a baker :-)
Have your pie crust(s) ready. Then thaw out the pie kit, in a colander, in a bowl to catch the juices. When completely thawed, pour the juices into a sauce pan, bring to a boil and reduce by 1/3 to 1/2.
I found the first time I just poured the whole thawed kit into the crust there was too much liquid (as the freezing/thawing process releases a lot of juice) and a lot of it was lost oozing out of the pie while it baked.
THE Pie Recipe
Have a bowl of water with a bit of lemon juice, to keep fruit from darkening after cutting.
Core and cut up 6-8 apples into half inch slices (I personally do not peel my fruit - I like the texture and fiber it gives to the pies). I found with thicker slices there was a lot of 'air' in the filling and the pie would collapse once the apples began to bake down. You want about 3-4 cups of sliced fruit. For apricots or peaches you will usually need more fruit to make the volume.
Once you have all the fruit cut, drain in a bowl
MIX well together
sprinkle of salt (about 1/8 to quarter teaspoon)
2/3 cup of mixed 50/50 white and brown sugar
1 teaspoon cinnamon (Use the real good stuff - Ceylon)
2 tablespoons of flour
Sprinkle over the cut fruit, toss well but gently. Spoon into freezer bags or quart mason jar, label, date and freeze.
TO BAKE
Have your crust ready. Keep the crust that will be the bottom, chilled or frozen. I like to make cut outs from the top crust and then use the cut outs to decorate the pie.
Have about 1 tablespoon of butter cut into slivers ready, chilled
1 teaspoon of cinnamon sugar
Thaw the fruit, catch the juice and boil the juice down by 1/3 to 1/2.
Preheat oven to 450 along with any tray you will be putting the pie on.
Place fruit in pie shell, pour reduced juices over, dot with the butter.
Place the top crust on, crimp edges to retain juices, sprinkle with cinnamon sugar.
Bake for 15 minutes. Reduce oven temperature to 350 and continue baking until you can see the juices bubbling and the crust is nice and brown. Ovens vary - it will be another 30-45 minutes (for a total of 45-60 minutes). Check at the 30 minute mark (at that point a total of 45 minutes) after you turn the oven down.
For peach pie you have the same process. If apricots, Deane likes the pie with more sugar to compensate for apricots nice tang.
Use your freezer to take full advantage of the bounty your fruit trees give you.
Last year I also did a blog on sun drying the fruit - they turned out really well.
http://edibleherbsandflowers.blogspot.com/2011/05/preserving-bounty-sun-drying.html
Enjoy our spring!
-- Catherine, The Herb Lady
Sunday, January 29, 2012
Update on Bait Dog Rescue
Dear Folks,
I wanted to update you on the story of Belle/Beau the bait dog rescued by urbanrescues.com in Phoenix.
He is doing incredibly well for the condition he was in when rescued. They did have to amputate his leg as the injuries were so severe. His recovery thus far is awesome.
I would also like to note that Facebook removed the awful dog fighting promotion pages - YIPPEEE! Hopefully no others will find their way there.
If you would like to get an update on Belle, click here.
This link has several elements to it. You can click on "Belle" and get his story. But on the opening page you can see that Belle's story has created such an amazing outpouring of donations that Urban Rescues has created "Belle's Fund" to assist other rescues.
Consider donating a few dollars if you can.
I will get back to the green gardening and cooking in next posts, but I felt this was worthwhile to pass on to you all.
Have a great day,
-- Catherine, The Herb Lady
I wanted to update you on the story of Belle/Beau the bait dog rescued by urbanrescues.com in Phoenix.
He is doing incredibly well for the condition he was in when rescued. They did have to amputate his leg as the injuries were so severe. His recovery thus far is awesome.
I would also like to note that Facebook removed the awful dog fighting promotion pages - YIPPEEE! Hopefully no others will find their way there.
If you would like to get an update on Belle, click here.
This link has several elements to it. You can click on "Belle" and get his story. But on the opening page you can see that Belle's story has created such an amazing outpouring of donations that Urban Rescues has created "Belle's Fund" to assist other rescues.
Consider donating a few dollars if you can.
I will get back to the green gardening and cooking in next posts, but I felt this was worthwhile to pass on to you all.
Have a great day,
-- Catherine, The Herb Lady
Tuesday, January 17, 2012
Charity Addition
Dear Folks,
I am adding another charity to my favorites. There are so many worthy causes, I'm sure you all have your favorites. Sometimes a cause also highlights a terrible human-caused issue and this is one of them.
Urban Rescues in Phoenix, rescues from the 'to-be-euthanized' lists at the shelters.
The most recent case was not just about saving a stray but a 'bait dog' used by dog fighters to train their dogs for their horrible fun.
The most recent good news is the vet believes Belle/Beau will make it. The videos and descriptions are difficult to watch, but I'm putting a link below for you to donate to their work. The money is going to the special fund for Belle/Beau, but funds needed over what they need for Belle will continue their work. VIEWER note the pictures are difficult to watch and the reason I am using the female/male name is they thought the poor dog was a female initially - enough said.
http://www.adoggieinthewindow.com/urbanrescues.com/belle-the-bait-dog/
To make a donation
I learned about Belle/Beau and the continuing dog fighting practices because I decided to follow one bait dog rescuer on facebook - through them I learned not only about this poor baby, but also that there is at least one facebook page devoted to encouraging and supporting dog fighting. Horrible. If you have a mind to, find the page(s) and report them to FB as graphic violence and hopefully they will be removed.
I have also added one of my favorite kitty rescue organizations, which works hard to find and place homeless cats.
http://www.kittykatrescue.com/
On a more positive note today is "leave a note" day. Leave a note anonymously anywhere (on a table, desk, restroom mirror) with a positive message to give the finder a smile. Something like "you are important to people in your life" or "you are loved, be kind to yourself"
Have a great day, folks,
-- Catherine, The Herb Lady
I am adding another charity to my favorites. There are so many worthy causes, I'm sure you all have your favorites. Sometimes a cause also highlights a terrible human-caused issue and this is one of them.
Urban Rescues in Phoenix, rescues from the 'to-be-euthanized' lists at the shelters.
The most recent case was not just about saving a stray but a 'bait dog' used by dog fighters to train their dogs for their horrible fun.
The most recent good news is the vet believes Belle/Beau will make it. The videos and descriptions are difficult to watch, but I'm putting a link below for you to donate to their work. The money is going to the special fund for Belle/Beau, but funds needed over what they need for Belle will continue their work. VIEWER note the pictures are difficult to watch and the reason I am using the female/male name is they thought the poor dog was a female initially - enough said.
http://www.adoggieinthewindow.com/urbanrescues.com/belle-the-bait-dog/
To make a donation
I learned about Belle/Beau and the continuing dog fighting practices because I decided to follow one bait dog rescuer on facebook - through them I learned not only about this poor baby, but also that there is at least one facebook page devoted to encouraging and supporting dog fighting. Horrible. If you have a mind to, find the page(s) and report them to FB as graphic violence and hopefully they will be removed.
I have also added one of my favorite kitty rescue organizations, which works hard to find and place homeless cats.
http://www.kittykatrescue.com/
On a more positive note today is "leave a note" day. Leave a note anonymously anywhere (on a table, desk, restroom mirror) with a positive message to give the finder a smile. Something like "you are important to people in your life" or "you are loved, be kind to yourself"
Have a great day, folks,
-- Catherine, The Herb Lady
Thursday, January 12, 2012
Learn To "Grow" a Community Garden - Mesa Residents
Dear Folks,
iMesa Community Garden Initiative is moving forward with a meeting
coming up.
Sat. Jan. 21, 1:30 to 4 p.m. at Mesa Main Library, 64 E. First St.
Before you dig up some dirt and put a seed in the ground, there are many things to think about to create a community garden in your neighborhood or on any vacant piece of property. If you are interested
in starting a community garden, but aren't sure where to begin, you can start with this program designed to teach you how to get a garden up and growing. Topics include finding a site, fundraising, creating
garden guidelines, garden committees and handling some of the challenges, too. Long-time community gardener, Doreen Pollack from the Valley Permaculture Alliance will provide a brief presentation, and
then will facilitate a discussion with other community garden members and the audience
http://www.mesaaz.gov/sustainability/CommunityGarden.aspx
Use the link above to go to their web page and see what is available to you and / or how you might want to get involved.
I will be attending the meeting, to help encourage everyone who has an interest in building this kind of great community support benefit.
A community garden can be a or THE focal point in a neighborhood. If you are already happily gardening in your own backyard, consider becoming involved in assisting a community garden to "grow" in your
neighborhood.
-- Catherine, The Herb Lady
iMesa Community Garden Initiative is moving forward with a meeting
coming up.
Sat. Jan. 21, 1:30 to 4 p.m. at Mesa Main Library, 64 E. First St.
Before you dig up some dirt and put a seed in the ground, there are many things to think about to create a community garden in your neighborhood or on any vacant piece of property. If you are interested
in starting a community garden, but aren't sure where to begin, you can start with this program designed to teach you how to get a garden up and growing. Topics include finding a site, fundraising, creating
garden guidelines, garden committees and handling some of the challenges, too. Long-time community gardener, Doreen Pollack from the Valley Permaculture Alliance will provide a brief presentation, and
then will facilitate a discussion with other community garden members and the audience
http://www.mesaaz.gov/sustainability/CommunityGarden.aspx
Use the link above to go to their web page and see what is available to you and / or how you might want to get involved.
I will be attending the meeting, to help encourage everyone who has an interest in building this kind of great community support benefit.
A community garden can be a or THE focal point in a neighborhood. If you are already happily gardening in your own backyard, consider becoming involved in assisting a community garden to "grow" in your
neighborhood.
-- Catherine, The Herb Lady
Tuesday, January 03, 2012
Greening - Advertising's Illusion of Information
Dear Folks,
Did you happen to see any of the Chevy Christmas commercials featuring "Nick"? I can't get the jingle music out of my head. This very well done, attractive and inviting commercial is the kind that sticks with you. And it got me to really thinking about all the messages we are bombarded with daily, even hourly about what to buy, why to buy it and how it will change our lives.
I participate in surveys from time to time involving existing or possible products and it really infuriates me when they ask questions like "how does xxxx make you feel" but they are talking about something like a purse or iPhone or a sports drink. They are looking for answers like "important", "winner", "successful."
Dorothy L. Sayers was a writer in several gendres, most notably to the general public her Lord Peter Wimsey, mystery series. Sayers was known by her audience for her research into the settings for her books. In "Murder Must Advertise," the "immorality" of advertising was described in an excellent passage:
Emphasis added by me:
Bredon shuddered.
“I think this is an awfully immoral job of ours. I do, really. Think how we spoil the digestions of the public.”
“Ah, yes-but think how earnestly we strive to put them right again. We undermine ’em with one hand and build ’em with the other. The vitamins we destroy in the canning, we restore in Revito, the roughage we remove from Peabody ’s Piper Parritch we make up into a package and market as Bunbury’s Breakfast Bran; the stomachs we ruin with Pompayne, we re-line with Peplets to aid digestion. And by forcing the damn-fool public to pay twice over-once to have its food emasculated and once to have the vitality put back again, we keep the wheels of commerce turning and give employment to thousands-including you and me.”
“I think this is an awfully immoral job of ours. I do, really. Think how we spoil the digestions of the public.”
“Ah, yes-but think how earnestly we strive to put them right again. We undermine ’em with one hand and build ’em with the other. The vitamins we destroy in the canning, we restore in Revito, the roughage we remove from Peabody ’s Piper Parritch we make up into a package and market as Bunbury’s Breakfast Bran; the stomachs we ruin with Pompayne, we re-line with Peplets to aid digestion. And by forcing the damn-fool public to pay twice over-once to have its food emasculated and once to have the vitality put back again, we keep the wheels of commerce turning and give employment to thousands-including you and me.”
I was thinking about the whole paradox of our reliance on advertising to help us make decisions on purchases, and all the information LEFT OUT, while focusing on only the points the advertiser wants to make to sell the product. Much (but not all) advertising is an illusion using "slight of word" to direct the audience from information they might otherwise want to know.
I was curious about what big companies may be selling with the right hand, and also with the left hand. I decided to go to the site of Cargill one of the biggest world-wide companies with ownership of dozens of companies. They most recently teamed up with Coke Cola to produce "tru-via" a supposedly natural sweetener made from Stevia, but the won't tell you what the other 'natural' ingredient is, while touting that it is natural
Cargill not only sells high fructose corn syrup components they also sell Barlív™ barley betafiber safe for diabetics and to lower cholesterol. I find that some how a too-apt example of Machiavelli's deception and manipulation. I would feel the same way if I found out one of my favorite organic seed suppliers owned stock in Monsanto {shudder}.
How about that "natural flavoring"?
From a Huffington Post article: Natural flavors come from nature, but that doesn't mean they come from what the label says. In other words, a strawberry flavor doesn't have to come from a strawberry.
http://www.huffingtonpost.com/2011/11/28/artificial-natural-flavors-givaudan_n_1116081.html
The "art and science" of advertising is to have you think something very specific when it does not want you to think generally, and to give you the definition of what a word or phrase means rather than whatever it meant before.
The producers of high fructose corn syrup a product that is as processed as refined oil in my opinion, want the public to understand that they are "just like xxxx" - only different.
From "sweet surprise" There FAQ on their version of a myth and reality
Myth: sugar is healthier than high fructose corn syrup
Reality: high fructose corn syrup is nearly identical in composition to table sugar
Did you note the qualifier "nearly"?
Myth: High fructose corn syrup is not natural
Reality: High fructose corn syrup is made from corn -- a natural grain produce. High fructose corn syrup contains no artificial or synthetic ingredients or color additives and meets the Food and Drug Administration's requirements for use of the term "natural."
The term "natural" has been almost completely re-made according to corporate and FDA/USDA guidelines so that the consumer really has no idea what "the company" means when it uses the word "natural" on its labels or in advertising -- except that they can't play around (too much - there is always a way around things) with the word Organic.
The FDA which says it has no real guideline on the use of the word natural, has said this:
However, the agency has not objected to the use of the term if the food does not contain added color, artificial flavors, or synthetic substances. -- http://www.fda.gov/AboutFDA/Transparency/Basics/ucm214868.htm
Now did you notice that it exempted 'processed' from the sentence and they did this because -- From a food science perspective, it is difficult to define a food product that is 'natural' because the food has probably been processed and is no longer the product of the earth. Ibid.
Nice out. That basically means companies can call something natural as long as it complies with the proscriptions sited in the first quote. So flour that has been hulled, de-germed and bleached can be called natural. Or corn that has been reduced to corn syrup - at this point it is simply a juice reduction and then "undergone enzymatic processing to convert some of its glucose into fructose to produce a desired sweetness." -- from wikipedia.
If you want to consider the health affects of HFCS, consider this -- when beekeepers decided to use HFCS as a winter supplement for their bees replacing sugar syrup, the bees died because of a buildup of HMF, a compound produced in high heat conditions of sugar containing foods. HMF is present in many foods - in small quantities, insufficient to cause problems. But when too much is consumed? Well, what the scientists are saying right now is "no correlation of intakes of HMF and disease could be demonstrated yet." ibid
The interesting note I find in the sited research supporting HFCS as 'okay' is "Although pure fructose can cause metabolic upsets at high concentrations and in the absence of glucose, such experiments are irrelevant for HFCS, which is not consumed at extreme high levels and contains both fructose and glucose. " emphasis added -- http://www.ajcn.org/content/88/6/1716S.long
While White's research states there is no significant increase of HFCS over sucrose (sugar) I have difficulty accepting where his information came from - as a shopper you need only look at the labels on every or every other processed product from bread to cereal to find HFCS, sometimes with other 'sugars and sweeteners' but many times the first in the list of sweeteners.
The way I read that - and I do look at other reports which most recently have given HFCS a pass on relation to obesity and diabetes as early reported - is that when you have a substance which is touted as okay in moderation, but is found in many if not most processed foods, how to you moderate your intake except to make everything fresh yourself?
Where I am going with all this is about how much of our lives become reliant on some entity telling us what we need or want or should have/do (I have to include me in my writing and thoughts in this too :-) and how 'important' or 'successful' it will make us feel. From TV advertising to lobbyists giving legislators the 'facts' of an issue, most of us do not do our own research.
I have become obsessive about reading labels, particularly for food, but also to find out if there is a USA made option to the 'thing' I want.
My bottom line is, an ad may get my attention, but unless I know the product very well, I am going to do a little more checking before I 'buy into' or purchase something an ad is telling me I "really" need.
I hope you all will do the same for your and your families over-all health and well being.
Okay, climbing down off the soap box :-)
-- Catherine, The Herb Lady
Sunday, January 01, 2012
New Year Snack - Stuffed Nasturtium Leaves!
Dear Folks,
Happy New Year, Everyone! I wish you all a wonderful, better, peaceful and productive year.
 Along with my passion for growing edibles I am also always trying to figure out new ways to use some of the bounty. Our gardening success can frequently be overwhelming with foods that are used only as condiments or simple additions/garnish -- like nasturtiums. This beloved old fashioned garden favorite is truly a gem in our desert winter gardens, growing and blooming from late fall to early summer.
Because of their peppery bite (leaves, flowers and young seed pods) they have long been used to flavor foods with taste and color. (see note on restrictions near bottom of blog)
So two thoughts crossed in my mind recently: 1) I LOVE stuffed grape leaves (Dolma) and could (but don't) eat an entire container of them by myself, and 2) I was staring at ALL THOSE nasturtium leaves in our garden and wondering about stuffing them!
A little research online and I found several references to stuffing nasturtium leaves instead of grape. Great! Now, I thought, how can I make it a little more nutrient dense? Traditional Dolma use rice. I am always trying to find tasty ways to use quinoa because of its protein power pack (and fiber) content. So that is what I did.
Two points about the recipe I need to point out:
1) It is VERY important to fit the stuffed leaves tightly in the pot - you will see some space in my picture and that turned out to be a mistake as two of the nasturtium bundles separated.
2) Use the largest leaves you can. We are incredibly blessed in that our "nastys" freely re-seed each year and they grow huge. The leaves I used were 7 inches across, about the size of a grape leaf.
Note for future blog post: I had planned last year to use some of our fig leaves for this kind of recipe, after researching and finding many references to ancient stuff leaves using fig leaves. I plan on really trying them this spring and if I do I will post my results.
These turned out so wonderful I can't wait to make them again and try some different ways. My meat-and-potatoes guy really enjoyed them - that is a huge plus!
While it looks like a lot of work, it actually goes very fast in preparation. Total cooking time for quinoa and finished stuffed leaves is about 40 minutes. Putting the mixture together and stuffing takes about 5-10 minutes, so most of the work is actually cooking time.
Catherine's Stuffed Nasturtium Leaves
1 cup of cooked quinoa (cook in salted water), cooled (see note on cooking quinoa near bottom)
6-7 large nasturtium leaves or 12+ small ones, rinsed and patter dry (note: cut the leaf stem off as close to the leaf as possible.)
8 kalamata olives, thinly sliced
2 tablespoons minced parsley
3 tablespoons olive oil
3 tablespoons fresh lemon juice
Taste quinoa for salt but keep in mind that the olives will impart salt and taste. Mix quinoa, olives and parsley together. Mix olive oil and lemon juice together. Pour 1/3 of oil mixture over quinoa and fold to mix in (don't mash the grains). Pour another third of the oil mixture in the pot you will use.
Assemble the rolls. With the vein side up, place 2 tablespoons approximately near base on the leaf (if using small leaves about 1 tablespoon). Roll over, then fold over left and right sides and continue folding to create the bundle, place seam side down in pot. Make sure they are snugged tightly together. If you can't fill the pot, put a potato, carrot or some other vegetable in with bundles to keep them close together (that is what I will do next time if I do not have enough bundles. The veggie will get a nice flavor.
Pour the remaining oil mixture over the bundles and add enough water to come up about half way the height of the bundles. Bring to a low simmer and cook covered for 20 minutes. Let cool and enjoy!
I am going to grate a little carrot into the mixture next time and one future batch will have to include fresh spearmint too.
Nasturtium Health Note: Nasturtiums contain oxalic acid, with the seeds having the highest concentrations. Pregnant or lactating women and people with kidney issues should not consume nasturtiums. For others, like spinach which also contains oxalic acid, eating too much will limit calcium absorption. As with most foods eat in moderation.
How To Cook Quinoa: Quinoa is a great grain to try, one of only two plant sources of complete protein, ttis ancient grain from the same family as spinach and epozote is tiny, and when cooked separates into two parts a curly 'c' and translucent pearl. The little C is the fiber outer coating. It is VERY important to rinse quinoa before cooking. There is a powdery coating on all types which is 1) bitter, and 2) contains saponin (also found in spinach and oats) and should no be consumed in large quantities. To cook quinoa use a 1:2 ratio of grain to water = 1 cup of quinoa to 2 cups of salted water. Bring to a boil, reduce to simmer and cook covered for 20 minute until water is absorbed, if you are not using right away, add a touch of oil oil to keep from sticking together (although quinoa is not like rice in becoming really gluey)
Have a wonderful day,
-- Catherine, The Herb Lady
Happy New Year, Everyone! I wish you all a wonderful, better, peaceful and productive year.

Because of their peppery bite (leaves, flowers and young seed pods) they have long been used to flavor foods with taste and color. (see note on restrictions near bottom of blog)
So two thoughts crossed in my mind recently: 1) I LOVE stuffed grape leaves (Dolma) and could (but don't) eat an entire container of them by myself, and 2) I was staring at ALL THOSE nasturtium leaves in our garden and wondering about stuffing them!
A little research online and I found several references to stuffing nasturtium leaves instead of grape. Great! Now, I thought, how can I make it a little more nutrient dense? Traditional Dolma use rice. I am always trying to find tasty ways to use quinoa because of its protein power pack (and fiber) content. So that is what I did.
Two points about the recipe I need to point out:
1) It is VERY important to fit the stuffed leaves tightly in the pot - you will see some space in my picture and that turned out to be a mistake as two of the nasturtium bundles separated.
2) Use the largest leaves you can. We are incredibly blessed in that our "nastys" freely re-seed each year and they grow huge. The leaves I used were 7 inches across, about the size of a grape leaf.
Note for future blog post: I had planned last year to use some of our fig leaves for this kind of recipe, after researching and finding many references to ancient stuff leaves using fig leaves. I plan on really trying them this spring and if I do I will post my results.
These turned out so wonderful I can't wait to make them again and try some different ways. My meat-and-potatoes guy really enjoyed them - that is a huge plus!
While it looks like a lot of work, it actually goes very fast in preparation. Total cooking time for quinoa and finished stuffed leaves is about 40 minutes. Putting the mixture together and stuffing takes about 5-10 minutes, so most of the work is actually cooking time.
Catherine's Stuffed Nasturtium Leaves
1 cup of cooked quinoa (cook in salted water), cooled (see note on cooking quinoa near bottom)
6-7 large nasturtium leaves or 12+ small ones, rinsed and patter dry (note: cut the leaf stem off as close to the leaf as possible.)
8 kalamata olives, thinly sliced
2 tablespoons minced parsley
3 tablespoons olive oil
3 tablespoons fresh lemon juice
Taste quinoa for salt but keep in mind that the olives will impart salt and taste. Mix quinoa, olives and parsley together. Mix olive oil and lemon juice together. Pour 1/3 of oil mixture over quinoa and fold to mix in (don't mash the grains). Pour another third of the oil mixture in the pot you will use.
Assemble the rolls. With the vein side up, place 2 tablespoons approximately near base on the leaf (if using small leaves about 1 tablespoon). Roll over, then fold over left and right sides and continue folding to create the bundle, place seam side down in pot. Make sure they are snugged tightly together. If you can't fill the pot, put a potato, carrot or some other vegetable in with bundles to keep them close together (that is what I will do next time if I do not have enough bundles. The veggie will get a nice flavor.
Pour the remaining oil mixture over the bundles and add enough water to come up about half way the height of the bundles. Bring to a low simmer and cook covered for 20 minutes. Let cool and enjoy!
I am going to grate a little carrot into the mixture next time and one future batch will have to include fresh spearmint too.
Nasturtium Health Note: Nasturtiums contain oxalic acid, with the seeds having the highest concentrations. Pregnant or lactating women and people with kidney issues should not consume nasturtiums. For others, like spinach which also contains oxalic acid, eating too much will limit calcium absorption. As with most foods eat in moderation.
How To Cook Quinoa: Quinoa is a great grain to try, one of only two plant sources of complete protein, ttis ancient grain from the same family as spinach and epozote is tiny, and when cooked separates into two parts a curly 'c' and translucent pearl. The little C is the fiber outer coating. It is VERY important to rinse quinoa before cooking. There is a powdery coating on all types which is 1) bitter, and 2) contains saponin (also found in spinach and oats) and should no be consumed in large quantities. To cook quinoa use a 1:2 ratio of grain to water = 1 cup of quinoa to 2 cups of salted water. Bring to a boil, reduce to simmer and cook covered for 20 minute until water is absorbed, if you are not using right away, add a touch of oil oil to keep from sticking together (although quinoa is not like rice in becoming really gluey)
Have a wonderful day,
-- Catherine, The Herb Lady
Saturday, December 10, 2011
Old TIme Radio Holiday Shows / Music for iPod and mp3 play lists.
Dear Folks,
I enjoy listening to old time radio programs and there are hundreds available for holiday-theme listening. You can load your iPod or similar mp3 device, create a custom list from the available CDs for party and entertaining background shows/music, or play them on your computer while you are doing chores.
I personally enjoy having the shows and music on while I'm doing holiday cooking and chores.
OTRCAT.com is my source of choice for these shows
Jon, at OTRCAT, offers a daily free download. The cost of the discs is pennies a show.
Have a great weekend,
-- Catherine, The Herb Lady
P.S. Check out my newsletter group post on upcoming classes on sustainability issues.
I enjoy listening to old time radio programs and there are hundreds available for holiday-theme listening. You can load your iPod or similar mp3 device, create a custom list from the available CDs for party and entertaining background shows/music, or play them on your computer while you are doing chores.
I personally enjoy having the shows and music on while I'm doing holiday cooking and chores.
OTRCAT.com is my source of choice for these shows
Jon, at OTRCAT, offers a daily free download. The cost of the discs is pennies a show.
Have a great weekend,
-- Catherine, The Herb Lady
P.S. Check out my newsletter group post on upcoming classes on sustainability issues.
Monday, December 05, 2011
While Dealing With Your Life -- keep on tending your garden
Dear Folks,
In the last week or so I have read or seen a variety of thoughts on several different 'fronts' of life ranging from the political messages (or non-messages), who does and does not have a job, who is and is not taking advantage of the system, who is (And Is Not) making really meaningful contributions and solutions to our problems, and WHY most people are not satisfied with enough to be happy about their lives!
In the beginning . . . life may have been hard but it was simple. You needed food, comfortable shelter, clothing and freedom from fear.
When did bigger and more become so important we forgot about quality?
Listen to our friend Jim Pipkin's (Jim's facebook music store is here) new song "Primitive Minds" and contemplate this question:
Why do we as a society now consider that more and bigger is the golden-goal, particularly if more and bigger are really inferior?
Consider a zucchini - no I'm not making a silly statement - anyone who has ever grown or been blessed by friends and neighbors with zucchini, understands the more and bigger in a very micro view - young zucchini are more tender, tastier and more nutritious than older zucchini, and easier to use. Yet some people want to grow their zukes to the biggest size they can to show how good they are at gardening. A gardener picking young zucchini will have more, sooner, and better for them than someone who decides they have to have the bigger product.
Two recent articles really caught my attention:
1) an article discussing the degradation of the nutrient value of our food crops over the last 50 years (1950-1999) due to changes in varieties and farming practices -- Consider just one - corn originally a high protein grain crop which sustained cultures for Millenia dropped from a 1950s average of 3.22 grams of protein per serving down to 0.223 grams per serving -- a drop in nutrition by 70+%. The fact that you would then have to consume something like 3 times as much corn to achieve the same protein content, means 3 times the calories to get that desired protein -- Journal of the American College of Nutrition
2) an article in the Mother Earth News by Bryan Welch (Publisher of MEN) - relating the continued unworkable requirement that the only way to achieve stability is to grow population and 'new' whatevers.
Mother Earth News - December 2011
The article ends in part "...but keep tending your garden."
And that brings my mind back full circle to what is important.
Welch's article got me thinking about ALL THOSE numbers the various economists, government, Wall St., and pundits throw at us daily about whether something is up, down or stable. I have always questioned the wisdom, for instance, of including 'housing starts' in whether or not our economy is doing good. Jobs - yes, but housing starts presumes more population is the only way to show progress.
Welch's article takes the premise that what currently fuels growth is not necessity (in its truest sense, like food, clothing, shelter) but the pursuit of luxury are what fuels most of our growth. We can't be satisfied with what we need, but want to 'to keep up with the Jones," to feel fulfilled and accomplished. The problem is we are running of out of 'new' resources.
Welch's article is entitled "Unplugging Our Economic Ponzi Scheme" and the idea of a growth fueled only by population growth is a real eye-opening definition of Ponzi Scheme.
If you say the word sustainable to the world at large the collective shudder implies that sustainable means going backwards and nothing is further from the truth. If something is sustainable it is implied that it will continue on. "Resources" that are finite can't be sustained, they can only be replaced with something different, rationed (until they are gone), foregone when they are gone, or given only to those in 'authority' or the ones with the most money.
The 2 most valuable activities an individual person or family could do for themselves, right now, would be to learn or hone a skill or trade, and two, tend your garden.
What do I mean by a skill or trade? I mean something that is not necessarily modern but something that is a useful experience/expertise that can be sold, traded or donated. If you are a doctor, lawyer or chief of some-company it would still behoove you to learn or re-learn a necessary skill or trade (and yes doctors you have a skill, but it would not hurt to learn how to raise chickens so you have eggs to trade).
Carpentry or wood-working
Simple electrical work
Mechanics
Sewing
Baking
Cooking
Gardening
Masonry
Tending livestock
Knitting
Skills or trade can certainly be high-tech, but consider what else besides high-tech would be tradeable in a difficult situation. If the power is out knowing how to hook up a computer is useless, but knowing how to provide a sewn or knitted blanket is not. Knowing how to cook over an open fire or any kind of a grill - and cook anything you need is useful when you do not have electricity.
If it sounds like I am talking in terms of survival - I am but not as a 'the world is coming to an end' but at what I see as a lack of any reasonable options for those who are without a job - short or long term. If the stories that I've seen are any indication, losing a job is so mind-numbing for most hard-working people because they did not have a ful-back skill or trade. The job they had was what they set their minds on having and no other 'what-ifs' were contemplated.
That is what complacency tends to do to us - most of us do not give enough consideration to the 'what-ifs' other than buying insurance to help our family if we die. Losing a job or jobs is not contemplated because it is the unimaginable "won't happen to me" mentality because there is no back up plan.
How do you learn a skill or trade? Schools of course, but you can also volunteer as a helper or apprentice to an organization you like.
When I was a teenager, I volunteered after school several days a week at the local TB association. I learned office skills there that aided me my whole life, and gave me a foundation for the jobs I later had. There was the usual office work, but also the responsibility, mindfulness of what was needed to get things done, and concern for doing a quality job with a team, that instilled in me a belief that everyone should work together. Looking back I was incredibly lucky in my choice of organizations to assist because they treated me with consideration that would normally be accrued to someone much older and/and a paid employee.
When I wanted to learn how to take proper care of the goats I wanted to get, I took 'lessons' from the gal I eventually purchased from. The lessons included my desire to learn everything that was needed - mucking out stalls, hoof trimming, milking procedures, etc. Later on I learned to assist while a friend did some of the less appealing things that temporarily cause a minute of pain to kids - not a pleasant job, but a necessary one.
I did not take for granted that learning how to take care of a goat was no different than taking care of a horse or cat or dog - the differences were IN THE learning, not assuming I knew what I needed to know - I wanted to make sure they were cared for by me, correctly, from the beginning, not as an experiment by me, on them.
Because I was a willing 'apprentice' my help and learning were appreciated by my friends and me.
While some of the above may not seem related, I see it all as part of not only the choices we make but as a portend of how we will manage or even survive, if we choose quality over quantity and skill over mindless 'progress'. I do not think it is progress if we have more but the product is so inferior as to be all but impossible to survive on or with.
In many ways we have allowed ourselves to be 'told' what we wanted and needed. Companies and ad agencies have perfected the 'entitlement' message. I have become so suspicious of any use of the term natural or similar that I go look up information on 'it.' Do you check the real purpose or quality of an item as much as you price check?
When we accept that only others can be the source of our necessities, then we risk having a roof made of paper, garment made of chemicals, or a meal of straw. That is unsustainable.
-- Catherine, The Herb Lady
In the last week or so I have read or seen a variety of thoughts on several different 'fronts' of life ranging from the political messages (or non-messages), who does and does not have a job, who is and is not taking advantage of the system, who is (And Is Not) making really meaningful contributions and solutions to our problems, and WHY most people are not satisfied with enough to be happy about their lives!
In the beginning . . . life may have been hard but it was simple. You needed food, comfortable shelter, clothing and freedom from fear.
When did bigger and more become so important we forgot about quality?
Listen to our friend Jim Pipkin's (Jim's facebook music store is here) new song "Primitive Minds" and contemplate this question:
Why do we as a society now consider that more and bigger is the golden-goal, particularly if more and bigger are really inferior?
Consider a zucchini - no I'm not making a silly statement - anyone who has ever grown or been blessed by friends and neighbors with zucchini, understands the more and bigger in a very micro view - young zucchini are more tender, tastier and more nutritious than older zucchini, and easier to use. Yet some people want to grow their zukes to the biggest size they can to show how good they are at gardening. A gardener picking young zucchini will have more, sooner, and better for them than someone who decides they have to have the bigger product.
Two recent articles really caught my attention:
1) an article discussing the degradation of the nutrient value of our food crops over the last 50 years (1950-1999) due to changes in varieties and farming practices -- Consider just one - corn originally a high protein grain crop which sustained cultures for Millenia dropped from a 1950s average of 3.22 grams of protein per serving down to 0.223 grams per serving -- a drop in nutrition by 70+%. The fact that you would then have to consume something like 3 times as much corn to achieve the same protein content, means 3 times the calories to get that desired protein -- Journal of the American College of Nutrition
2) an article in the Mother Earth News by Bryan Welch (Publisher of MEN) - relating the continued unworkable requirement that the only way to achieve stability is to grow population and 'new' whatevers.
Mother Earth News - December 2011
The article ends in part "...but keep tending your garden."
And that brings my mind back full circle to what is important.
Welch's article got me thinking about ALL THOSE numbers the various economists, government, Wall St., and pundits throw at us daily about whether something is up, down or stable. I have always questioned the wisdom, for instance, of including 'housing starts' in whether or not our economy is doing good. Jobs - yes, but housing starts presumes more population is the only way to show progress.
Welch's article takes the premise that what currently fuels growth is not necessity (in its truest sense, like food, clothing, shelter) but the pursuit of luxury are what fuels most of our growth. We can't be satisfied with what we need, but want to 'to keep up with the Jones," to feel fulfilled and accomplished. The problem is we are running of out of 'new' resources.
Welch's article is entitled "Unplugging Our Economic Ponzi Scheme" and the idea of a growth fueled only by population growth is a real eye-opening definition of Ponzi Scheme.
If you say the word sustainable to the world at large the collective shudder implies that sustainable means going backwards and nothing is further from the truth. If something is sustainable it is implied that it will continue on. "Resources" that are finite can't be sustained, they can only be replaced with something different, rationed (until they are gone), foregone when they are gone, or given only to those in 'authority' or the ones with the most money.
The 2 most valuable activities an individual person or family could do for themselves, right now, would be to learn or hone a skill or trade, and two, tend your garden.
What do I mean by a skill or trade? I mean something that is not necessarily modern but something that is a useful experience/expertise that can be sold, traded or donated. If you are a doctor, lawyer or chief of some-company it would still behoove you to learn or re-learn a necessary skill or trade (and yes doctors you have a skill, but it would not hurt to learn how to raise chickens so you have eggs to trade).
Carpentry or wood-working
Simple electrical work
Mechanics
Sewing
Baking
Cooking
Gardening
Masonry
Tending livestock
Knitting
Skills or trade can certainly be high-tech, but consider what else besides high-tech would be tradeable in a difficult situation. If the power is out knowing how to hook up a computer is useless, but knowing how to provide a sewn or knitted blanket is not. Knowing how to cook over an open fire or any kind of a grill - and cook anything you need is useful when you do not have electricity.
If it sounds like I am talking in terms of survival - I am but not as a 'the world is coming to an end' but at what I see as a lack of any reasonable options for those who are without a job - short or long term. If the stories that I've seen are any indication, losing a job is so mind-numbing for most hard-working people because they did not have a ful-back skill or trade. The job they had was what they set their minds on having and no other 'what-ifs' were contemplated.
That is what complacency tends to do to us - most of us do not give enough consideration to the 'what-ifs' other than buying insurance to help our family if we die. Losing a job or jobs is not contemplated because it is the unimaginable "won't happen to me" mentality because there is no back up plan.
How do you learn a skill or trade? Schools of course, but you can also volunteer as a helper or apprentice to an organization you like.
When I was a teenager, I volunteered after school several days a week at the local TB association. I learned office skills there that aided me my whole life, and gave me a foundation for the jobs I later had. There was the usual office work, but also the responsibility, mindfulness of what was needed to get things done, and concern for doing a quality job with a team, that instilled in me a belief that everyone should work together. Looking back I was incredibly lucky in my choice of organizations to assist because they treated me with consideration that would normally be accrued to someone much older and/and a paid employee.
When I wanted to learn how to take proper care of the goats I wanted to get, I took 'lessons' from the gal I eventually purchased from. The lessons included my desire to learn everything that was needed - mucking out stalls, hoof trimming, milking procedures, etc. Later on I learned to assist while a friend did some of the less appealing things that temporarily cause a minute of pain to kids - not a pleasant job, but a necessary one.
I did not take for granted that learning how to take care of a goat was no different than taking care of a horse or cat or dog - the differences were IN THE learning, not assuming I knew what I needed to know - I wanted to make sure they were cared for by me, correctly, from the beginning, not as an experiment by me, on them.
Because I was a willing 'apprentice' my help and learning were appreciated by my friends and me.
While some of the above may not seem related, I see it all as part of not only the choices we make but as a portend of how we will manage or even survive, if we choose quality over quantity and skill over mindless 'progress'. I do not think it is progress if we have more but the product is so inferior as to be all but impossible to survive on or with.
In many ways we have allowed ourselves to be 'told' what we wanted and needed. Companies and ad agencies have perfected the 'entitlement' message. I have become so suspicious of any use of the term natural or similar that I go look up information on 'it.' Do you check the real purpose or quality of an item as much as you price check?
When we accept that only others can be the source of our necessities, then we risk having a roof made of paper, garment made of chemicals, or a meal of straw. That is unsustainable.
-- Catherine, The Herb Lady
Subscribe to:
Posts (Atom)


