Garden, Plant, Cook!

Tuesday, June 23, 2015

Watermelon and Free Seed Share reminder

Dear Folks,

This year I actually got various transplants in the ground - on time!  On February 15th I transplanted some tomatoes (we have been harvesting them for about 3-4 weeks now) cantaloupe and Blacktail Mountain Watermelon.

I forgot to take a picture of the cantaloupe - which we ate and I saved seeds from.

And the Blacktail Mountain Watermelon.

Because of the placement of the vines (I was trying something new - limited foot space but growing up a string/pipe trellis, the various shading from the surrounding trees did limit sunlight so while the vines were (and still are) nice and healthy we only got 2 useable fruit off the cantaloupe (sweet and delicious) and 1 nice one off the watermelon.  Who knows if the vines live through the summer I may get more fruit later on. :-)

It is as described over at Baker Creek - sweet and delicious!

"70 days. One of the earliest watermelons we know of, superb for the north, but it also grows well in heat and drought. The flesh is red and deliciously sweet. Fruit have a dark rind and weigh 8-12 lbs. each. This excellent variety was developed by our friend Glenn Drowns, owner of the Sand Hill Preservation Center in Iowa. A favorite of many gardeners across the USA. One of the best we have ever tried!" -- http://www.rareseeds.com/blacktail-mountain-watermelon/

I am also saving seeds from this melon.


Free Seed Share

And about saving seeds, some of the seeds in my seed bank I bring to the upcoming Seed Share at Mesa Community Farmers Market are from my gardens.

If you are not aware of (just 1 of the reasons for savings seed from something you have grown) a process usually called "regional adaptation" - meaning re-sowing seed grown in an area, your garden, becomes better adapted and productive with each successive generation.

This Friday, June 26th,
9 a.m. - Noon
Mesa Community Farmers Market
Center Street, South of University

I host this event 3 times a year to coincide with the next sowing season.  Fall sowing begins the middle to July.

You do not have to bring seed to pick up some.  If you bring seed, please bring only organic or naturally grown non-gmo either from your garden or purchased.  I suggest focusing on edible varieties.

I hope to see you Friday!  Have a great week.


 -- Catherine, The Herb Lady

My books and planting calendar are available in print or as PDFs

My Publisher

You can also find the books at these other options on the internet


Ibook

https://itunes.apple.com/us/artist/catherine-crowley/id372564893?mt=11

amazon - print

http://www.amazon.com/Catherine-Crowley/e/B002C1HWG0/ref=sr_tc_2_0?qid=1367065857&sr=1-2-ent


Barnes & Noble - print and Nook ebook

http://www.barnesandnoble.com/c/catherine-crowley

Kobo

http://store.kobobooks.com/en-US/Search?query=Catherine%20Crowley&fcsearchfield=Author


Tuesday, June 16, 2015

Free Seed Share Coming Up - Friday, June 26th

Dear Folks,

My next 3-times a year FREE Seed Share is coming up.

Mesa Community Farmers Market
Center Street south of University, Mesa
June 26, 2015
9 a.m. - Noon

It may sound counter-intuitive to have a seed share in June, in the heat, however if you want winter squash including pumpkins you have to count backwards 90-120 days from Halloween or Thanksgiving.  Also, getting call veggie and herbs seeds in the ground allows for them to germinate as soil cools


How It Works:
Choose:    Any seeds we have – small envelopes will be available with pens to select and mark what you want to take home.

Bring:     Any seeds you harvested.  Share any organic or heirloom seeds you purchased.  Focus on edible seed varieties.

What:    No -  GMOs - if you are unsure if the seeds you have are GMO, please just bring yourself to choose seeds available.

Why:    Grow some of your own food, help “your economy,” and share with friends and family.

Where:    Mesa Community Farmers Market, Center Street, South of University on the East Side.

You Do Not Need To Bring Seeds to participate.

You can have my month-to-month planting information at your fingertips in the PDF version of my calendar.  Purchase once ($6) and download into all devices you have which read PDF.

http://www.lulu.com/shop/herbs-2-u/desert-gardening-success-perpetual-calendar/ebook/product-22030956.html

-- Catherine, The Herb Lady

Sunday, May 31, 2015

Homemade Dried Vegetable Stock/Bouillon

Dear Folks,

The sun dried apples are done, on to my next sun drying project a Vegetable Stock/Bouillon Powder.

First step find a recipe!

I discovered that there are all sorts of homemade stock/bouillon recipes out there, but a lot of them had things in them I did not like.  Many "vegetable" version called for dried beef or chicken bouillon as an ingredient.

I suppose I could grind up some of my dry cured salami but that was not what I was looking for.

I wanted a vegetable and herb powder to add to soups, stews, pasta / grain water or even salad dressings.

As I was looking at all the recipes I did not want, when my "Duh" moment hit.  What I was looking for was a vegetable stock recipe - but dried.

After looking at a few stock recipes (Martha had some good ideas but added a potato - later I thought).  Other basic stock recipes cautioned against adding garlic as part of the base.  Martha also cautioned against using any of the broccoli family as it may bring an off taste to the base (I did throw a couple of curly kale pieces in my recipe below).

So looking over what I had in the garden I decided on the ingredients below.  Although bay leaf is always added to soups and stews I chose to use some conehead thyme (an herb with a  flavor mix of savory, thyme and oregano) as a replacement.  When I use the mix later I can always add a bay leaf.  I grow bay.  I have a huge tree.  However it is very difficult to get it ground really well that does not result in sharp pieces, e.g., I always opt to use bay whole (except when I cure meats during the curing process I crush up the bay but remove all later on).


Day 1

Vegetable Stock Base - Dried 
Young red onion (roasted on the grill)
Red and green celery young stalks and leaves
Carrots
Green bell pepper
Greens: sorrel, red leaf lettuce, curly kale
Rosemary,
Conehead Thyme
Basil


Ratios are approximate - I used about 50% more carrot than the onion and celery (equal amounts of those).  For the herbs and greens about the amount called for in a recipe for soup or stew 5-6 sprigs total.

About greens in this mix - I wanted things which could add their own flavor and possibly a little bulk.

I thought these would take a day or two to dry completely and then use my bullet grinder to reduce to powder and store to use as needed.

We grilled the other day and I threw some of our young red onions on - had left over so I think the smoky flavor of the grill will add to the overall flavor of the mix.

Some of the combination is based on my Herb Soup recipe where all of the flavors of lettuces and herbs creates an incredible mix of layered flavors.(I posted the recipe at the Valley Permaculture Site.) 

Day 2

You can see in the picture how much most the veggies and herbs shrunk (about 5 hours in our 97 degree temp).  The onions and carrots took a little more than the 5 hours. (You want them bone dry.)
 
Day 3
 
I actually ground them today (the 31st) - I just did not get to it yesterday.  This is about a 1/4 cup of final powder and the flavor is AWESOME - I love how this turned out.  Because of the celery (particularly the red variety which tends to hold more natural sodium than the green) the mix tastes like it has salt added.

It will be easy to adjust salt and anything else I want to add when using this mix like, bay leaf, garlic or shallots (there is no pepper spice in it for instance).  Just a nice basic veg and herb mix for flavoring anything that a bouillon powder would be used for and it will keep for a long time in my dark pantry.

So my dear readers - don't buy store bought if you are growing vegetables and herbs - make your own "solar powered" soup and stew base.


-- Catherine, The Herb Lady

Tuesday, May 26, 2015

Caper, Caper, Seed Orientation, Dehydration with the Sun

Dear Folks,

Suzanne Vilardi of Vilardi Gardens and I have been working on our "Caper Caper Mystery" project for almost 3 years now.  Caper (Capparis spinosa) plant seeds are notoriously difficult to germinate.  We want to find a reliable way to germinate seed and grow caper plants for production of Capers and Caper Berries here in the valley.  (Suzanne is known for her amazing tomato, herb etc. transplants available at local farmers markets and some of the valley nurseries - check out her facebook page (above) for times and locations for purchasing.)


This is a picture of the first flower this spring on one of the 'mother' plants. (Taken May 8th.)

As we go along I will give you some history of the project and more updates.

Sowing Seeds

As a general rule I recommend soaking your seeds overnight (except beans and peas - only soak for 8 hours maximum).  This speeds up germination time (less days) and increases germination rate (percentage which germinate).

Underwood Gardens (aka Terroir Seeds) has a nice article on seed sowing orientation.  They make a good point about sowing seeds in the best position for faster growth (particularly with large seeds like pumpkin, melon, squash and beans).  Give a look.  Also they are a reliable source for non-GMO seeds.

Going into our heat, use existing plants to act as nurseries for the seed, sowing just under the edge of the plants.  This protects the seeds from birds and gives a little canopy to cool the soil.

When sowing never let the sown soil area dry out going into our heat.  The seeds may already be germinating under ground, but if they hit a dry/hot soil point, they will die before every breaking the surface.

Solar Drying aka using the sun to dry foods

Last year I was able to purchase the trays for an electric dehydrator without the base.  Why would I do that, you ask?  Because the dehydrator I like to use is the sun and it works perfectly.  (I also got the set of trays for $2 :-)

I sliced up a bunch of our apples - dumped them in lemon water to prevent browning and they are drying in the sun as I type. (I do not peel our fruit when I process it.) Some of the trays I left plain and some I sprinkled cinnamon sugar on them.  Once dried they store wonderfully in mason jars in our pantry.  In a pinch I could cook them up for applesauce or make a pie (I love snacking on them.)

Back in late March when we had some nice 80 degree days I dried some citrus slices, herbs and I tried drying asparagus for later sauteeing (the asparagus was a fail).  Herbs dry very well in the sun as did the citrus.  I can use the citrus either for decoration on foods or I can hydrate by boiling, add some sugar and make tiny batches of marmalade.  (Check out my marmalade recipes which make the most of our citrus as a real jam/preserve and note jelly flavored with a few pieces of rind.)


After the apples are done - I will make up a batch of seed crackers and dry them in the sun also.  I will do a new blog post on the crackers with recipes and post a picture.

. . .

Mark Your Calendars The Next Free Seed Share at the Mesa Community Farmers Market is June 26th, - 9 a.m. to Noon - you do not need to share seed to pick up some in time for fall sowing (which begins late July / early August).

Have a great time in the garden and the kitchen!


-- Catherine, The Herb Lady

Find my Calendar (print and PDF) and books on my publisher's site.

Books are also available at iBooks, Amazon, Barnes & Noble and Kobo.

Ibook

https://itunes.apple.com/us/artist/catherine-crowley/id372564893?mt=11

amazon - print

http://www.amazon.com/Catherine-Crowley/e/B002C1HWG0/ref=sr_tc_2_0?qid=1367065857&sr=1-2-ent


Barnes & Noble - print and Nook ebook

http://www.barnesandnoble.com/c/catherine-crowley

Kobo

http://store.kobobooks.com/en-US/Search?query=Catherine%20Crowley&fcsearchfield=Author

Lulu (my publisher)

http://www.lulu.com/spotlight/herbs2u


Wednesday, May 20, 2015

Tips For June Gardening - And May Harvest

Dear Folks,

We have been fortunate to be in a mild El Nino pattern which should continue into our Monsoon time.  Interestingly a mild El Nino pattern (according to local Meteorologist Caribe Devine) historically produces more Monsoon rain than a strong El Nino - let's hope for that!

 Typically we dread going into the major heat of the summer so below are some of my tips for the garden going into June.

GARDEN TIPS for June 
Temp Range 112/73
Arizona was visited by a scorcher in 1990 of an unofficial high of 126.

In addition to air temperatures, bare soil surface temperatures during a summer day can approach that of asphalt, 180 degrees!


June through August in the Desert Southwest is the equivalent of winter in North Dakota — you maintain what you have planted, taking special care of young or sensitive plants. With the exception of August when the heavy pre-fall "seed" planting begins, it is a good idea to hold off on any major transplanting until the fall when the temperatures (below 90 daytime) drop back to prime planting weather.


Typically we do not see below 90 daytime temperatures (except on a rainy day) from May 29 to September 29th.

If you have to transplant (as opposed to sowing seed) plants, our Flower Mulching* technique can be used to protect young plants by canopying the soil around them, placing the flowering plants very close to the base of the young plants.  *Use a 6 pack of your favorite heat-loving flowers to surround each transplant - about 3-5 plants depending on the size of the transplant.

Heavy watering requirements may result in yellowing of leaves due to iron deficiency, especially of fruit trees (Chlorosis). Apply Ironite (or green sand) before next watering to correct.


. . .

Deane took a bunch of pictures the other day highlighting all of our wonderful garden production.

Starting from upper left:  White Alpine Strawberry, Apricots, Apples, Indigo Rose Cherry Tomato, Peaches, Red Alpine Strawberry, Red Sunflower, Red Cherry Tomato.

The Indigo Rose Tomato is new to us this year and we love it! 

-- Catherine, The Herb Lady

If you would like one of my gardening "tools" Amazon has both of my books (gardening and cooking), and you can still order my 2016 calendar as a print or PDF - you can consider it a perpetual helper to aid in sowing and planting at the optimal time for best success.

Note: If you use the Amazon links I do get a small commission for any purchases made.

PDF perpetual Calendar 

Print Calendar 2015


Wednesday, May 13, 2015

Dry Curing Salami - My First Attempt

Dear Folks,

I read a recipe created by Jacques Pepin on dry curing a piece of pork tenderloin to make a type of salami (called a Saucisson by Jacques).

This turned out really tasty and I look forward to making it again.

Dry curing is usually done hanging in a net bag to allow air circulation.  In the recipe Jacques specifically that this could be done in the refrigerator.  Great, I thought!

Our modern refrigerators are constantly removing moisture which allows foods to dry -- either intentionally like when I dry my herbs on plates; or when you leave something uncovered and find the bread or carrot completely shriveled.

Dry Cured Pork Tenderloin

Ingredients:
2 pork tenderloins, each about 1 pound
1 cup of kosher salt
2 tablespoons of light brown sugar

1 tablespoon of brandy or cognac
1 tablespoon cracked black pepper
1 tablespoon herbes de Provence,

Directions
Cut the tips off the ends of the tenderloin (Save for another use) to have the meat the same width.  Trim silver skin off.

In a ziplock bag mix the kosher salt and brown sugar.  Add meat, seal and rub to coat.  Place in the refrigerator for 12 hours or overnight.

Have ready a pan with a drip rack in it.  Wipe the meat off and dry (the salt and sugar will have drawn out liquid).

Rub the meat with the brandy then cover/coat with mix of black pepper and herbes de provence.

Place on the rack and position in the refrigerator where the air will circulate.

It will take from 3.5 to 6 weeks to dry.  (Jacques said he liked it a little moist when finished.)

Mine was quite dry at 5 weeks so I am going to try testing at about 4 weeks next time.

"I like them when they are still a little soft, not too dry. Slice very thinly, and enjoy with bread and butter and a cool glass of wine" -- Jacques Pepin 


I found the recipe on Splendid Table from Jacques' Cookbook.

. . .

My next project is to make some homemade bacon from a pork belly - I have several recipes to choose from.  I'm not sure when I will get to it, but for sure I will post when I do.

 
-- Catherine, The Herb Lady

Tuesday, May 05, 2015

The Incredible Edible Sunflower - Third Leaf

Dear Folks,

On my series on the edible sunflower I am now focusing on the edible flower bud.

Sunflower Bud Taste Test  - April 25, 2015

The unopened flower is edible.


The general recommendations I had found was to first boil for 3 minutes, drain, then steam or boil until tender.

I cut 6 buds, 4 from one sunflower 2 from another (those 2 are the smaller ones).

I cut the bottom off 2 of the larger ones.

On the other 2 larger ones I left the bottom (bit of stem), but took off the first row of calyx petals from the buds.  This is like removing the very tough outer leaves of an artichoke head/flower.

I started 2 pots of water to a boil.

Boiled for 3 minutes, drained and immediately put into the second pot and boiled for 2 minutes, then drained.  Put the pot back on the hot burner and melted a bit of salted butter, tossed in the sunflower buds and swirled to coat.

I cut the 4 larger buds in half to show the inside and provide sampling for Deane and I.  (Note: The inside looks lavender in color - this sunflower is a red one - the yellow variety should show yellow or golden.)

On the buds I left the outer calyx leaves on - we noticed a bit more bitterness than the ones where I removed them.

The very small ones were not distinguishable.

I had tossed into the boiling water, the remainder of the true leaves and they did not have the bitter bite of the raw ones (we tasted before I cooked them).

Everyone's tastes are going to be different.  Some folks may find a second boil before the final boil (a total of 3 boils) is needed to remove all bitterness.

I would also consider salting the final water (or you can salt at the table).

Deane said it best, it is not "as good" as artichoke hearts but the flavor of the artichoke is there.  A useful substitute for artichoke hearts if you have an abundance of sunflowers.

If you have an abundance of sunflowers, using some of the buds for an occasional side dish will add a different flare to your meal.


-- Catherine, The Herb Lady

http://www.herbs2u.net/ 

Tuesday, April 28, 2015

The Incredible Edible Sunflower - Second Leaf

Dear Folks,

Everyone has most likely eaten sunflower seeds, or more commonly, sunflower kernels -- the shelled seed.

The seed can be eaten raw, roasted/toasted with or without spices, ground into meal/flour (even "Seed Butter" with a bit of oil and salt added), and sprouted.

Consider making my 'cracker' recipe with ground sunflower kernels.

The sprouts can be eaten raw, cooked in meals like stir-fry, or dried and ground into flour for 'sprouted' breads and other baked goods.  Like all seeds and nuts, flour from these great foods contains no gluten, so keep that in mind when baking with either the ground seed or dried and ground sprouts.

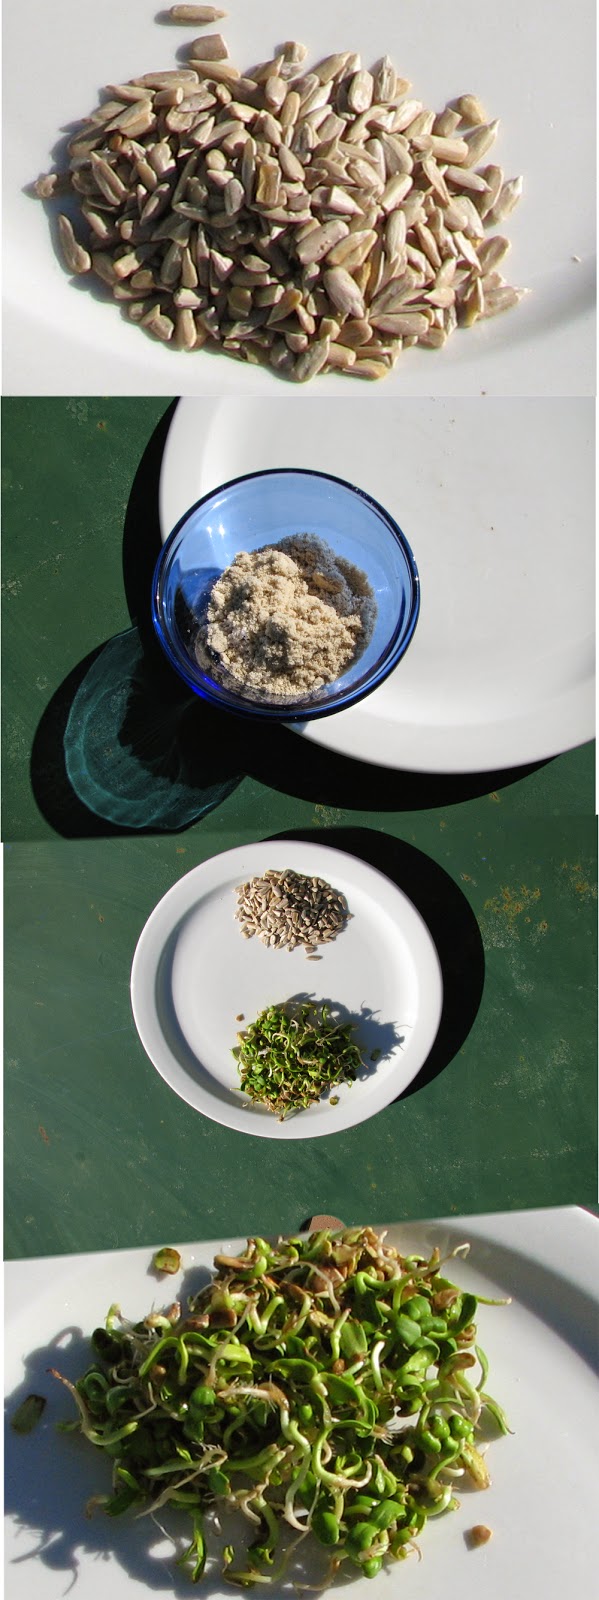
I have put together some information on the nutrition of some of the phases of the seed.  Use these as guides not absolutes.

In the pictures I am showing 2 tablespoons (1/8 cup) of kernels.

Ground this results in a level but not packed 1/4 cup of meal/flour

Sprouted I wound up with just at 3/4 cup of sprouts at day 5

Sunflower Kernels (no hull)
2 tablespoons (1/8 cup)
Calories 102
Fat 9.01 grams
Protein 3.64 grams
Fiber 1.5 grams
Iron .92 mg
Calcium  14 mg
Source: USDA / NND

Sunflower Butter/Meal (ground from kernels)

2 tablespoons
Calories 197
Fat 17.66 gm
Protein 5.53 gm
Fiber 1.8 gms
Iron  1.32 mg
Calcium  20
Source:  USDA / NND

Sunflower Sprouts 

(Multiple these by factor of 3 to equal 3/4 cup)
1/4 cup
Calories 190
Fat 16 grams
Protein 6 grams
Fiber 2 grams
Iron 14 mg
Calcium 20 mg
Source: LiveStrong


Nutrition Sources:

http://ndb.nal.usda.gov//
http://www.livestrong.com/article/524936-the-nutrition-in-sunflower-sprouts/
  

Why Sprout?

So you might be wondering about sprouting seeds, nuts, veggies (beans etc.) and grains with all the great weather we have here in our desert gardens.

In 4 season climates, sprouting is recommended because they can have fresh greens all winter long.

Now look at our summers where we have wonderful beans, corn, sunflowers, basil, some tomatoes but little lettuce or greens.

So sprouting during our hot months of the year gives us additions to our salads, soups and stews, which are easy to do, can be made on a rotating basis of variety, and in a volume suited to the number of people in a home.

I used the good-old mason jar for sprouting my sunflowers - I have a sprout cap - plastic lid with holes to permit draining and air circulation.  However, there are some sprouting systems available that provide more flexibility and possible performance.

About the hulls/shells of sprouts - they can be either a pain or a boon depending on your preferences.  I saw a nice tip on a sprouting site the other day.  Use your salad spinner to 'de-hull' or 'de-shell' the finished sprouts.

I did not try this, but I do figure you don't want to be too forceful with the spinning, unless you plan to chop the sprouts anyway, as the force will no-doubt break them up some.

If I sprout black-oil sunflower seeds I plan on using the spinner as I KNOW those shells can be tough to get off.

I hope you have your sunflowers planted.  You can seed in through July to enjoy them all the way through fall.

My PDF calendar helps you plant / sow at the best times through the desert, edible garden year..


 -- Catherine, The Herb Lady

Note:  If you click on ads on my blog and purchase items I may receive a small commission.

Sunday, April 26, 2015

The Incredible Edible Sunflower - More Fun Facts

Dear Folks,

Yesterday while harvesting some parts of the sunflower for my series, I noticed a lot of sap along the exterior edges of the sunflower leaves.

Cool Factoid!  Guttation!

The sap was sticky and sweet and I knew from earlier research (see note below about grape pearls) that it was not a problem, but a curiosity.

"Guttation is the exudation of drops of xylem sap on the tips or edges of leaves of some vascular plants, such as grasses."  -- wikipedia

"...root pressure forces some water to exude through special leaf tip or edge structures, hydathodes or water glands, forming drops."

I thought that was a pretty cool, new-to-me piece of information.

Another aspect of growing sunflowers in your garden is the Allelopathy attraction of sunflowers to aphids.  Notes on sunflowers as the 4th sister in the Three Sisters (Monsoon) growing practice of the Native Peoples was the fact that sunflowers drew aphids away from the other plants (corn, beans and squash).

I had a recent opportunity to see this in our gardens.  Two points about dealing with aphids:  1) you can use safe soap sprays to your advantage, but 2) you need to do so in such a way that a) it does not harm the beneficial insects, while b) allowing enough of the aphids to draw in the beneficial insects.

In the first picture below you can see that aphids have started to swarm on one of my sunflowers.

In the second picture you can see an assassin bug (the cavalry arriving) cruising one of the sunflowers.

For those of you becoming familiar with the good bugs/bad bugs in the garden, you may think the picture of the assassin is a leaf-foot.  Though a little similar in appearance the feet are different, and more difficult to see in the picture are the very, very long front legs of the assassin.

I did use the spray in the recommended 3 times over 15 days - no more aphids!

Grape Pearls:  About a month or so ago our Staci noticed white spots of something she thought might be pests on her grape vine stems.  I thought it looked like sap from the picture she sent and found out it was "Grape Pearls" a type of sap.

"Grape pearls are small sap-like, fluid-filled balls that are exuded from surface cells of rapidly growing grape vines. They appear most commonly in the spring and are often confused with mite or insect eggs. Some vines have many grape pearls but the pearls can appear singly or in smaller groups. They are usually found on the underside of leaves but can be on shoots as well. Grape pearls, also called "sap balls" are of no consequence to the vine." -- http://www.ipm.iastate.edu/ipm/hortnews/2009/6-3/grapepearls.html

If you missed the first post in my new blog series on the sunflower, click here.

You may find some of my publications helpful with gardening in the desert for vegetables, fruits and herbs, or ideas for cooking with your harvest.

My publisher site is here.

Have a great day in the garden.  (P.S. Rainy time is a good time for transplanting - it helps the soil seal to the roots of the plants.)


-- Catherine, The Herb Lady

Thursday, April 23, 2015

The Incredible Edible Sunflower - First Leaf

Dear Folks,

Over that last half dozen or so years I have learned just how truly edible this beloved-flower is.  So I am going to do a series of posts (leafs) on all that is wonderful about this Americas Native and one of my top favorites to grow in the garden for total enjoyment.  (Pictured - one of the large ones leaning over - I call this Sunflower On My Shoulder, Makes Me Happy!)

The sunflower originated in the Americas and some archeologists believe it was domesticated before corn (2000 BBC approximate).  It was introduced to Europe in the 15th Century and cultivars made their way back to America later.

The fact that we live in the sub-tropical desert makes it even more important - I think - that all of your gardens of edibles include this multi-tasker of a plant.

Helianthus annuus is the official name of the wild, roadside herald of summer.  The wild sunflower produces many small flowers, whereas the domestic varieties which now come in a wide range of colors (from white to dark, dark maroon) produces 1 large flower with a few smaller side flowers.  The sunflower is a cousin to the artichoke which explains its edible qualities.  Jerusalem Artichoke another "branch" of the sunflower family is grown for its edible root tubers.  See my prior blog post here on harvest of the Jerusalem Artichoke (called "Sunchoke").

The height of the sunflower plant varieties can range from 3 or 4 feet to over 12 feet.  Many of the domestic hybrids are in the 5-7 range.


I have grown many of the colors in my garden over the years.  All are enjoyable, my favorites though are the bright yellow and red varieties.

The uses of the flower are truly amazing.  The Native People grew is as a "fourth sister" in their Three Sister (corn, beans, squash) growing concept.  The seed was eaten or ground into meal/flour.  Even the dried stalks were used as building material by the Native Peoples.

The sunflower provides enjoyment in other ways.  The Birds - particularly the finches are just delightful to watch grazing them.  You can build what I call an "Edible Playhouse."  Sunflower Houses are a very old, and enjoyable garden theme.  I discussed these with a little mockup at the "Mesa Celebrates Day," last weekend.
(The pictures are a collage of Gold Finches enjoying one of the wild sunflowers in our gardens, and a sunflower house picture I found on the internet.  The original source of the picture disappeared so I cannot give proper credit - if someone recognizes it as theirs I would be happy to give credit.)

Over the following "leaves" of this series I will discuss all the different edible parts, share cooking ideas and pictures.

Edible Parts:  Pretty much the whole plant.

Young stems, leaves and unopened flower buds.
Petals.
Pared disc (head).
Seeds for chewing, sprouting, pressing for oil and flour/meal.
Roots (references to some use in medicine)

Give some serious thought to growing a sunflower house - google sunflower house and image and you will come up with many ideas.  In our desert gardens a sunflower house through the summer would provide a welcome shade area for children, grandchildren and the child-in-you to retreat.

The good news is you can plant sunflower seeds NOW.  Pre-soak overnight or up to 3 days (changing the water each day) and plant 6 to 12 inches apart in full sun.

Plant Sunflower Seeds from February through July - and you will have blooms from May through October.

You can read up more history of the Sunflower over on wikipedia.  And here at National Sunflower Association site.

Fun facts to look up about sunflowers:   "phototropism" and "fibonacci numbers"


For fun check out information on "May 1st International Sunflower Guerrilla Gardening Day"

Make It A Sunflower Day!!


-- Catherine, The Herb Lady

Tuesday, April 14, 2015

Jam Bread - or what to do when you Can too much fruit!

Dear Folks,

I had a challenge - I stopped "putting up" our fruit because I was over-loaded with canned fruit from several years ago and no place to put more.

And then we had a beautiful crop of pineapple guava and citrus this year and after a while you can only eat or give away so much.

Two pieces of information coalesced into my creating a jam bread recipe - and finding a marmalade recipe I could really enjoy.

The marmalade post is here.

Quick Breads or Cake Breads are well loved additions to the table - frequently made at holidays (like fruit cake) in a loaf pan in the form of a batter made with fruit, nuts, sugar etc.

With all my preserves available I decided there had to be a way to use jam/preserves in a quick bread.

It took me a while to find several types of recipes I could cobble together to make one that sounded like it would work - and it did :-)

Let me make this important note.  I use the WHOLE fruit, I use organic sugar (but not as much as most recipes call for) and lemon juice when I can my fruit.  With my jams you get mostly fruit when you enjoy it.

So I feel real good about sharing my jams with others and knowing it is wholesome in all that the word means.

Cathreine's Jam Bread

  • 1 1/2 cups all purpose flour
  • 1/2 teaspoon salt
  • 1 teaspoon baking powder
  • 2 eggs
  • 1/4 cup sugar (I have not found more was needed, but adjust to taste)
  • 1/4 cup oil
  • 1 1/2 cups jam/preserves
  • 1 cup chopped walnuts (or any nut you enjoy) 
  Directions:
  1. Preheat oven to 350 and spray loaf pan - set aside
  2. In one bowl sift flour salt and baking powder
  3. In another bowl whip eggs to frothy, add sugar and oil and mix very well. Add jam and mix well.
  4. Mix in flour until batter is well mixed, stir in nuts.
  5. Pour into prepared pan and bake 45-50 minutes.
  6. Cool on rack, slice and enjoy!
The jar pictured was from my first marmalade making back in February.  I froze the exact amount needed for the bread and thawed it yesterday to make the bread.  I love the color!

A note on this and my soda bread recipes - I refrigerate or freeze these as there are no preservatives to keep them at room temperature.  They freeze and thaw really well and refrigerate well for a week or two (if they last that long).


-- Catherine, The Herb Lady

If you enjoy my recipes you may like my cook book available in PDF and Print form

PDF

Print from my publisher

Amazon

Barnes & Noble

Tuesday, April 07, 2015

Marmalade and Red Celery

Dear Folks,

I discovered an outstanding recipe for making marmalade from our citrus.  I first made some several weeks ago.  I did not can it because I wanted to see how very small batches (1-2 fruit) turned out.  The verdict was "great".

So the other day I made three versions and canned them.  The hardest part of this recipe is deciding how big you want the pieces of fruit.

Historically I was not fond of marmalade - to me they were overly sweet jellies with a few pieces of fruit in them.  I am a jam/preserve kind of gal, not a jelly person.  If it is a fruit something I want either the whole fruit or 100% juice.

A recipe in the Edible Phoenix Spring 2015 issue by Molly Beverly, got me re-thinking because she used the WHOLE FRUIT, minus the seeds.  Okay now we were talking my idea of a 'jam'.

As good as Ms. Beverly's recipe sounded (check out her other recipes on the link for using an abundance of lemons), I wanted something with less sugar.

I found a blog (Living On A Dime) post which was more to my liking - I still tweaked the amount of sugar, but the surprisingly small amount of water was just perfect.

If the recipe seems too easy,  1 fruit, etc. the wonderful thing is you can double, triple etc. You can, easily in the time it takes to cut the fruit and cook for 15 minutes, make a small batch that morning, enough for breakfast or using later in the day!

Our Community Table as the Farmers Market had end of the season Meyer Lemons.  I picked our navels and Moro Blood Orange, making 3 different batches that day.  Each batch consisted of 5 fruit, so I ended up with 3-4 half-pints of each flavor.   I think they look like sunshine in a jar!


Catherine's Marmalade

1 citrus
1 tablespoon water
1/4 to 1/3 cup of sugar per fruit (I use organic cane sugar) - 1/2+ cup for lemons or grapefruit to taste

Wash the fruit well if there is any dust or debris (I find bits of leaves etc. sometimes that have dropped and embedded in our navels and blood oranges).

Cut the ends off, slice in half lengthwise and remove any seeds.

Very thinly slice the fruit, catch all juice.  You can quarter and quarter again lengthwise if you want smaller pieces.  This is the most labor intensive part.  Living on a Dime suggested a blender.  I tried a mandoline and finally gave up and just sliced with a knife.

In a sauce pan combine the water sugar and any juice.  Bring to a boil, stirring to dissolve the sugar.  Add fruit and simmer for 15 minutes.

Pour into mason jars and cap.

If you want to can, I chose to hot pack (immediately after cooking the marmalade) in a waterbath for 15 minutes for half-pints.  (Follow normal canning procedures to sterilize the jars and heat the lids.)

The other great thing about desert gardens is the ability to do small batch canning throughout the year - unlike 4 season climates where you are sort of locked into doing gallons and gallons at the end of summer before winter sets in.

If you do not can, refrigerate after it cools down.  Use up within 3-4 weeks.

Beside using as a spread on toast, glaze seafood, chicken or pork with marmalade.  I also make a "Jam Bread" - essentially a quick bread/cake with my preserves and marmalade will work also - going to make one next week and I will post picture and recipe.

Celery in The Desert Garden


I started growing RedVenture celery in the garden several years ago and it now re-seeds freely here and there.  The red means it has some lycopene in the stalks.  The flavor is a bit more strong and 'salty' than typical garden celery.  Besides the idea of having it growing conveniently in your garden, I only need to cut the number of stalks I need for a recipe.  I also sun dry or refrigerator dry leaves for later use.

Kitchen Recycle Celery

Some purchased vegetables can be "recycled" into the garden to regenerate more harvest.  Examples are onion or scallions - cut the bottom 1 inch with root and plant level after soaking for a couple of hours or overnight.  You will have green tops to cut in a few weeks.

One of my favorites it the bottoms or organic celery bunches.  When I do not have enough growing, I buy an organic celery bunch, cut the 1 and a half or 2 inch bottom off, soak overnight and then plant level.  The picture shows one planted January 4th and harvestable tops the end of March.

Waste not - want not :-)

Have a great day in the garden and kitchen.


 -- Catherine, The Herb Lady

My calendar, books etc.
 

Sunday, April 05, 2015

Calvary Arriving to Handle Aphids

Dear Folks,

Several days ago I posted about that the aphids have arrived and using safe soap spray.

I am very careful in using the spray to make sure the good bugs are not among the aphids - and I should have noted that in my post.

Sooooo, the reason to be careful using the spray is also about not spraying willy-nilly.

One of my mantras has been the good bugs (predators of pests) don't show up until you ring the dinner bell, i.e., there has to be some aphid activity to draw the bugs in white hats in.

So here are some good guys who I saw this morning.  The ladybug, of course, but lesser known is the assassin bug. The larvae, young and adult are all good aphid hunters.

It is also important to note that many of these good bugs can bite, they are, after all predators.  Let them do their job and they will reward you by multiplying.

On that same note, many of the larvae, juveniles and some adults need nectar so having something flowering in the garden at all times is good for you and the beneficial insects.

So to the beneficial insects - be a good-bug host, and they will go forth and multiply.

-- Catherine, The Herb Lady

Calendar (PDF and Print) and Books

Monday, March 30, 2015

The Aphids Are Here! The Aphids Are Here!

Dear Folks,

The one down side to getting into our lovely weather in the spring is the aphids like the cool night temperatures also.

The reliable safe soap spray is a way to deal with these soft-bodied pests.  Hard bodied insects like the leaf-footed/squash bug require different measures, such as keeping debris picked up and away from the base of plants and Hard Hosing as soon as you see them.  You can also use neem oil sprays on those pests.

Sunflowers (I learned recently) draw aphids, which is a good thing, but then you need to deal with them.

Here is a composite picture I took of one of my sunflowers Saturday and this Morning (Monday), which shows the before and after of the 1st cycle spraying (more on that below).

I know it is difficult to fully see what is happening but there are many dead or dying aphids in the right half of the picture

SAFE SOAP SPRAY and how to use it most effectively.

1 quart of water
1 teaspoon Dawn dish soap (I recommend the original)*
1 teaspoon of vegetable cooking oil (I keep old no-longer-useable-oils for this purpose).

Mix in spray bottle.

How to use:
1) if the bugs are really bad, hard hose off as best as you can.
2) shake (shaking is important, the ingredients do not stay mixed) the spray bottle as you spray, top and bottom of leaves and down growing center (this is particularly important with the broccoli family)
3) REPEAT!  5 days later and 5 days after that.

If you do not repeat the spraying 5 days apart you will lose the advantage.

What is happening is the 1st spray kills most of the adults and just hatched young.**
The 2nd spray kills those which hatch after 1st spray (the soap/oil does not, unfortunately damage the eggs).
The 3rd spray kills any stragglers.

Watch for new activity and deal with it the same way.  You may have to do this 2 or 3 times before our temperatures rise into the 100 range, when the aphid activity will decline substantially.

They will come back in the fall when the temperatures drop back down into the below 100 range, so keep this spray recipe handy.

*Original Dawn is still used to help sea birds damaged and endangered by oil spills.  I consider it the safest option for this spray and the little that goes into the soil will do no damage.

** Live-bearing aphids, a real problem for the broccoli family, do not lay eggs and are more difficult to control if you do not follow the spraying regime properly.

WHITE FLIES are a form of aphid and can be treated the same way.  The challenge with these type of aphids is that is is almost impossible to control completely, their numbers are in the 10s of thousands, but you can minimize the damage by following the spraying regime, beginning with hard hosing off first.

My Calendar shows the soap spray on March.   While both the print and PDF versions are dated 2015, the information is applicable year to year.

The PDF version is $6 and can be downloaded into all of your devices that have Adobe or other compatible reader, with a single purchase price.

You can find the print version of the calendar and my other publications here.

Do not let the bugs get you down, you can deal with them AND enjoy your garden at this lovely time of year.

Have a best day!


-- Catherine, The Herb Lady

Friday, March 27, 2015

Homemade Sodas

Dear Folks,

I have a "thing" about the amount of garbage sodas for sale - mostly aimed at children.

So here are some great homemade sodas to help you and the family kick the junk habit. (the pictures is from Ms. Dudash's article in The Arizona Republic, March 13, 2015) All have some nutrients, and yes they are sweetened, but you can choose one of the real Stevia products (like Sweetleaf) to substitute for lower calorie (I say lower because many are made with some fruit juice so there is natural sweetness - but you also get Vitamin C along with other small levels of vitamins and in some minerals).

What child does not enjoy options?  You can have the base ready for action whenever there is a group or party.

Your base is a sweet condensed mix, either a 100% frozen juice concentrate (no sugar added), thawed or a flavored (you choose) syrup.  Example:  Many children enjoy orange soda.  All you need is thawed 100% orange juice concentrate to make a glass of orange soda.  There is a 100% frozen juice pineapple orange that is a nice version.

1/4 cup base to 3/4 cup chilled sparkling water, ice if you like and there you have a cold, refreshing glass of wholesome beverage.

The sparkling water can be any you like.  FYI Club soda has sodium in it, seltzer does not.  Many artisanal waters have micro nutrients.

First up is a neat recipe from Michell Dudash who did an article for the Arizona Republic.

This is a base for a Cola, which makes up to 14 glasses.  You store the base until you want a glass.  This is probably the most ingredient in these recipes, but since you are making a base for 14 glasses it is worth the extra time.

http://www.azcentral.com/story/entertainment/dining/recipes/2015/03/24/earl-grey-cola/70384092/

Ms. Dudash also shared some homemade versions of fast food favorites like Chicken Nuggets to get your children enjoying homemade fast food.

http://www.azcentral.com/story/entertainment/dining/2015/03/24/get-healthy-fast-food-copycats/70380966/

Bon Appetit Magazine posted a slide show of 12 homemade sodas.

http://www.bonappetit.com/recipes/slideshow/12-refreshing-homemade-soda-recipes/?slide=1

TIP:  When making the ginger ale - don't throw away the ginger after making the base.  Save the slices, roll them in organic sugar, let air dry and you have candied ginger for nibbling or baking.

TIP:   If you make the lemongrass lime leaf soda and do not have Kaffir lime leaves you can use lemon or lime tree leaves from your own trees, just add 50% more leaves.  All citrus leaves are edible and have the scent and flavor of the fruit.

If you just wish to have some flavor, like the flavored seltzers available, muddle some fruit in the bottom of a glass, maybe add a piece of mint, top with chilled seltzer and ice and you have a refreshing drink.

Now that we are getting into the warm times, you should have some wholesome beverage options available to make refreshing and healthy drinks.

Have a best day,


-- Catherine, The Herb Lady

My publisher's site

For you gardeners - my "perpetual" calendar will give you the information for best gardening success in the desert - when to plant, tip and garden maintenance information.

Thursday, March 26, 2015

Harvest Show & Tell at the Boyce Thompson Arboretum - Plant Sale Coming To End

Dear Folks,

Last Sunday I presented a lecture on the Key to Successful edible gardening in the desert - planting and sowing at the optimal time for the variety.

I brought along a sample of what I harvested from the garden that morning.

Rose, red lettuce, red celery, Syrian Oregano, Conehead Thyme, Spanish Thyme, Bay, Mexican Oregano, White Flowering Rosemary, Lavender, Red Onion (large scallion), White Alpine Strawberry, Limequat, Banana Leaf, Nasturitum Leaves (large and variegated) Edible Flowers: Nasturtium, Johnny Jump-Ups, Blue Sage, Purple Stock, Arugula, Arabian Jasmine, Calendula.

In all of my lectures I like to use my "show and smell" harvests to illustrate not only the wonderful range of scents but the beauty in an edible garden.

The picture also illustrates the timing of growing in the desert.  ALL of these plants have been growing in my gardens through the winter to enable me to harvest on a bright March morning.

My special thanks to Paul Wolterbeek for taking the picture.

My books (beginners guide to edible landscaping and a recipe book using herbs as the base flavor) are available at the gift shop at Boyce Thompson Arboretum.  Check them out the next time you visit the wonderful BTA.

Their spring plant sale is still going on through this coming weekend - March 28 - 29th.

-- Catherine, The Herb Lady

My Publisher's Site

Tuesday, March 17, 2015

Irish Soda Bread Recipe

Dear Folks,

My beef has been corning for 2 weeks, I bought the veggies to go into the crock pot today with the beef and I decided to do a little research on Irish Soda Bread.

As an American of Irish descent (and Polish and English) our family has always fully embraced being Irish and enjoying the holiday for all the hearty food traditions.

Several years ago I started corning my own beef to control the ingredients (I do not use pink salt/aka nitrates) and I wanted to choose different cuts of beef.  Click here for my post on the corning and then cooking recipes.

But I have never made the traditional Irish Soda Bread.  My sister was able to visit Ireland twice, and has made the bread in the past, and raved about the bread severed at the B&B's she stayed at - rustic, brown and hearty.

So to my research - the first recipes which turned up included raisins, sugar, butter, eggs and buttermilk.  Well that sounded like the breads I've bought in the past.  And then I happened on an article about what real Irish bread was.

In a nutshell the traditional Irish bread is one of their staffs of life, along with potatoes, meant to sustain the hard working Irish, and not a dainty served with dinner.

Flour, salt, baking soda (the leavening agent) and sour milk.

The sour milk is an important point.  Anyone who has done research on traditional milk learns that unpasteurized milk goes sour (clabber) - pasteurized milk goes bad.  It is about the natural bacteria present in wholesome fresh from the animal milk vs. processed.

Back in the 1980s a gentleman named Malachi McCormick wrote a book "Irish Country Cooking"and was interviewed around St. Patrick's Day about "Irish Soda Bread" and the buttermilk controversy.

Historically, buttermilk was not widely available in Irish households, he said. To get buttermilk, you had to have a churn, and not all homes did. But sour milk, milk that has curdled, "was a daily act of God" found in even the poorest households. Rather than toss this "spoiled" milk out, Irish cooks used it to make bread.  http://articles.baltimoresun.com/1995-03-19/features/1995078208_1_irish-soda-bread-baking-soda-bread-makers

In talking to my sister she remembered the same article (or similar) and the REAL Irish Soda Bread - which by-the-way, was simply called "Brown Bread".

Today's buttermilk is actually not REAL either, which was the milk, whey and bits left over from churning.  Today's buttermilk is a cultured milk (certainly okay and good) but not the real deal.

So armed, with a reliable recipe from Epicurious  I tweaked the recipe to revert back to the basic Irish concept (whole wheat flour - but I used a white 100% whole wheat flour - not as dark as traditional 100% whole wheat), not caraway seeds (usually another American version), and then I wanted to come up with something to replace the sour milk, and I did not want to do the lemon juice/vinegar in milk routine.

I always have organic yogurt on hand, so I decided to stir in 1/2 cup of organic Greek style yogurt into 1 cup of whole milk.

BINGO!!  I got the most wonderful bread, real bread texture, solid crust and delicious too, spread with organic butter.

This may be our regular bread from now on.  For a number of years I have been working with variations of bread I do not have knead (my hands are simply not up to it).  The texture on this bread is more bread like than the recipes I've created before.

Catherine O'Crowley's Irish Bread

3 1/2 cups unbleached white whole wheat flour (I used King Arthur's)
1 teaspoon baking soda
3/4 teaspoon salt
1/2 cup organic Greek Style Yogurt
1 cup whole milk
Flour for dusting

Preheat oven to 425.  Lightly flour your baking sheet.

Sift flour, salt and baking soda into a bowl.  Stir yogurt and milk to combine.
Create a well in the center of the flour mix and start adding the yogurt / milk mix stirring with a wooden spoon.  Continue adding all the liquid and combine until the dough holds together.  You may need to use your hands to get the last bit of dry melded into the dough.

Shape the dough into a 6-8 inch circle, place on baking sheet and flatten to about 2 inches high.  Use a knife to score a deep X almost all the way to the sides.

Bake for 35 minutes or until the bottom sounds hollow when tapped.

Cool completely on a wire rack.

Serve with good butter, honey, molasses or jam.

Note:  the extra flour on the pan toasted and I reserved in a jar in the freezer for making gravies later on.

I know I can easily add herbs or cheese even raisins to loaves in the future!

I hope you have a wonderful St. Patrick's Day!


-- Catherine, The Herb Lady

My website has links to my calendar (print and PDF versions) and on the About Us page lectures and events coming up!  

Monday, March 02, 2015

Lectures Coming Up - Mark Your Calendars

Dear Folks,

I have 3 lectures coming up this month and next.

Boyce Thompson Arboretum
March 22, 2015
10:30 a.m. - 11:30 a.m.
The Key To Successful Gardening In the Desert

https://www.facebook.com/events/334324350099244 


Chandler Sunset Library
March 28, 2015
10:30 a.m. - Noon
Co-Lecture with Jean Groen
Our Edible Desert
Threes Sisters and A Fourth 

https://www.facebook.com/events/361201717399507 


Celebrate Mesa
April 18, 2015
Noon - 4 p.m.
Details to be announced.


I hope to see you at one of these events.

Get your gardening on!


-- Catherine, The Herb Lady

http://www.herbs2u.net/